How To Make a WordPress Website: A Step-by-Step Guide
WordPress is one of the most popular platforms for creating and managing websites on the internet. This robust content management system (CMS) allows small and large businesses and LLCs to retain complete control over their websites’ appearance and functionality. But, WordPress can be difficult to navigate.
This guide will walk you through the nine steps to take to build a simple website with WordPress. We will explain how to build a WordPress website and show you how to create a professional site quickly and easily.
Need help with hosting your WordPress website? We recommend using Bluehost to get your site up and running.
Before You Begin
As exciting as it can be to want to immediately get started, it’s important to clarify something here. WordPress can be a confusing platform to use because it offers so many different things. One point of confusion is whether or not to use WordPress.com or WordPress.org.
WordPress.com is a hosting service that provides a platform more suited to blogs that don’t seek to earn money online. WordPress.org, on the other hand, is an open-source CMS that gives users full control over their website’s content and customization. We recommend WordPress.org for most businesses.
This guide will focus solely on how to build a WordPress.org website.
Skip Ahead:
Step 1: Purchase a Domain Name
Step 2: Purchase a Hosting Package
Step 3: Install WordPress
Step 4: Familiarize Yourself With the WordPress Dashboard
Step 5: Add Content
Step 6: Customize Your WordPress Website
Step 7: Install Plugins
Step 8: Preview Your WordPress Website
Step 9: Publish Your WordPress Website
Step 1: Purchase a Domain Name
The first step to build a WordPress website involves selecting and purchasing your website’s domain name. If you don’t already have a domain name in mind, use our Domain Name Generator tool to help you find one specific to your business and service area.
After you select your domain name, you must purchase it from a domain name registrar. Some website hosting providers, such as Bluehost, will register your domain name for free for the first year. If you choose a different web hosting provider, you’ll have to purchase your domain name through your chosen host or directly from a domain name registrar.
Bluehost for domain registration and website hosting
We recommend getting started with Bluehost. TRUiC readers can register their domain with Bluehost free for the first year and plans start as low as $2.95 per month when you click the button below.
Step 2: Purchase a Hosting Package
To build a WordPress website with Bluehost, follow these simple steps to purchase your website hosting package:
- Visit Bluehost.
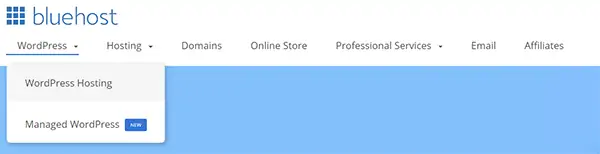
- Select “WordPress>WordPress Hosting” from the main navigation menu.
![WordPress hosting options dropdown with Bluehost.]()
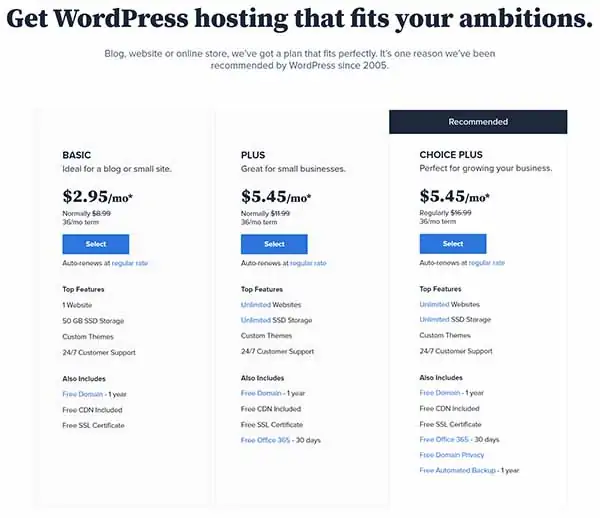
- Select the Choice Plus plan.
![WordPress hosting prices and plans.]()
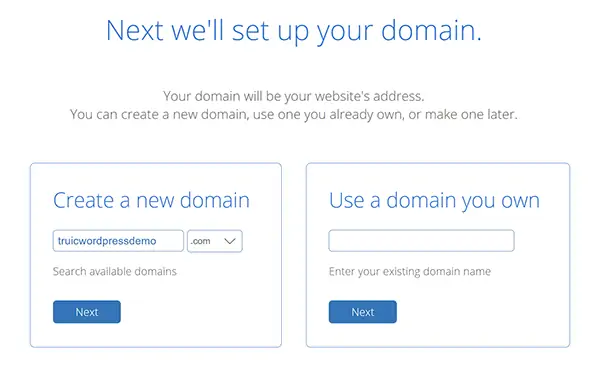
- Enter your domain name and then click the “Next” button.
![WordPress domain set up screen.]()
- You’ll then need to complete these five sections:
- Account Information: Enter your name, your business’s address and phone number, and the email address you want to associate with this account.
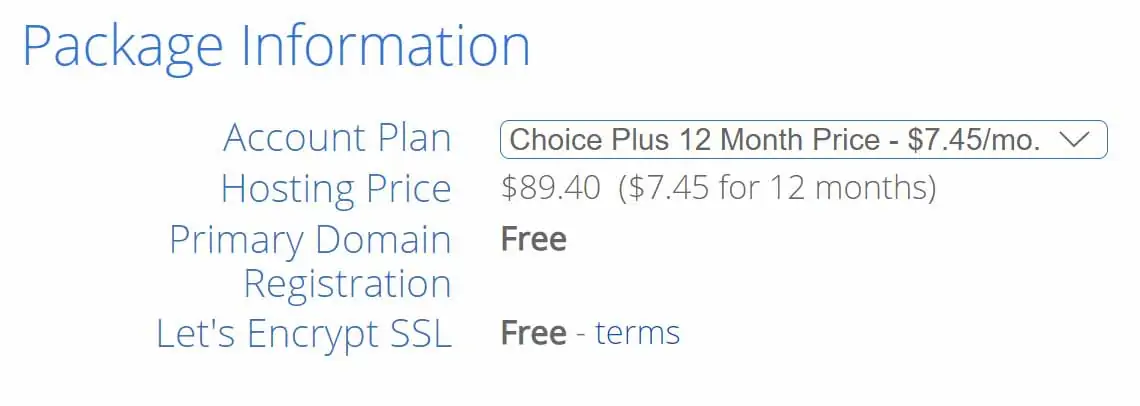
- Package Information: Select the terms for your Bluehost package. You can choose a 12-month, 24-month, or 36-month contract.
![WordPress package information.]()
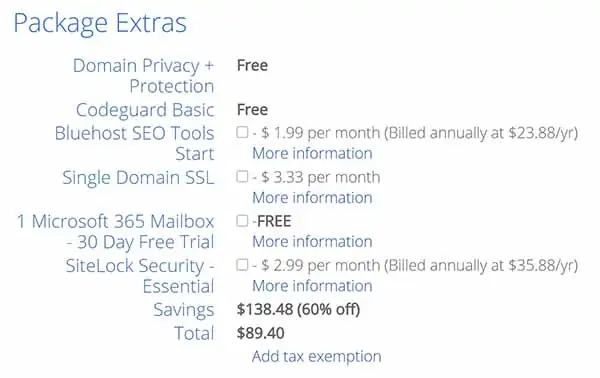
- Package Extras: Choose which, if any, of these extra options you want to add to your Bluehost package:
- Bluehost Search Engine Optimization (SEO) Tools: Bluehost offers its own SEO tools. Website owners may want to purchase SEO tools from Bluehost or explore other free (and paid) SEO tools available to them.
- Single Domain Secure Sockets Layer (SSL) Certificate: Bluehost offers advanced SSL features. Initially, website owners may want to use the free SSL certificate included with their hosting package and then upgrade to a single domain SSL certificate later on.
- Microsoft 365 Mailbox 30-Day Free Trial: Check the box next to this option if you want to take advantage of this free trial offer.
- SiteLock Security Essential: Bluehost also offers its own website security tools. Website owners may want to purchase these security tools from Bluehost or explore other free (and paid) security tools available to them.
- Tax Exemption: If you should receive a tax exemption for this purchase, click the “Add tax exemption” link and enter your tax exemption number.
![WordPress Package extras description.]()
- Payment Information: Enter your payment information.
- Terms and Conditions: Review Bluehost’s terms and conditions, cancellation policy, and privacy notice. Click the box to accept them and then click “Submit.”
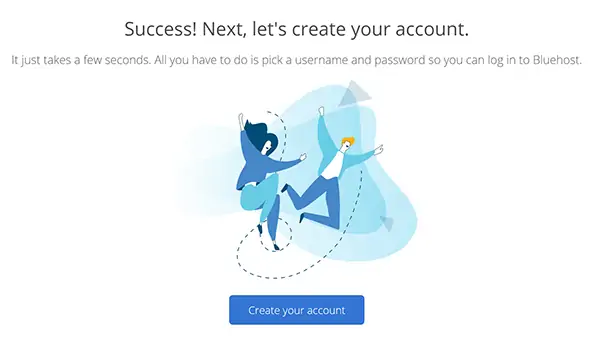
- After processing your payment information, Bluehost will display the screen below and ask you to complete your Bluehost account setup.
![WordPress create account call to action.]()
- After clicking the “Create your account” button, enter a password for your Bluehost account, click the box to accept Bluehost’s privacy policy and terms of service (after reviewing them), and then click the “Create Account” button.
Step 3: Install WordPress
The next step in creating a WordPress website involves logging in to Bluehost and installing WordPress.
How Much Help Do You Need?
Bluehost gives new users three options at this point: “No help needed,” “A little help,” or “Built for you.”
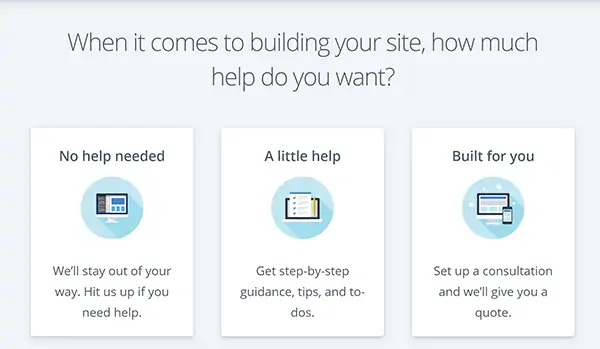
For the purposes of this guide, we’ll select “No help needed.”
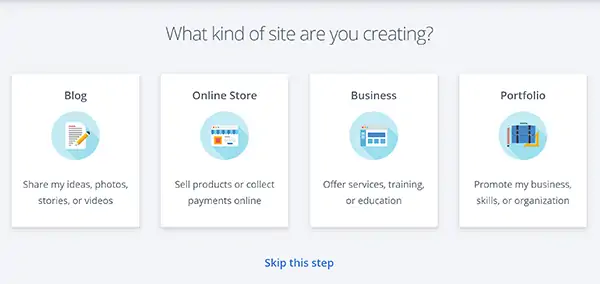
What Kind of Website Do You Want To Build?
Bluehost will then ask you what kind of website you want to create. You can choose “Blog,” “Online Store,” “Business,” or “Portfolio.” Bluehost also gives users the option of skipping this step. For the purposes of this guide, we’ll select “Business” and, when prompted, we’ll reply that we’re a little comfortable with creating websites.
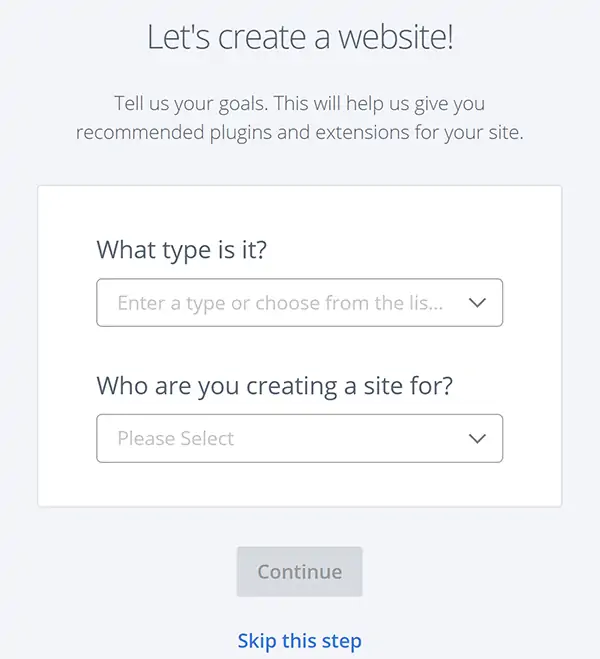
What Type of Business Do You Have?
Next, Bluehost will ask you to select your business type. This will enable it to suggest specific plugins and extensions you may want to use. Because we plan to build a generic website for purposes of this guide, we’ll select “Skip this step.”
What Pages Do You Want on Your Site?
Bluehost will now ask you what pages you want to include on your website. Select any pages that apply to your business. You can always add or remove pages at a later time. For the purposes of this guide, we’ll select “Skip this step.”

What’s Your Site’s Name and Tagline?
Bluehost will then ask you to provide a name for your website, which will appear at the top of your site, and your site’s tagline, which will appear on search engine results pages.
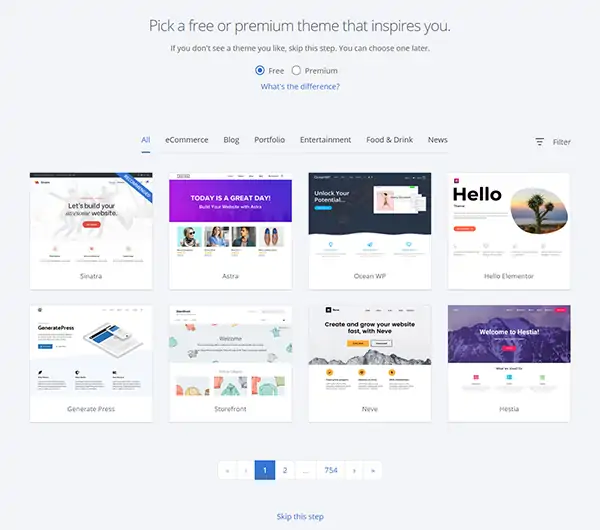
What Website Theme Do You Want To Use?
At this point, you’ll have the option of selecting a free (or premium) theme to pre-install on your website. If you don’t like any of the themes listed, you can always add (or change) your theme after you finish your WordPress installation. For the purposes of this guide, we’ll select the Astra theme.
We highly recommend you choose a theme that includes premade page templates. This will save a lot of time when you create your website. The Astra theme includes several page templates we’ll use in this guide. To find more themes, check out our Best WordPress Themes article.
Step 4: Familiarize Yourself With the WordPress Dashboard
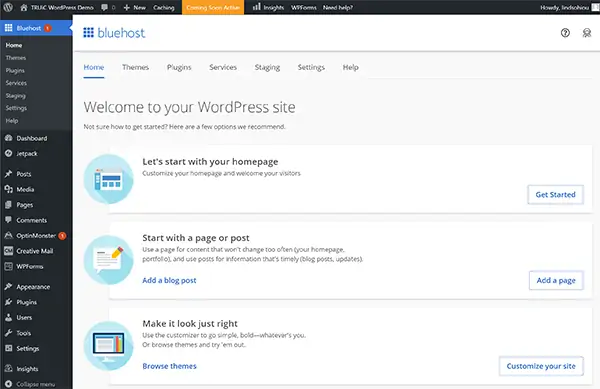
After completing the Bluehost WordPress installation, you can log in to your WordPress website. Select “My Sites>Manage Site>Log In To WordPress” from the main navigation menu.
As soon as you log in to WordPress via Bluehost, you’ll see the Bluehost welcome screen. This is one of many sections within the WordPress dashboard. Before you add content to your WordPress website, it’s important to first familiarize yourself with the WordPress dashboard, its menus, and the plugins that come pre-installed with Bluehost.
The Top Menu Bar
Along the top of your screen, you’ll see these options:
- WordPress Icon: If you want to visit the WordPress.org website, its documentation page, access support, or provide feedback, you can do so from this icon’s drop-down menu.
- Your Website’s Link: Use this menu item to view your live website at any given time.
- Comments: If you allow people to comment on your website’s page(s) and/or posts, you can view, edit, and reply to comments using this link.
- New: Use this drop-down menu to quickly create a new post, page, user, or form as well as to upload new media files.
- Caching: WordPress uses caching to improve your website’s performance. When someone requests data from your website (e.g., views a page), your cache will store that data to deliver the information faster to the next user. From the top menu, you can choose to adjust your cache settings or purge (empty) your cache if you just made changes to your site.
- Coming Soon Active: Bluehost automatically creates a “Coming Soon” page that the general public will see until you publish your website. If you click the “Coming Soon Active” option from the top menu bar, it’ll take you to the Bluehost menu where you can publish your website when ready.
- Insights: Bluehost automatically installs a plugin called MonsterInsights. By clicking this menu item, you’ll see a prompt to connect your website to MonsterInsights and set up your website analytics. You don’t have to set up your MonsterInsights account as soon as you create your website. You can activate it at any time — or delete (or replace) it, if desired.
- WPForms: Bluehost also automatically installs the WPForms plugin. You can use this plugin to create dynamic forms on your website, including contact forms and newsletter subscription forms. It also enables you to see who completed these forms on your site and have these forms feed into other payment or email marketing programs. You can start using this plugin at any time — or delete (or replace) it, if desired.
- Need Help?: Clicking this link will take you directly to Bluehost’s WordPress dashboard where it’ll display the “Help” tab. From here, you can access Bluehost’s resource center or contact its support team directly.
- Username: On the far-right side of the top menu bar, you’ll see your username. You can edit your profile or log out of your WordPress website from here.
The Left Menu Bar
Along the left side of your screen, you’ll see these options:
- Bluehost: This menu item comes pre-installed on all Bluehost WordPress websites. From this section, you can access Bluehost’s WordPress tips, theme library, plugin library, premium services, settings, and resource center. This section also allows you to create a staging site.
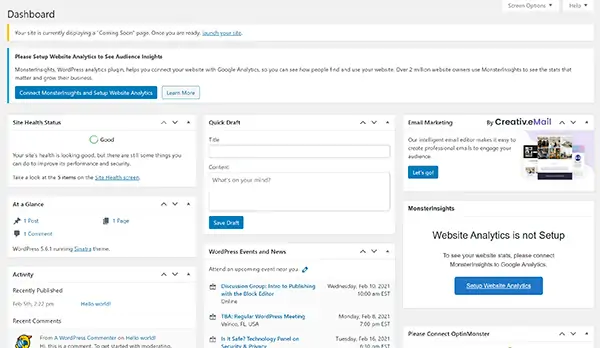
- Dashboard: The WordPress dashboard — also known as an “admin panel” — provides an overview of your website. It includes a number of blocks that’ll alert you to required updates as well as share important details about plugins, your website’s health, and more.
If you don’t use Bluehost for your website hosting, this is the first page you’ll see each time you log in to your WordPress website.![WordPress dashboard window.]()
- Jetpack: Bluehost automatically installs the Jetpack plugin on the WordPress sites it hosts. While it can slow down larger websites, many people view this plugin as essential for beginners. It includes SEO, security, performance, and customization tools that can help beginners design and manage their websites. You can start using this plugin at any time — or delete (or replace) it, if desired.
- Posts: Website owners can add, edit, and delete WordPress posts from this section. You also can manage categories and tags, which can help further classify your posts into broad and detailed topic groups.
- Media: From the media section, site owners can view the media library as well as upload and manage media files.
- Pages: Website owners can add, edit, and delete WordPress pages from this section.
- Comments: In this section, you can read and respond to comments on your posts and/or pages.
- OptinMonster: Bluehost automatically installs the OptinMonster plugin, which site owners primarily use for lead generation and dynamic form creation. You can start using this plugin at any time — or delete (or replace) it, if desired.
- Creative Mail: Bluehost also automatically installs the Creative Mail plugin, a popular tool mainly used for email marketing. You can start using this plugin at any time — or delete (or replace) it, if desired.
- WPForms: Bluehost also automatically installs the WPForms plugin. You can use this plugin to create dynamic forms on your website, including contact forms and newsletter subscription forms. It also enables you to see who completed these forms on your site and have these forms feed into other payment or email marketing programs. You can start using this plugin at any time — or delete (or replace) it, if desired.
- Appearance: From the appearance section, website owners can manage their website’s theme, customize their homepage, manage widgets and plugins, and more.
- Plugins: From the WordPress plugins menu, you can install, manage, and delete your website’s plugins.
- Users: You can use this section to give other people access to edit your website. In addition, you can set a WordPress password so you can log in to your WordPress website directly instead of logging in through Bluehost. After you make a mental note of your username and set up a password, you can log in to your new website by simply typing https://yoursitenamegoeshere.com/wp-admin.
- Tools: Website owners can perform additional management tasks from the tools section, including importing and exporting content to and from another CMS. New website owners and WordPress beginners won’t need to use this section.
- Settings: Website owners can use the settings menu to manage their:
- Global Website Settings (e.g., its name, date format, and time zone)
- Writing Settings (e.g., the default category and settings to post content via email)
- Reading Settings (e.g., what content your homepage displays and how many blog posts your site will display at a time)
- Discussion Settings (i.e., how your site handles comments)
- Media Settings (e.g., you can standardize photo sizes)
- Permalink Settings (e.g., the design of links to your website, such as: https://truicwordpressdemo.com/2021/02/sample-post/ or https://truicwordpressdemo.com/sample-post/)
- Privacy Settings (i.e., you can upload and manage your website’s privacy policy here)
- Insights: Bluehost automatically installs a plugin called MonsterInsights. By clicking this menu item, you’ll see a prompt to connect your website to MonsterInsights and set up your website analytics. You don’t have to set up your MonsterInsights account as soon as you create your website. You can activate it at any time — or delete (or replace) it, if desired.
Step 5: Add Content
Adding content represents the next step in building a WordPress website. As previously noted, we recommend choosing a theme that includes premade page templates. We’ll use the Astra theme’s page templates to design our pages. Most business websites will include these four pages: “Home,” “About Us,” “Services,” and “Contact.”
Install an Astra Template
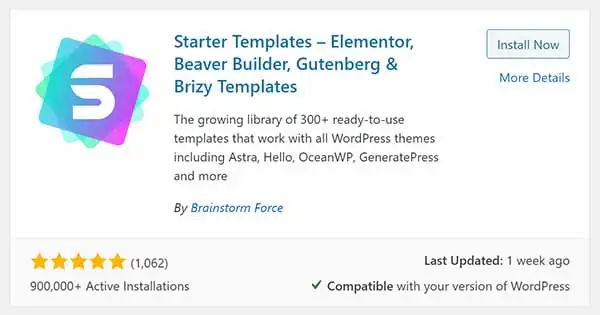
To install Astra’s page templates, click “Plugins>Add New” from the WordPress admin panel.
- Enter Astra into the search field.
- Look for “Starter Templates - Elementor, Beaver Builder, Gutenberg & Brizy Templates.”
![WordPress Starter Templates plugin library.]()
- Click the “Install Now” button.
- After the installation process finishes, click “Activate.”
- When the plugin activates, you’ll arrive at the “Plugins” section of the WordPress admin panel.
- Look for the “Starter Templates” plugin and click “See Library.”
- You’ll then see a prompt to select a page builder. While you’ll find several drag-and-drop builders available for WordPress, we’ll choose WordPress’s own page builder by clicking “Gutenberg.”
- You’ll then see a number of pre-made templates you can use to make building your website much easier. Find a template that will work for your business and its goals. For the purposes of this guide, we’ll choose the “Pet Sitting” template.
- To install all pages within the template, click “Import Complete Site.” To only install the homepage (you’ll have to create your other pages from scratch or with another template), click “Import ‘Home’ Template.” For the purposes of this guide, we’ll import the complete site.
- Click “Import,” and then enter your contact information and click “Submit and Start Importing.”
- When the import process ends, click “View Site.”
Design a WordPress Homepage
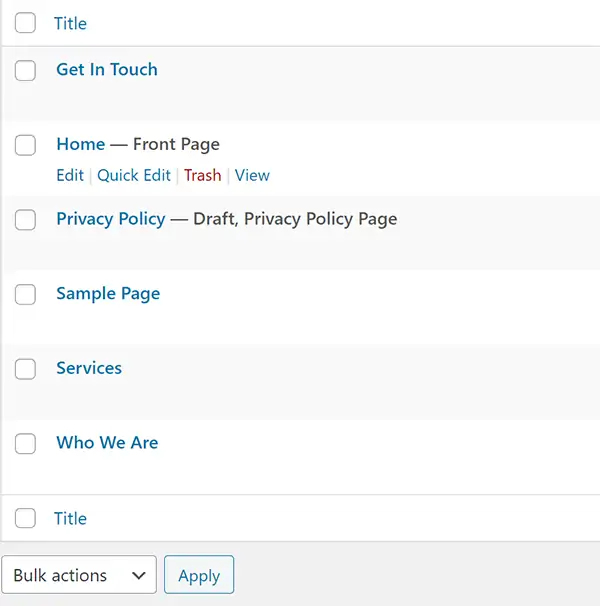
After you install the Astra template, you can customize it to suit your business. To edit your WordPress homepage, select “Pages” from the left sidebar. Find the homepage and click “Edit.”
- From this point, you can use WordPress’s Gutenberg page builder to add, edit, and delete content from your website’s homepage. Learn more about the Gutenberg editor via WordPress’s extensive documentation. We’ll now update the homepage one section at a time.
- In the first section, we want to update the location, phone number, and introductory text. To do so, simply select the text you wish to change and start typing.
![WordPress website theme text field example.]()
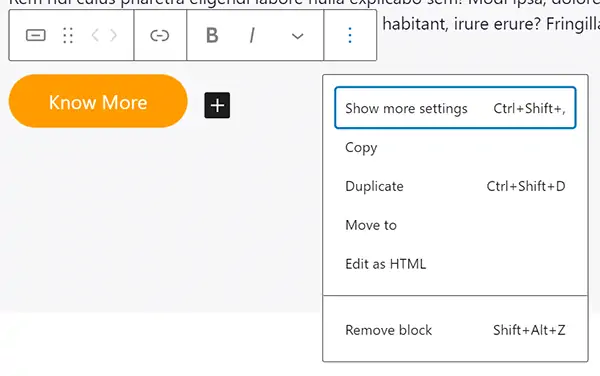
- In the second section, we want to update the text and make the “Know More” button link to the site’s “Services” page.
- Select the text you wish to change and start typing.
- To update the button text, color, etc., click the button and select “Show more settings.”
![WordPress text editing settings and options.]()
- Make any changes you’d like to your “Know More” button. We’ll edit “Know More” to instead read “Services.”
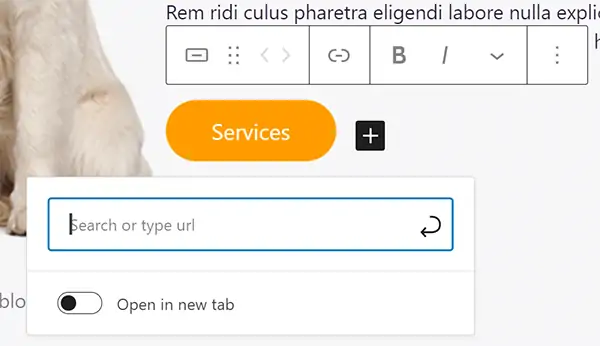
- To link the updated button to the “Services” page, click the hyperlink icon and paste in the URL (web address) of your future “Services” page. In our case, it’s https://truicwordpressdemo.com/services.
![WordPress link editing.]()
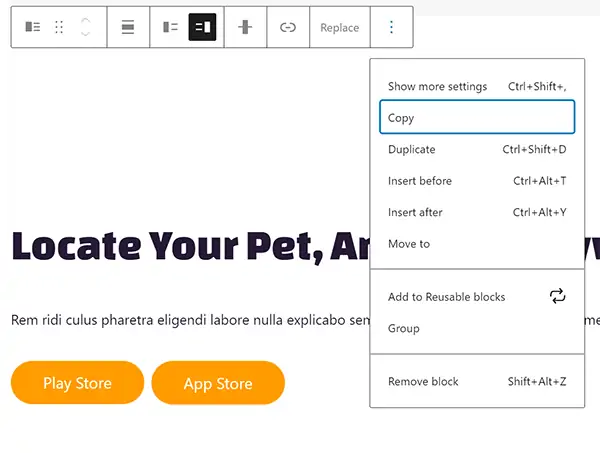
- Because we don’t want to include the next section on our website, we’ll select that section by clicking the white area to the right of the photo.
- Then, click the three dots icon and select “Remove Block.”
![WordPress layout and text alignment options.]()
- Continue making changes to the rest of the homepage, as desired.
- When you finish all desired edits, click “Update” in the top-right corner of your screen.
- To return to the WordPress admin panel, click the WordPress icon in the top-left corner of your screen.

Edit Your “About Us” Page
To edit the “About Us” page on your WordPress site, select “Pages” from the left sidebar.
- Find the “Who We Are” page and click “Edit.”
- To change the page title from “Who We Are” to “About Us,” select the grey “Who We Are” text at the top of the screen and type “About Us.”
![WordPress about us section.]()
- To replace an image, simply select the image, click “Replace,” select “Upload,” and then upload a new photo from your computer.
- From this point, you can use WordPress’s Gutenberg page builder to add, edit, and delete content from your website’s “About Us” page. Learn more about the Gutenberg editor via WordPress’s extensive documentation.
- Continue making changes to the rest of the page, as desired.
- When you finish all desired edits, click “Update” in the top-right corner of your screen.
- To return to the WordPress admin panel, click the WordPress icon in the top-left corner of your screen.

Edit Your “Services” Page
To edit the “Services” page on your WordPress site, select “Pages” from the left sidebar.
- Find the “Services” page and click “Edit.”
- Use WordPress’s Gutenberg page builder to add, edit, and delete content from your website’s “Services” page. Learn more about the Gutenberg editor via WordPress’s extensive documentation.
- Continue making changes to the rest of the page, as desired.
- When you finish all desired edits, click “Update” in the top-right corner of your screen.
- To return to the WordPress admin panel, click the WordPress icon in the top-left corner of your screen.
Edit Your “Contact” Page
To edit the “Contact” page on your WordPress site, select “Pages” from the left sidebar.
- Find the “Get In Touch” page and click “Edit.”
- To change the page title from “Get In Touch” to “Contact,” select the grey “Get In Touch” text at the top of the screen and type “Contact.”
- Use WordPress’s Gutenberg page builder to add, edit, and delete content from your website’s “Contact” page. Learn more about the Gutenberg editor via WordPress’s extensive documentation. We’ll now update the “Contact” page’s map.
- To update the map:
- Open a new internet browser tab.
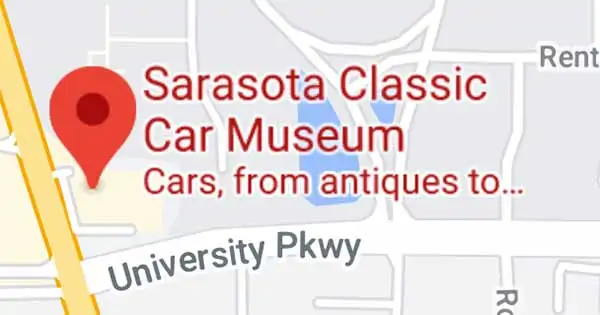
- Visit https://www.google.com/maps.
- Locate your business on Google Maps.
- Click the red pin that represents your business’s location.
![Google maps location.]()
- Click “Share.”
![Google business review and information example.]()
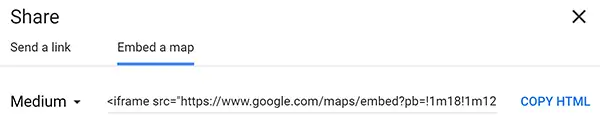
- Click “Embed a map.”
- Click “COPY HTML.”
![WordPress embed google maps option.]()
- Return to your website’s “Contact Us” page.
- Delete the “iframe” text.
![WordPress iframe source code for google mad embedding.]()
- Paste the HTML link in the empty box.
- Continue making changes to the rest of the page, as desired.
- When you finish all desired edits, click “Update” in the top-right corner of your screen.
- To return to the WordPress admin panel, click the WordPress icon in the top-left corner of your screen.


Step 6: Customize Your WordPress Website
To customize your WordPress site’s homepage, select “Appearance>Customize” from the WordPress dashboard.

The “Customize” section will allow you to make a number of changes to your homepage as well as to the look and feel of your entire site. Follow the next steps to further customize your WordPress homepage and the rest of your website.
Learn why having a cohesive color scheme is important for both your business branding and website. Use our How to Choose a Great Website Color Palette guide for more.
Update Sitewide Fonts and Colors
- Click “Global.”
- To update your website’s default fonts, select “Typography.”
- To update the font used for writing normal text on pages and posts, select “Base Typography” and then make your desired changes.
- To update the fonts used for headers, select “Headings” and then make your desired changes.
- To update your website’s default colors, select “Colors>Base Colors” and then make your desired changes.
- Click the open-angle bracket (“<”) to return to the main “Customize” menu.
Update Your Website Header

- Click “Header.”
- To update your logo, site title, and tagline, click “Site Identity.”
- Click “Change Logo” to upload your business’s logo. If you haven’t created a logo for your business, check out our Free Logo Maker. It’s best to use a transparent, portable network graphics (PNG) file.
- Update your site’s title, tagline, and icon.
- Click the open-angle bracket (“<”) to return to the main “Header” menu.
- To update the layout of your header, click “Primary Header” and make your desired changes. Click the open-angle bracket (“<”) to return to the main “Customize” menu.
- To remove the “Download App” button from the top menu, click “Primary Menu.”
- Click the “Last Item in Menu” drop-down menu.
- Select “None.”
- Click the open-angle bracket (“<”) twice to return to the main “Customize” menu.
When you finish customizing your WordPress site, click the blue “Publish” button. This will save your changes and return you to the WordPress admin panel.
Step 7: Install Plugins
Next, you’ll install and activate any plugins you wish to run on your WordPress website. You may have read our Best Plugins for a WordPress Site article or you may have a list based on your own research. To manage your website’s plugins, click “Plugins” on the WordPress dashboard.
From here, you can add, install, activate, and delete any plugins to help you meet your website’s — and your business’s — goals.
Step 8: Preview Your WordPress Website
Before you publish your website, you should preview it to ensure it looks (and functions) exactly the way you intend. This also represents a good time to test your website and solicit feedback. Ask other members of your organization to meet with you to review your website and test its functionality.
To see what your website will look like, hover over your website’s title (in the top-left corner of your screen) and click “Visit Site” from the drop-down menu.

Step 9: Publish Your WordPress Website
When you’re ready to publish your WordPress website, click “Bluehost” from the left menu bar. Scroll down and click “Launch Your Site.” Check your website again to make sure everything looks and functions the way you intended.
Final Thoughts
Congratulations! Now that you've successfully built and launched your WordPress website, you're ready to focus on growing your small business. There’s always more to learn and discover as you expand your business, website, and brand. Check out any of our resources below to keep going on your entrepreneurial journey.
Build Your WordPress Site With Bluehost
Bluehost makes it easy to host and build your WordPress website. Get started today with plans as low as $2.99 for the first year.