How To Make a BigCommerce Website: A Step-by-Step Guide
Few small business owners have much time to think about establishing an online storefront while managing their daily operations. That’s where BigCommerce comes in.
This flexible, open, software as a service (SaaS) platform can help small business owners create a digital storefront with a range of powerful ecommerce tools. BigCommerce offers analytics and integration tools for third-party applications. It also provides ways to help connect small businesses with customers around the globe.
This step-by-step guide will take you through the process of creating an account with the BigCommerce website builder.
Recommended: Work alongside this guide with a BigCommerce free trial to get a better feel for what this builder can do.
The 5 Steps to Make a BigCommerce Website
Before you start building your business website, we recommend taking some time to map out its overall structure.
While this step isn’t necessary, it’s a best practice because it’ll help you create a site with a cohesive flow. For help with this planning phase, check out our How To Structure a Website article.
Now, onto the five easy steps to making your BigCommerce website:
- Create a BigCommerce Account
- Explore the BigCommerce Page Builder
- Customize Your BigCommerce Website
- Enable Ecommerce Functionality
- Publish Your Online Store
Step 1: Create a BigCommerce Account
To begin, head over to BigCommerce and click the “Start Your Free Trial” button. Fill out the prompts then click on the “Continue to Store Details” button.

The BigCommerce platform will then ask you to choose a name for your online store, create a password, and provide your personal information (e.g., your name, phone number, and business size).
For the purpose of this article, we’ll select the “Just starting out: <$50K” option. You should choose whichever option most accurately represents your business.
Once you complete this form, click on the “Create Your Store” button to proceed. You must then answer these three questions:
- Do you have an existing website?
- What will you be selling?
- What best describes how you currently sell your products?
Once you provide your answers, click on the “Finish” or “Ask Me Later” buttons.
Get Started With BigCommerce
Begin your BigCommerce journey with a no-risk free trial today. Click the button below to get started.
Step 2: Explore the BigCommerce Page Builder
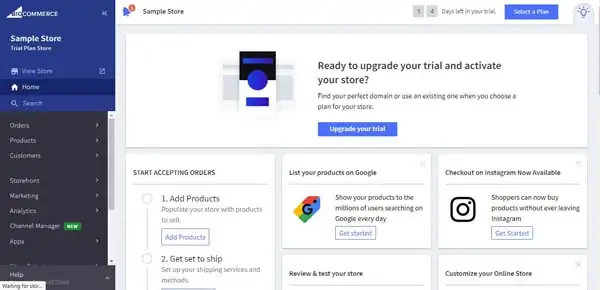
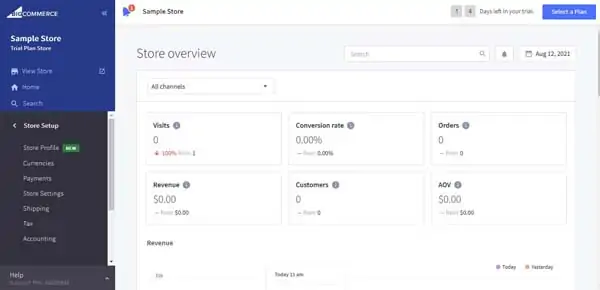
You’ll now reach your website’s control panel, which provides a range of tools — including ecommerce tools — you can use to build and customize your website.
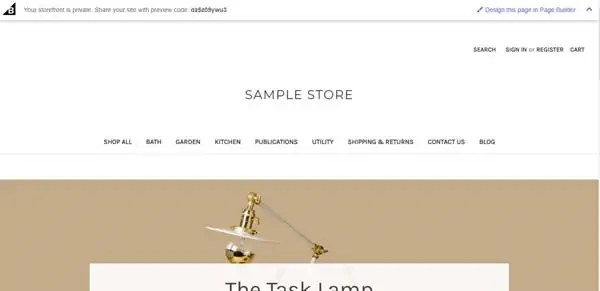
To begin, click on the “View Store” option at the top of the control panel’s left-hand menu. This’ll automatically open a separate browser tab with a preview of your website based on how you answered several questions when you created your BigCommerce account.
But, don’t worry if your website preview doesn’t meet your exact needs. The BigCommerce website builder enables you to fully customize this template. To do so, click on the “Design this page in Page Builder” button in the upper-right corner of the screen.
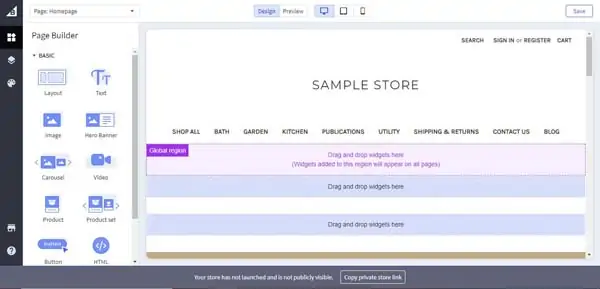
The BigCommerce Page Builder will now open in a third browser tab. It includes a range of tools you can use to tailor your website to your small business.
In the left-hand toolbar, you’ll find six tool icons: “Return to Control Panel,” “Widgets,” “Layers,” “Theme Styles,” “View Live Store,” and “Help.”
Use the “Widgets,” “Layers,” and “Theme Styles” icons to access a range of site-building tools to help you design your website. You also may use the “Phone,” “Computer” and “Tablet” icons at the top of the screen to toggle between editing modes for different screen sizes.
Step 3: Customize Your BigCommerce Website
Once you familiarize yourself with the Page Builder, it’s time to start using its powerful set of editing tools to customize your BigCommerce website.
Need BigCommerce design inspiration? Here are 10 eye-catching Bigcommerce website examples to spark your creativity.
Customize Your BigCommerce Theme
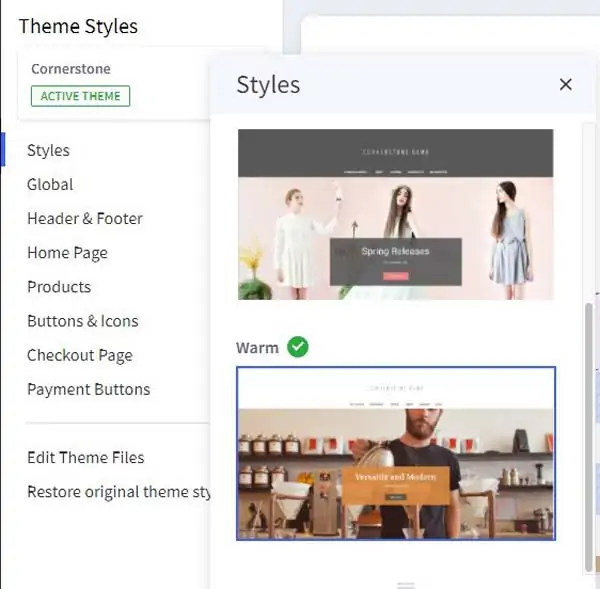
Begin by clicking on the “Theme Styles” icon in the left-hand toolbar.
A “Themes Styles” menu will then appear with a list of options. Under the “Styles” option, you can choose from several preset color palettes (e.g., “Warm,” “Light,” and “Bold”). Your selection will then automatically adjust your website’s fonts and colors.
Under the “Global” option, you’ll reach a submenu where you can modify the background and line colors for each section of your site by clicking on the box next to a section’s name and choosing your preferred color.
You also can use this submenu to edit the font family, size, color, and hover color for your website’s body text and headings as well as load indicator and form input field colors.
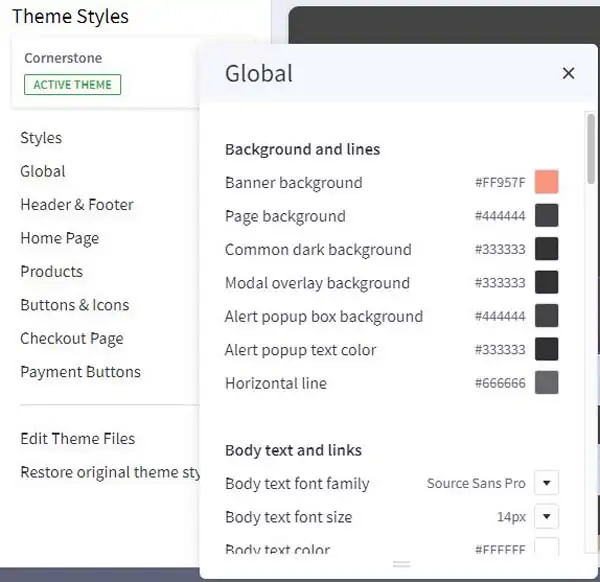
In addition, this “Global” submenu provides options for image and product display style and allows you to hide page headings and breadcrumbs.
Adjust Layout and Columns in BigCommerce
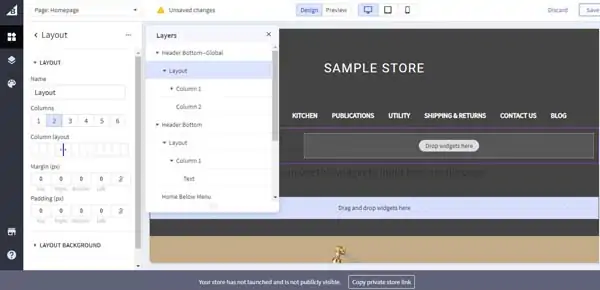
To adjust the layout of a specific section, click on the “Layers” icon in the left-hand toolbar. Next, choose the section you want to edit from the layers listed and double-click on the “Layout” tab to open a menu of options.
From this menu, you can choose the number of columns within a section, the column layout, the margin pixels, and the padding pixels. You also can adjust the layout’s border style, color, thickness, and background — including the option of adding an image to the section.
To customize the columns within a section, click on the “Layers” icon in the left-hand toolbar. Next, beneath the “Layout” tab, click on the column number you want to modify. You can now edit that column’s content alignment, margin pixels, and padding pixels.
You also may choose a color or image for the column’s background as well as modify the style, color, and thickness of the column’s border.
Add Text
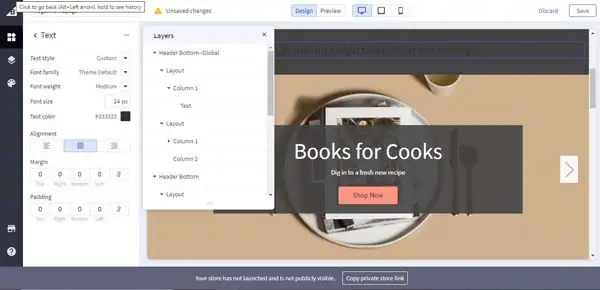
To add text, click on the “Widgets” icon in the left-hand toolbar. You’ll then see a “Text” icon in the “Widgets” menu that then appears. Click on that “Text” icon, drag it over to the section where you want the text to appear, and drop it there.
A menu of options will then open on the left side of the page. Use that menu to edit the text style, font family, weight, size, and color as well as the margin and padding pixels.
Always add text consistent with your business’s branding — both in content and style. You also should replace any placeholder content in your website template by double-clicking on that existing text to open a text-editing menu.
To modify the text in your homepage header, click on the “Layers” icon in the left-hand toolbar. Then, use the tools listed under the “Global” and “Header and Footer” options to adjust the header’s logo positioning, image size, font size, and font color.
To learn more about the importance of using a great font for your website and branding, refer to our Best Website Fonts guide.
Update the Images
To add images to your website, click on the “Widgets” icon in the left-hand toolbar. You’ll then see an “Image” icon in the “Widgets” menu that then appears. Click on that “Image” icon, drag it over to the section where you want it to appear, and drop it there.
This action will open a default image, which you can replace with an image of your choosing, as well as an image-editing toolbar.
To upload an image, hover over the “Image” icon in the image-editing toolbar and click on the “Upload Image” button. Alternatively, you can link to an image available on another website by clicking on the “Link” tab at the bottom of the page and inserting a URL.
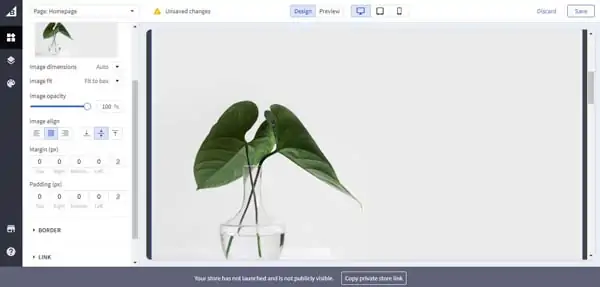
You can now edit the image’s dimensions and fit so that it displays on your web page without taking up too much space, but do this carefully because it can cause distortions. To move the image to the back of a section, simply change its column order in the “Layers” menu.
Edit the image’s opacity, alignment, border, and margin and padding pixels, as needed, to create a cohesive style. You also may attach “Alt Text” to the image to improve your website’s search engine optimization (SEO).
Add a Hero Banner
Hero banners provide an excellent way to display a promotion on your website. Simply pick an eye-catching title for your hero banner as well as a succinct description for your CTA button.
To add a hero banner, click on the “Widgets” icon in the left-hand toolbar. You’ll then see a “Hero Banner” icon in the “Widgets” menu that then appears. Click on that “Hero Banner” icon, drag it over to the section of your website where you want your banner to appear, and drop it there.
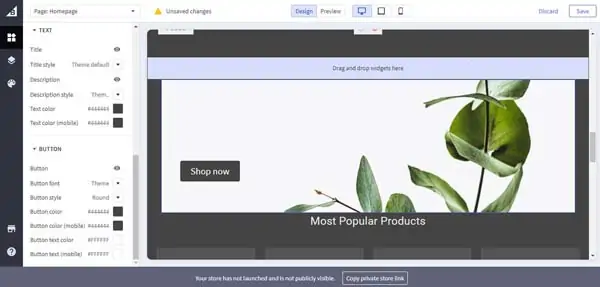
A menu will then open that’ll allow you to edit the banner’s specifications. You may include a link, if desired, to either an internal or external web page. You also can modify the banner’s size and background image as well as its fit, parallax effect, opacity, and alignment.
In addition, you can use this menu to edit the font style, color, and family for both the banner’s text and CTA button. While it also enables you to remove the CTA button, that’s not recommended because the purpose of a hero banner is to direct your online visitors to a product or service.
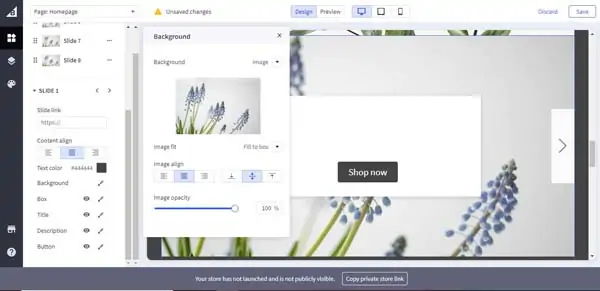
Add a Carousel
A carousel can help you promote multiple sales or display an array of products without taking up too much space on your website. Just remember to carefully select your carousel’s images and text to help maximize visitor engagement.
To add a carousel, click on the “Widgets” icon in the left-hand toolbar. You’ll then see a “Carousel” icon in the “Widgets” menu that then appears. Click on that “Carousel” icon, drag it over to the section of your website where you want it to appear, and drop it there. A menu will then open on the left side of the screen.
Use that menu to adjust the number of slides in your carousel. To add a slide, click on the plus sign (“+”) icon. To delete a slide, click on the ellipsis (“⋯”) icon next to it and select the “Delete” option from the drop-down menu that then appears.
You also have the option of creating a background for each carousel slide as well as editing each slide’s alignment, text, and button. Use the left (“<”) and right (“>”) arrows to toggle between the carousel’s slides.
Preview Your Page
If you’re satisfied with your customizations, click on the “Preview” button at the top of the screen to see a limited preview of your work. This enables you to see how your website will appear to online visitors. You can edit and preview your new BigCommerce website as many times as necessary before committing to a design.
For a more detailed tutorial featuring BigCommerce’s most popular features, read our How to Use BigCommerce guide.
Step 4: Enable Ecommerce Functionality
One of the main benefits of using the BigCommerce platform to create your business website is its wide range of ecommerce tools. The ability to build and maintain a high-performance, digital storefront continues to attract both large companies and small businesses to this platform.
To develop your online store, simply return to your website’s control panel and start exploring some of the other options in the left-hand menu.
Setup BigCommerce Store Settings
To begin, click on the “Storefront” option in the control panel’s left-hand menu. Next, click on the “Store Setup” tab to open a submenu that includes the following sections:
- Store Profile: Fill in your contact information here, including your business’s physical address, email address and phone number.
- Currencies: In this section, you can select the currency visitors will see and use in your online store. If desired, you can add multiple currencies to appeal to a broader market.
- Payments: This section allows you to choose which payment providers you’ll accept when your online visitors make a purchase.
- Store Settings: In this section, update your online store’s time zone, URL structure, security and privacy settings, as well as its SEO information (e.g., meta keywords and descriptions).
- Shipping: Use this section to change the shipping origin details and shipping options available to your customers.
- Tax: Set your sales tax calculations in this section, which also enables you to add a third-party tax service to your website.
- Accounting: Use this section to integrate third-party accounting services with your website, if desired.
Add Products to BigCommerce
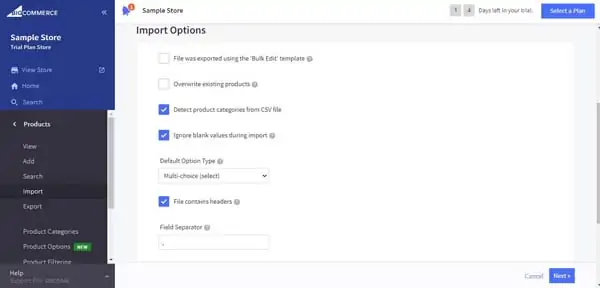
To add a product, click on the “Products” option in the control panel’s left-hand menu. This’ll open a list of several product-related tools. Click on the “Add” tool to add an individual product or the “Import” tool to import an existing product inventory from a comma-separated values (CSV) file.
When adding individual products, you must first complete the “Basic Information” screen. The required information includes the product name, category, brand, weight, and stock-keeping unit (SKU).
Then, you’ll need to enter a brief product description and upload any relevant product photos, videos, and identifiers like a bin-picking number (BPN).
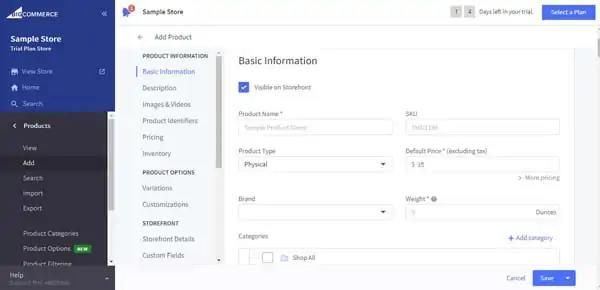
Once you provide all this information — along with a price — you can add product variants to help customers find similar products. You also can add product customizations, including modifier options like a text box or checkbox.
Next, set your storefront details and the purchasability of the item and then select your shipping, fulfillment, SEO, and gift-wrapping options. When done, click on the “Save” button to add the product to your online store’s inventory.
When importing an existing product inventory, select a CSV file from your device and enter the import options (e.g., the field separator and enclosure).
Make sure your product page has everything you need for your online business to succeed. Use our How to Design a Website guide to learn more.
Step 5: Publish Your Online Store
When you’re happy with your website — including its digital storefront — it’s time to go live. While BigCommerce offers a free trial period, you must purchase a premium plan to publish your website.
BigCommerce offers three plans: “Standard,” “Plus” and “Pro.” Each plan includes distinct benefits tailored to businesses in different stages of development.
For users who just started a business and want to sell products and services online, the “Standard” plan makes a cost-effective choice at $29.95 per month. To learn more about these plans, be sure to read our BigCommerce Pricing and Plans guide.
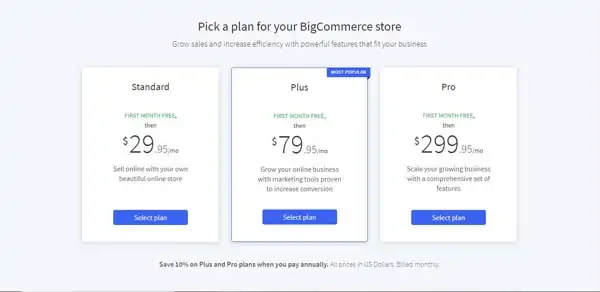
Anyone aiming to grow an existing business may instead prefer the “Plus” plan at $79.95 per month because it includes more marketing tools proven to increase conversion. If you want to scale up a growing business, the “Pro” plan justifies its $299.95 monthly cost with a comprehensive set of features designed for expanding companies.
Once you decide which plan best meets your needs, click on the “Select plan” button. You’ll then reach a page where you can choose your plan duration, enter your payment details, and then click on the “Place Order” button to check out.
Choose a Domain Name
After you purchase one of its premium plans, BigCommerce will ask you to pick a domain name for your website.
If someone else already claimed your preferred domain name, BigCommerce will notify you and help you find an available alternative — often a near match. For example, local businesses could consider incorporating their locality name in their domain.
Should you need help finding and choosing a domain name, check out our free domain name generator tool.
Launch Your BigCommerce Website
Once you purchase a plan and find an available domain name, it’s time to go live with your website. BigCommerce will return you to your site’s control panel and “Getting Started” guide after you complete your plan purchase. Simply click on the “Launch Store” button at the bottom of the page and you’re done!
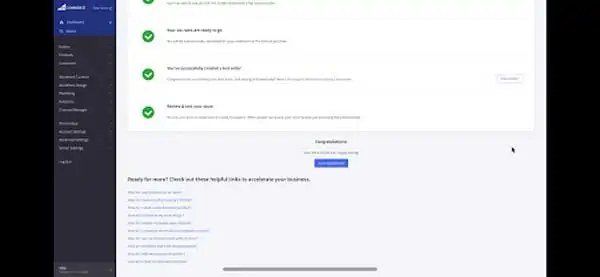
You now have a stylish and effective online store for your small business.
Final Thoughts
With the help of BigCommerce, you can create a beautifully designed, digital storefront in just a few hours. But, the real beauty of this platform is its flexibility.
Designed to grow with your business, BigCommerce enables you to upgrade your plan to meet your company’s evolving needs and experience the full benefits of its website-building software. It all starts with your first online sale.
Try BigCommerce
See what this builder can do for you and your online business. Click the button below to begin your free trial.