How To Make a Wix Website: A Step-by-Step Guide
Starting a new business is exciting, however, you can’t expect to run a successful business without having an online presence. You want a clean, professional-looking, customized business website, but what if you don’t have much experience building one?
The Wix website builder is an affordable, intuitive tool small business owners can use to create a website in just a few hours with no prior web development experience. This guide covers all the steps you must take to get started today.
Recommended: Make sure your website builder has everything you need to succeed. Check out our Best Website Builder Review to learn more.

Before You Begin
Subscribe to our YouTube channel
We know you’re ready to start creating your website immediately, but it’s a good practice to take some time to plan it out first. While you can certainly begin the process without this step, a little planning will make it easier.
Along with this guide, check out these other helpful articles to help you determine if the Wix website builder is the right tool for you and your business:
The 7 Steps to Make a Wix Website
Now, let's get started on our seven step guide to making a Wix website:
- Sign up for Wix
- Choose a Template
- Apply Your Business Branding
- Tailor Other Homepage Elements
- Edit Additional Pages
- Explore Other Customization Menus
- Preview and Publish Your Website
Step 1: Sign up for Wix
To start building your website, simply visit Wix.com and click on the “Start Now” button.
You'll then see a prompt to sign up with your email address or your Google or Facebook profile. After you provide this information, a quick-start page will appear on which you'll answer a few questions about the kind of website you want to build. Your answers will help the Wix website builder direct you to themes and templates that may best suit your business.

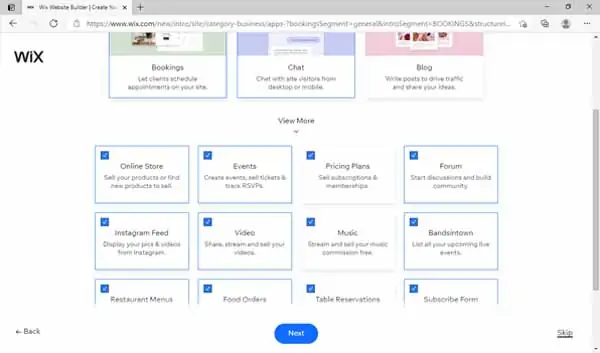
With Wix, you can create a website with or without an ecommerce store. You also can add some basic features to customize your site even before you start the building process, such as chat capabilities, appointment-booking tools for service and hospitality businesses, and much more.
Get started with Wix for free and upgrade whenever you're ready. Try Wix today.
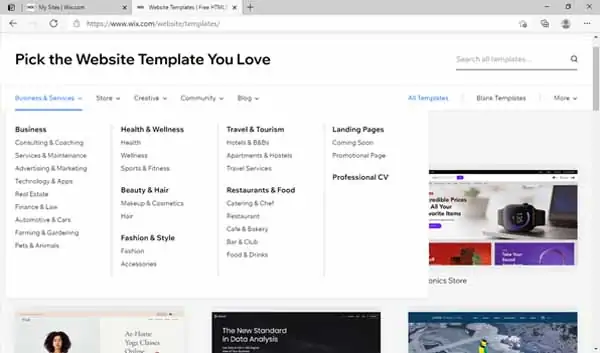
Step 2: Choose a Template
Next, it’s time to find a website template that fits your needs. Wix has dozens of free and premium (paid) templates from which to choose. You can filter and search Wix templates by industry, making it easy to find one you love. For the purposes of this guide, we’ll build a simple service business website.
Because Wix offers free website hosting, you have plenty of time to play around with templates before choosing a premium (paid) plan. When you do purchase a premium Wix plan, which will erase Wix-branded advertising from your website and include a custom domain without “Wix” in the URL, you’ll then have 14 days to request a refund if you’re unsatisfied with your site. Wix only offers this money-back guarantee on your first premium plan purchase, so choose carefully. You can always start with a lower-cost plan and upgrade later.
We recommend most small businesses start with the Wix Pro plan. For $23 per month when billed annually, you get a secure sockets layer (SSL) certificate for added protection on your custom domain, a free domain for the first year, 20 gigabytes (GB) of data and media storage, and up to two hours of video to highlight your business and its offerings. The Wix Pro plan also includes a free, one-year subscription to Wix’s popular Site Booster, Events Calendar, and Visitor Analytics apps.
Once you select a template, the Wix website editor will open in a new browser tab. Here’s where the fun part begins. You'll now have access to easy-to-browse menus to customize your website with your business’s photos, branding, and text.
Here’s the template we’ll use to build our simple service business website:
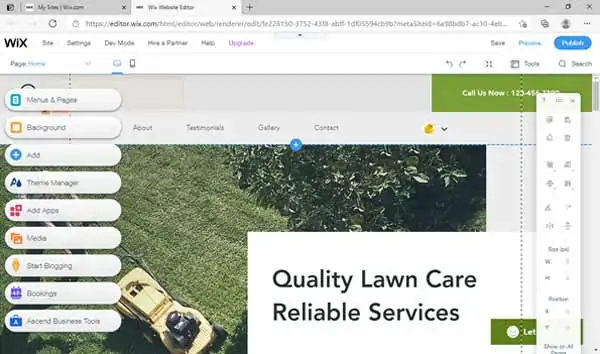
You can see the page structure menus on the left side of the template and the customization menus on the right. These drag-and-drop, point-and-click menus are the tools you’ll use to build a website that’ll make your business stand out.
Step 3: Apply Your Business Branding
Applying your business branding is one of the simplest — and most visually striking — steps you can take to start customizing your website. This includes your logo, your brand’s color scheme, and any background photos you want to use to showcase your business.
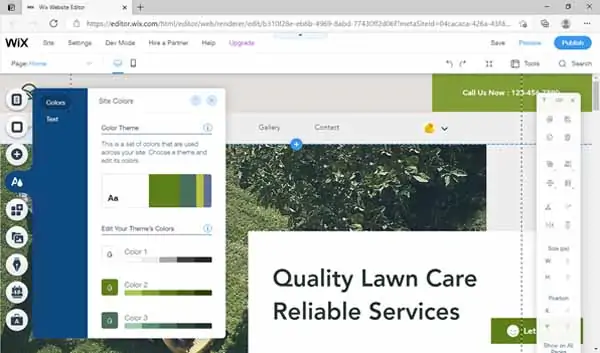
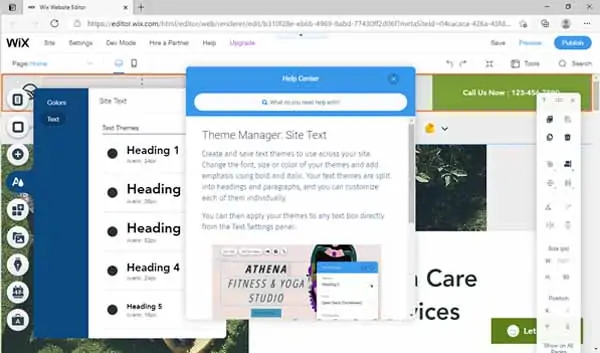
Your brand’s color scheme provides a great place to begin this process, so click on the “Theme Manager” button on the left side of the website editor screen to open the color and text menu.
If you have questions about anything, just click on the “i” icon to open the Wix Help Center. It doesn't get much easier than that!
For the purposes of this guide, we want to build a website for our Rubber Ducky Rescue business. As such, we’ll adjust the theme to bright colors and a cheerful font. To learn more about how colors impact the overall success of your business and branding, refer to our Website Color Palette guide.
Hovering over a text theme on the menu will highlight it and give you a “pen” icon to click. You can then choose the specific font and size you want for every text style on your website.
The “Colors” menu provides a selection of color palettes you can apply to your site to start customizing its appearance. Alternatively, you can adjust each color individually by entering the appropriate red, green, and blue (RGB) numbers or hex codes of the exact colors you want.
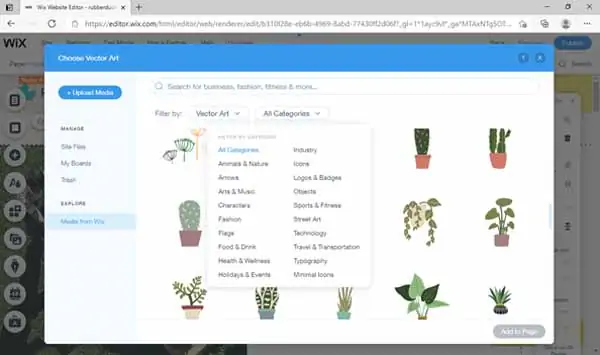
Next, we’ll edit our site’s homepage header — an area Wix calls the “strip” — to include our business’s name and logo. Click on the blue “Edit Strip” button near the top left of the page. This will open a menu from which you can edit the text to reflect your business name and add the identifying logo as “vector art” in the upper-left corner.
Vector art is a thumbnail image that represents your business, and you can upload your own or use any of Wix’s extensive vector art options available in its searchable library. The Wix website builder makes it easy to change these brand elements by simply clicking on what you’d like to edit and following the point-and-click menus.
After you finished adding your business name and vector art, you should change the text in the “Contact” box to reflect your business’s phone number and then hit the “Save” button for the first time. Located at the top-right corner of your screen, this button will prompt you to name your website.
If you’re working on a free site, the Wix branding will remain part of your domain until you choose a paid plan.
When you finish this step, you can either save your site as a draft or publish it online. Either way, you can keep customizing it because nothing is set in stone.
For example, you can play around with the other buttons on the “Edit Strip” menu to change the height and scrolling style of the strip, align your elements to the left, right, or center, and choose other small options to give your website a tailored feel.
If desired, you also can customize the entire header at the top of your website’s homepage. When you click on the header, you’ll see a “Change Header Design” button. Click on this button to open a menu of options for the header’s color, pattern, and opacity. Editing these options can give your site a bit more flair or neutrality based on your needs so have fun playing with the settings.
You’ll find forward and backward arrows in the top-right corner of the editing screen so you can toggle between choices and undo any edits you don’t like.
When you’re happy with your header, strip text, and color, click on the “Preview” button to see how your site will look from a visitor’s perspective. Here’s how our example site looks now:
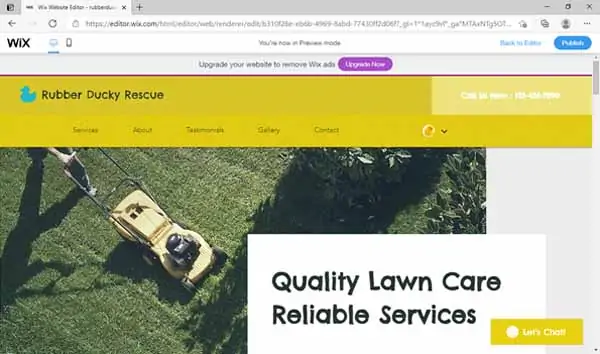
As you can see, we still need to customize other areas of our site’s homepage to match the edited header information.
Step 4: Tailor Other Homepage Elements
One of the best things about using the Wix website builder to create your site is that all site elements are customizable, movable, and flexible. You can control your site’s aesthetics simply by clicking and dragging, pointing and clicking, and uploading media that meets your needs. In this step, we’ll customize the rest of our basic homepage with a new background photo and text tailored to our example service business.
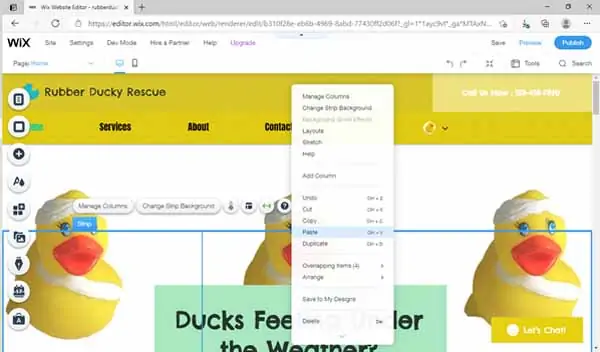
You can click almost anywhere on the page to find something new and exciting to customize. When you right-click on the page, for example, you’ll open the “Manage Columns” menu that enables you to change the size, appearance, and number of columns on the page. You can also set your background photo with many options for uploading your own media or using a Wix stock photo.

You can arrange your homepage background to appear solid, tiled, or patterned — and each menu offers a wide range of color and design options. For example, the “Strip Background” menu provides a selection of solid and patterned backgrounds as well as stock media and photo or video upload options. You also can click on any text boxes within your homepage to edit the text and text style, drag the boxes to reposition and resize them, or delete them altogether. (You can add them back at any time.)
On our example site, we chose to tile our injured rubber duck background photo and center the text box that leads to our service offerings:
Next, we’ll scroll down to begin setting up our business’s available services.
Remember that every part of the homepage is clickable, so you can add or remove elements to create the precise look you want. You can even right-click on individual components to open drop-down menus and make your edits that way.
All these buttons may seem a bit overwhelming at first, but you’ll find the Wix editing interface increasingly intuitive as you go along. A key benefit of using the Wix website builder is that every element of your site will remain independent of the others. But, that means you’ll see lots of buttons and menus in a small space while you work.
To change the “Services” section in the main navigation bar, hover over it until you see the section highlighted and the “Manage Services” button appear. You can then edit this section to include your business’s specific service offerings.
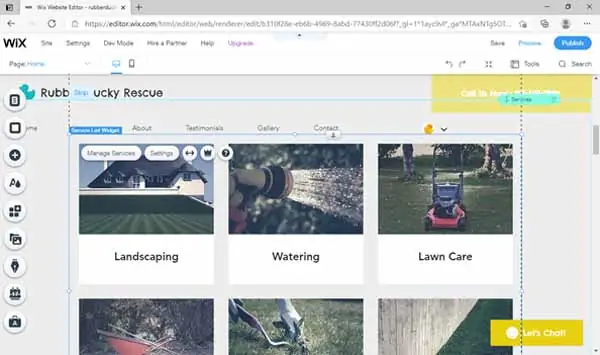
Clicking on the “Manage Services” button will open a dashboard in a pop-up window. From here, click on the ellipsis icons to edit the services your business provides. On a free or lower-tier Wix plan, you can describe and promote your services here. With the Wix Pro plan or a higher-tier plan, your customers will have the ability to book your services directly through your website — a pretty handy feature.

You can add and delete your services, assign prices and attributes, and give each service its own image.
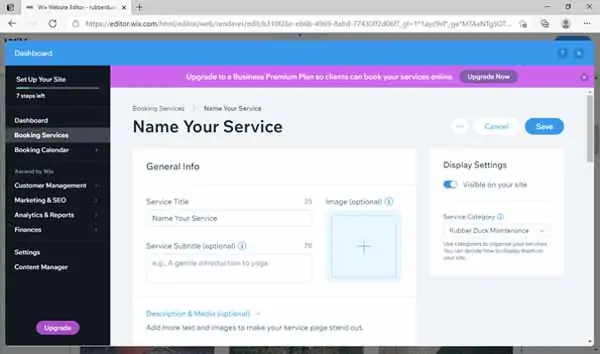
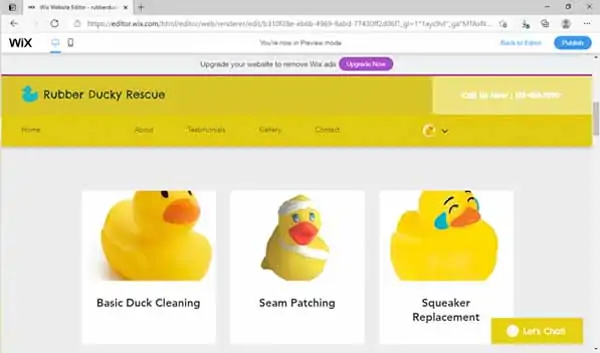
When you finish editing your service offerings, click on the “Save” button to exit the pop-up window and view your new “Services” page. Wix will automatically update and change the services menu everywhere it appears on your website.
When a customer clicks on each service, they’ll see the information you provided on the description page. That’s pretty cool, right? In fact, Wix autosaves all your changes after your first manual save to help you avoid lost information and wasted time if anything happens during your website-building or editing sessions.
Make sure your homepage has everything it needs to stand out. Check out our How to Design a Homepage guide.
Step 5: Edit Additional Pages
Now, it’s time to customize the other pages of your new website. Scroll up to the top of your screen so you can use the top and left-hand editing menus to complete your site.
Click on the first button in the left-hand editing menu — “Menus & Pages” — to open the options. From these cascading, drop-down menus, you can edit and adjust the order of your website pages, add contact and booking forms, and create member spaces — Wix’s take on customer accounts. These member spaces enable returning customers to store their information, follow your business in order to receive future updates, and connect with each other if they choose the “public follower” option.
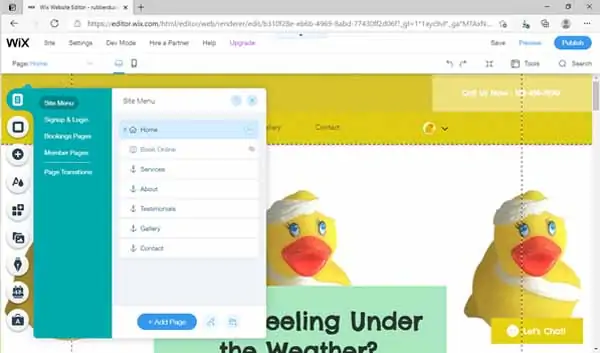
Some Wix templates have one long, scrolling page with multiple sections — like the one we chose for our example service business website — while others include separate pages for all of your main navigation menu headings. You also can edit each page or section of your website independently from the “Site Menu” window.
If you click on the “About” tab in this menu, for example, the screen will scroll to that section or jump to that page. You can then close the “Site Menu” window and make manual edits like we did with the “Services” page.
If you delete any sections on a website using a long-scrolling, single-page template, you can click and drag the section from above or below to close any gaps. If you delete a section or page from a website template that features separate pages, the menus will automatically update. While the Wix website builder includes lots of buttons and menus, that’s also the beauty of this tool because they make all of your website elements autonomous.
Next, you should edit the footer because that’s where visitors will find your contact information. Follow the same process as we did when editing the “Services” page.

Step 6: Explore Other Customization Menus
The Wix website editor’s editing dashboard has a lot of options that enable you to customize your website even further with graphics, extra sections, photo galleries, and dividers. The “Add” menu has more than a dozen customization options, including the ability to embed links to your business’s social media accounts and add music and video to your site.
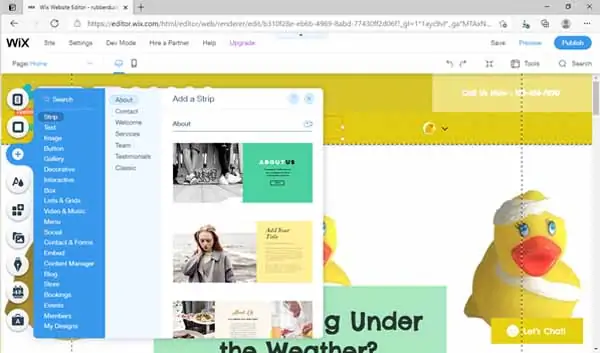
The “Add Apps” menu takes you to the Wix App Market, where you can find apps and plug-ins to enhance the functionality of your site — from calendars to website analytics tools. The “Start Blogging” menu walks you through the steps of adding a blog to your website to connect with your customers via engaging content.
The other editing menu buttons offer quick access to adjust your website’s backgrounds, text boxes, and other key elements. To learn more about further customizing your Wix website, check out our How To Use Wix article. It includes a range of tips to help you master Wix’s extensive features so you can continue to enhance your basic website.
Step 7: Preview and Publish Your Website
Congratulations! You now have a basic Wix website with your business’s branding, service offerings, contact information, and any other desired sections or pages.
It’s now time to click on the computer screen and mobile phone icons in the top-left corner of the Wix website editor to see how your new site will appear on a desktop computer and a smartphone. When you’re satisfied with your website preview, click on the “Publish” button in the top-right corner. Your business website is now live!
Final Thoughts
The Wix website builder makes it quick and reasonably straightforward to create a business website. Its editing interface may have a bit of a learning curve, but it’s worth the effort once you realize how much control you have over your website’s appearance and functionality.
Get Started With Wix
Wix has some of the best templates around and makes it easy to add unique features and functionality to your site. Get started with Wix for free by clicking the button below.