How to Use the BigCommerce Website Builder in 2024
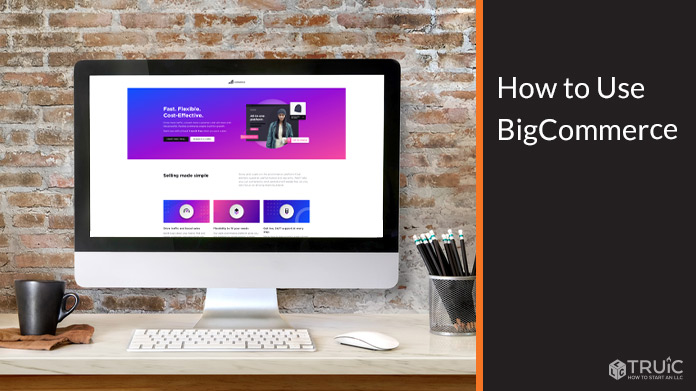
BigCommerce is a flexible and scalable ecommerce platform that can help you create a digital storefront for your online business. Its visual editor incorporates simple, drag-and-drop technology so you can get your store up and running in an afternoon.
This guide provides step-by-step instructions for using the BigCommerce website builder and adding ecommerce functionality to increase your brand awareness and attract new customers.
Ready to start your online store? Visit BigCommerce.
Signing Up With BigCommerce

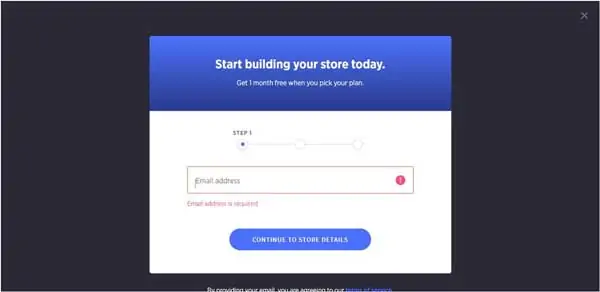
To get started building, head over to BigCommerce and click on the “Start Your Free Trial” button.
A pop-up window will then appear, asking for your email address. Enter your email address, and then click on the “Continue To Store Details” button. The BigCommerce platform will then ask you to choose a name for your online store, create a password, and provide your personal information (e.g., your name, phone number, and business size).
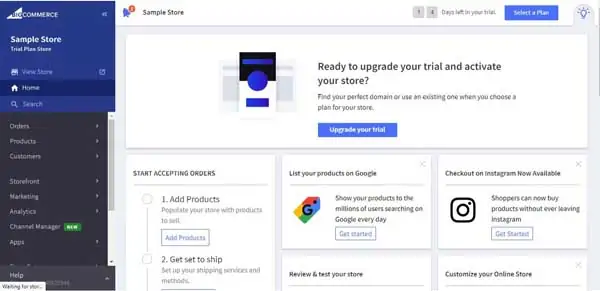
Once you complete this form, click on the “Create Your Store” button to proceed. You must then answer three final questions. After you provide your answers, click on the “Finish” or “Ask Me Later” buttons.
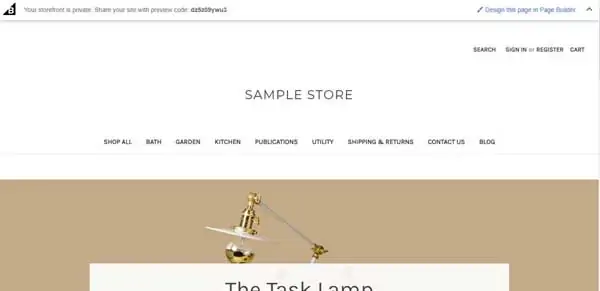
You’ll now reach your website’s control panel, which provides a range of tools — including ecommerce tools — you can use to build and customize your website. To begin, click on the “View Store” option at the top of the control panel’s left-hand menu. This’ll automatically open a separate browser tab with a preview of your website based on how you answered several questions when you created your BigCommerce account.
Don’t worry if your website preview doesn’t meet your exact needs. The BigCommerce website builder enables you to fully customize this template. To do so, click on the “Design this page in Page Builder” button in the upper-right corner of the screen.
Still looking for the right fit for building your business website? Check out our Best Website Builder Review to learn more.
Customizing Your BigCommerce Website
Once you familiarize yourself with the “Page Builder” visual editor, it’s time to start using its powerful set of editing tools to customize your BigCommerce website.
Choosing a Theme Style
To ensure your website reflects your business branding, you may want to begin by adjusting its theme. Make sure you know what type of color palette you want to use for your website before diving in.
To choose a theme style:
- Click on the “Themes Style” icon in the left-hand toolbar to open the “Themes Styles” menu with a list of options to help you fully customize your website’s style.
- Use the “Styles” option if you want to choose from several preset color palettes (e.g., “Warm,” “Light,” and “Bold”) to automatically adjust your site’s fonts and colors.
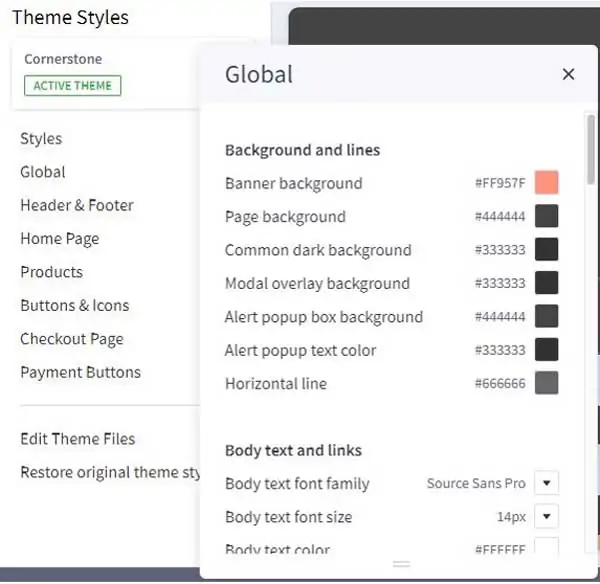
- Use the “Global” option to:
- Modify the background colors and lines for each section of your site by clicking on the box next to a section’s name and choosing your preferred color.
- Edit the font family, size, color, and hover color for your website’s body text and headings as well as load indicator and form input field colors.
- Access options for image and product display style and to hide page headings and breadcrumbs.
Customizing Layouts and Columns
The BigCommerce website builder also makes it easy to customize the layout and columns within individual sections of your site.
To edit layouts and columns:
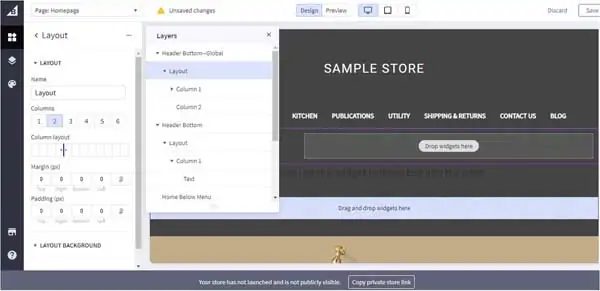
- Click on the “Layers” icon in the left-hand toolbar.
- Choose the section you want to edit from the layers listed and double-click on the “Layout” tab to open a menu of options.
- Choose the number of columns you want within a section as well as your preferred column layout, margin pixels, and padding pixels.
- Adjust the layout’s border style, color, thickness, and background. You’ll have the option of adding an image to the section’s background, if desired.
![How to use BigCommerce.]()
- To customize the columns within a section, click on the “Layers” icon in the left-hand toolbar.
- Next, under the “Layout” section in the menu that then appears, click on the column number you want to modify. You can now edit that column’s content alignment, margin pixels, and padding pixels.
- Under the “Layout Background” section in that same menu, choose a color or image for the column’s background as well as edit the style, color, and thickness of the column’s border.
- Click on the “Save” button in the upper-right corner.
Editing the Header and Footer
Visitors to your site typically see your homepage header first, which means it must quickly convey your business’s purpose and brand personality. Likewise, your footer appears on every page of your website so you want to ensure it highlights key information about your business.
To edit the header and footer:
- Click on the “Themes Style” icon in the left-hand toolbar to open the “Themes Styles” menu.
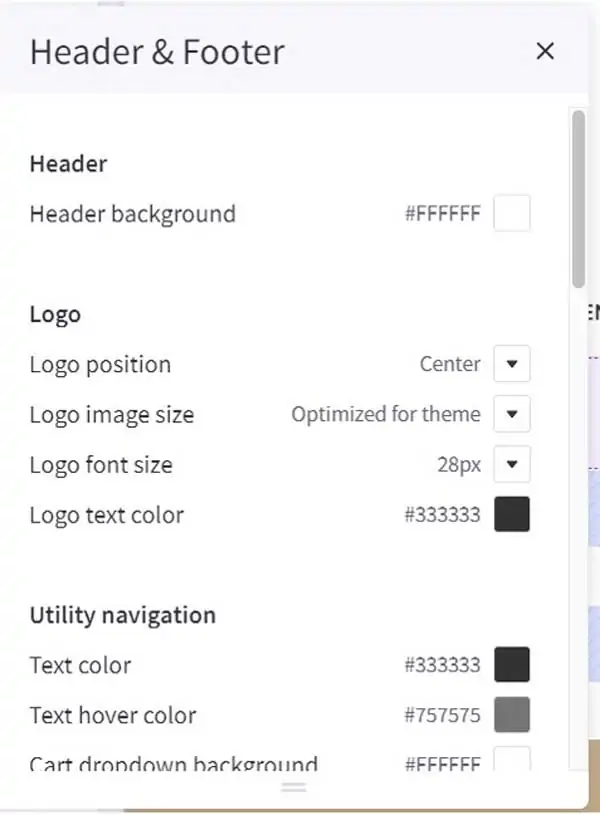
- Click on the “Header & Footer” tab.
- Choose your preferred header background color.
- Set the positioning of your logo as well as the header’s image size, font size, and text color.
- Edit the utility navigation colors that’ll appear on secondary action buttons like “Sign In” or “Subscribe,” including the text color, text hover color, cart drop-down menu color, border color, and background color.
- Edit the main navigation menu, including its text and text hover color, its drop-down menu border and background color, its display mode, and its quick-search background.
- Choose whether or not to display social media icons within your homepage header and footer.
- Choose which partner logos and other information you want to display in your footer.
- Add payment icons for your online store’s accepted payment methods.
- Click on the “Save” button.
Editing Other Homepage Elements
After customizing the homepage header and footer to suit your business, you’ll need to modify the other elements on your homepage.
To edit other homepage elements:
- Click on the “Themes Style” icon in the left-hand toolbar to open the “Themes Styles” menu.
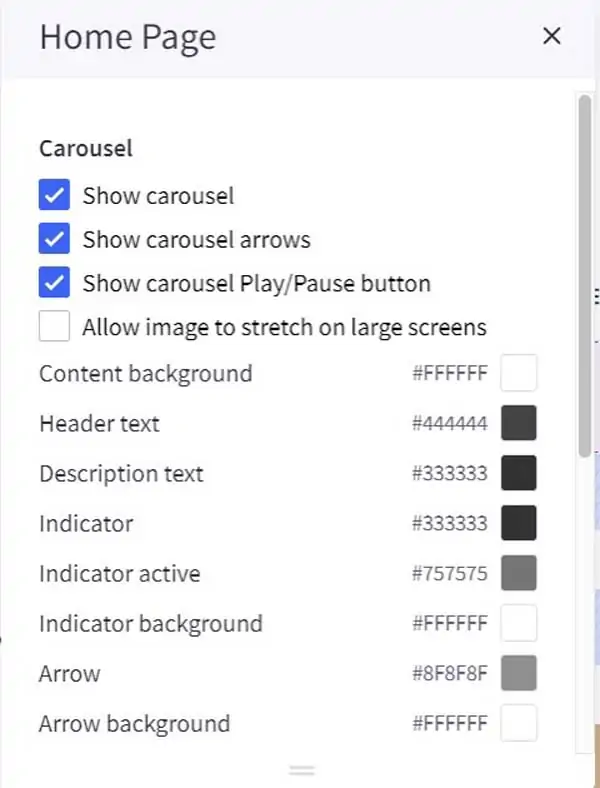
- Click on the “Home Page” tab.
- Decide if you want to include a carousel on the homepage and, if so, select the “Play/Pause” and “Display” settings.
- Choose your preferred homepage colors, including those for its content background, header text, description text, indicators, arrows, and “Play/Pause” buttons.
- Select the total number of products you want to feature on your site’s homepage as well as the number of “most popular” and “new” products within that total.
- Click on the “Save” button.
Make sure your homepage has everything it needs. Check out our How to Design a Homepage guide to learn more.
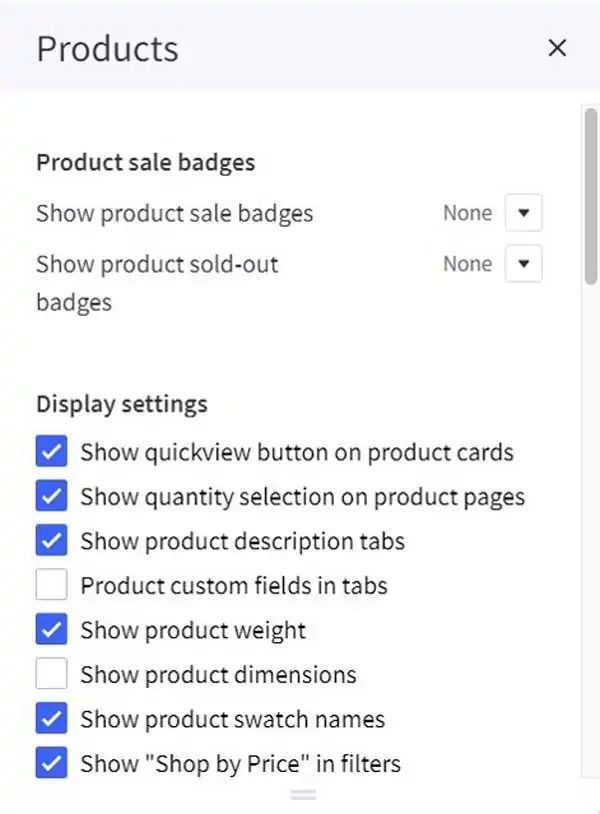
Editing Your Product Display Options
A website with well-displayed products can help increase sales conversions by making those items appear more attractive to potential customers. Refer to our Website Design guide for more tips.
To edit product display options:
- Click on the “Themes Style” icon in the left-hand toolbar to open the “Themes Styles” menu.
- Click on the “Products” tab.
- Select the product sale badges you want to display.
- Choose your preferred display settings, including quick-view buttons on product cards, quantity selection on product pages, product tab descriptions, custom fields in tabs, product reviews, as well as product weight, dimensions, and swatch names.
- Choose the number of products you want to display on category, brand, search results, and product pages.
- Select colors for your site’s product card features.
- Choose the size of your product images.
- Click on the “Save” button.
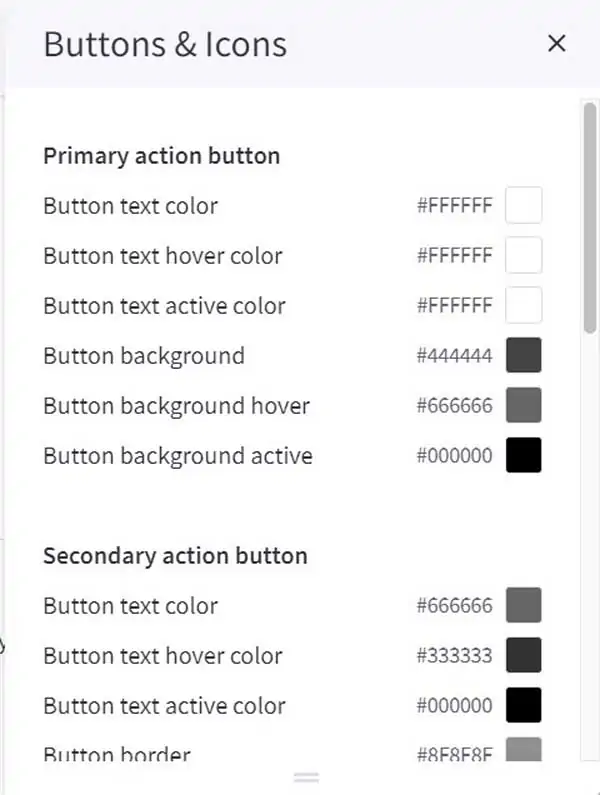
Adjusting Button and Icon Settings
Eye-catching CTA buttons will attract online visitors’ attention to key areas of your website.
To adjust button and icon settings:
- Click on the “Themes Style” icon in the left-hand toolbar to open the “Themes Styles” menu.
- Click on the “Buttons & Icons” tab.
- Choose the color settings for your buttons, including primary, secondary, tertiary, and disabled buttons as well as social media icons and checkboxes.
- Click on the “Save” button.
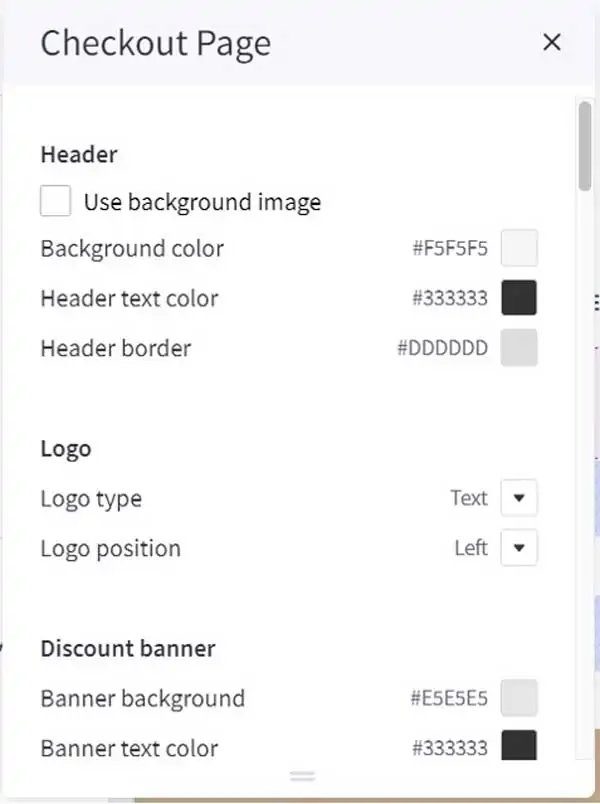
Editing Checkout Page Settings
Providing a smooth, streamlined checkout process can play a pivotal role in increasing your website’s sales conversions.
To edit checkout page settings:
- Click on the “Themes Style” icon in the left-hand toolbar to open the “Themes Styles” menu.
- Click on the “Checkout Page” tab.
- Select the background image or color you want to use in the header of your site’s checkout page.
- Select your preferred logo type and position.
- Choose colors for every feature of the checkout page — from its discount banners and actions buttons to its input fields and more.
- Click on the “Save” button.
Make your checkout page the best it can be. Use our helpful How to Make a Checkout Page article to learn more.
Using Widgets in BigCommerce
Widgets can not only help you expand the content and functionality of your site, but also tailor it to your business’s brand.
Adding Text
Your site’s text should convey your company’s messaging and branding while also providing valuable information to potential customers.
To add text:
- Click on the “Widgets” icon in the left-hand toolbar to open the “Widgets” menu.
- Click on the “Text” icon in the “Widgets” menu, drag it over to the section where you want the text to appear, and drop it there.
- Use the menu of options that then opens on the left side of the page to edit the text style, font family, weight, size, and color as well as the margin and padding pixels.
- Next, enter text consistent with your business’s branding in your new text box.
- Replace any placeholder text in your website template by double-clicking on existing text boxes to open a text-editing menu, and then entering your own text.
- Save your changes by clicking on the “Save” button in the upper-right corner.
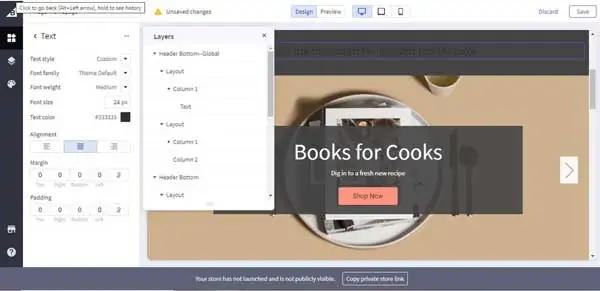
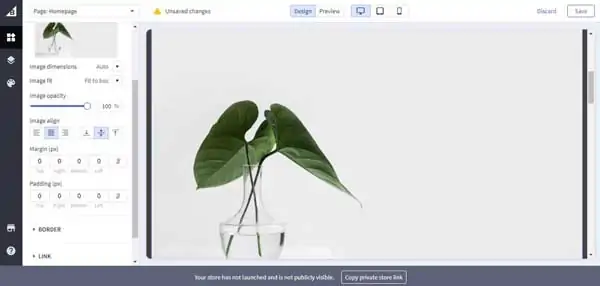
Adding Images
High-quality photos can help your website visually convey your business’s purpose and brand personality.
To add an image:
- Click on the “Widgets” icon in the left-hand toolbar to open the “Widgets” menu.
- Click on the “Image” icon in the “Widgets” menu, drag it over to the section where you want it to appear, and drop it there. This action will open a default image and an image-editing toolbar.
- To upload an image, hover over the “Image” icon in the image-editing toolbar and click on the “Upload Image” button. Alternatively, you can link to an image on another website by clicking on the “Link” tab at the bottom of the page and inserting a URL.
![How to use BigCommerce.]()
- Edit the image’s dimensions and fit so it displays on your site without taking up too much space while also ensuring your edits don’t distort the image.
- Move the image to the back of a section, if desired, by changing its column order in the “Layers” menu.
- Edit the image’s opacity, alignment, border, and margin and padding pixels, as needed, to create a cohesive style.
- Attach “Alt Text” to the image to improve your website’s search engine optimization (SEO).
- Remember to save your changes by clicking on the “Save” button in the upper-right corner.
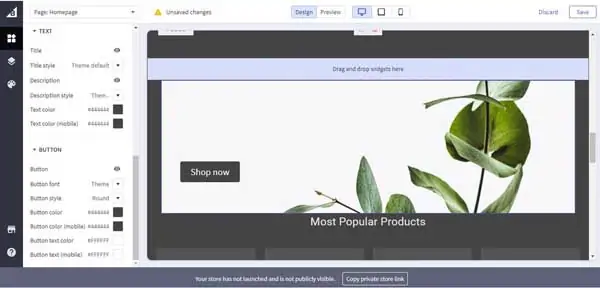
Adding a Hero Banner
Hero banners provide an excellent way to display a promotion on your website. Simply pick an eye-catching title for your hero banner as well as a succinct description for your CTA button.
To add a hero banner:
- Click on the “Widgets” icon in the left-hand toolbar to open the “Widgets” menu.
- Click on the “Hero Banner” icon in the “Widgets” menu, drag it over to the section of your website where you want the banner to appear, and drop it there.
![How to use BigCommerce.]()
- Use the menu that then appears to edit the banner’s specifications. For example, you can:
- Include a link to an internal or external web page.
- Modify the banner’s size and background image, including its fit, parallax effect, opacity, and alignment.
- Next, edit the font style, color, and family for both the banner’s text and CTA button. (Note: While you can remove the CTA button from your banner, that’s not recommended because the purpose of a hero banner is to direct online visitors to a product or service.)
- Click on the “Save” button in the upper-right corner.
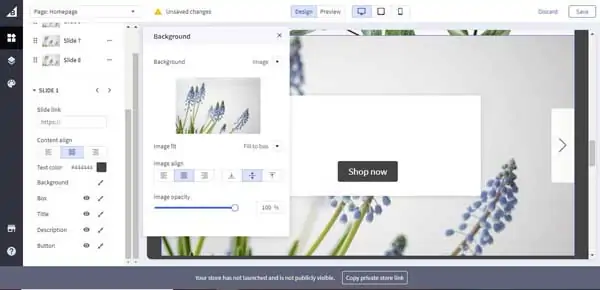
Adding a Carousel
A carousel can help you promote multiple sales or display an array of products without taking up too much space on your website. Just remember to carefully select your carousel’s images and text to help maximize visitor engagement.
To add a carousel:
- Click on the “Widgets” icon in the left-hand toolbar to open the “Widgets” menu.
- Click on the “Carousel” icon in the “Widgets” menu, drag it over to the section of your website where you want it to appear, and drop it there. A menu will then open on the left side of the screen.
![How to use BigCommerce.]()
- Use that menu to adjust the number of slides in your carousel.
- To add a slide, click on the plus sign (“+”) icon.
- To delete a slide, click on the ellipsis (“⋯”) icon next to it and select the “Delete” option from the drop-down menu that then appears.
- Next, choose a background for your slides and edit the alignment, text, and button for each slide. Use the left (“<”) and right (“>”) arrows to toggle between the carousel’s slides.
- Click on the “Save” button in the upper-right corner.
Adding Videos
Videos can help you create a visually engaging experience for your online visitors.
To add a video:
- Click on the “Widgets” icon in the left-hand toolbar to open the “Widgets” menu.
- Click on the “Video” icon in the “Widgets” menu, drag it over to the section of your website where you want it to appear, and drop it there.
- Enter a link to an external video in the box that’ll appear on the left side of the screen.
- To delete your video, click on it and then click on the “Trash Can” icon that appears in its upper-left corner.
Adding Buttons
CTA buttons can help you convert your website’s visitors into customers.
To add a button:
- Click on the “Widgets” icon in the left-hand toolbar to open the “Widgets” menu.
- Click on the “Button” icon in the “Widgets” menu, drag it over to the section of your website where you want it to appear, and drop it there.
- Enter a link in the URL field that’ll appear on the left side of the screen to your desired destination for the button.
- Adjust the button’s alignment, text, font family, color, and other font options, as desired.
- Choose the button’s style, including its color, border thickness, and border radius.
- Click on the “Save” button.
Enabling Ecommerce Functionality in BigCommerce
In addition to its website-building features, BigCommerce offers a wide array of ecommerce tools to help you grow the commercial side of your website. To start adding ecommerce functionality to your website, return to your control panel by clicking on the BigCommerce logo in the upper-left corner of the “Page Builder.”
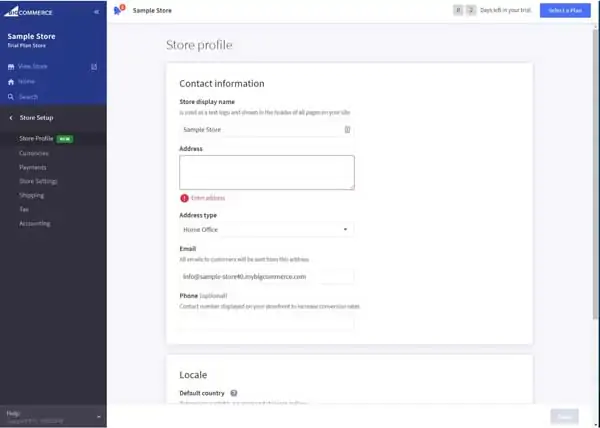
Setting Up Your Store Profile
Your store profile contains valuable information, including the contact information that’ll appear on your order invoices.
To set up your store profile:
- Click on the “Store Setup” option in the control panel’s left-hand menu.
- Select “Store Profile” to open the “Store Profile” screen.
- Enter your store’s name, address, and address type (e.g., an office, home office, commercial site, or warehouse).
- Enter an email address and phone number for your store.
- Click on the “Save” button.
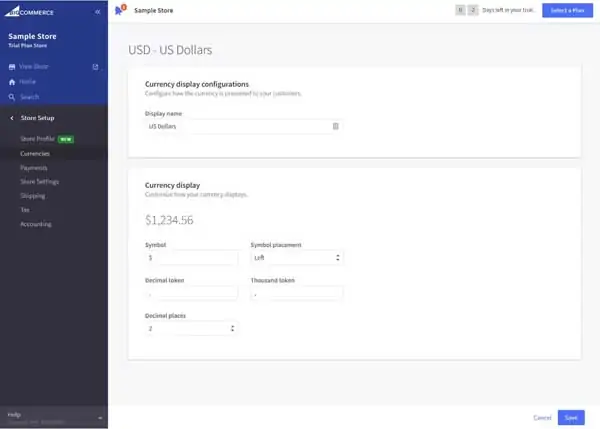
Updating Currency Settings
The BigCommerce website builder makes it easier for users to conduct international business by enabling their sites to display prices in multiple currencies. Use these options to update your website’s currency settings to create a smooth shopping experience for customers around the world.
To update currency settings:
- Click on the “Store Setup” option in the control panel’s left-hand menu.
- Select “Currencies” to open the “Currencies” screen.
- In the “Default Currency” section, click “Edit” to choose your default currency settings.
- In the “Currency Display Configurations” section, select a display name for your currency. If you wish to make U.S. dollars your default currency, for example, you should select that as your display name.
- In the “Currency Display” section, choose your preferred currency symbol, symbol placement, and decimal places, among other options.
- To add another currency, click “Currencies” under “Store Setup.”
- Select “Add new currency” from the section below “Default currencies.”
- When adding a new currency, you must enter the above information as well as the exchange rate to your default currency (e.g., $1 USD = €0.85 EU).
- Click on the “Save” button.
Modifying Checkout Settings
BigCommerce uses an optimized, one-page checkout process to minimize friction and help users increase their sales. You can modify these settings to ensure your online store’s checkout process flows as quickly and smoothly as possible for your customers.
To modify checkout settings:
- Click on the “Advanced Settings” option in the control panel’s left-hand menu.
- Select “Checkout” to open the “Checkout” screen.
- Choose whether or not your customers must have an account in order to check out.
- Choose whether or not customers with existing accounts must sign in to check out or if they may check out as guests.
- Choose whether or not customers may sign in with a link they receive via email.
- Choose whether or not your customers can access their cart across multiple devices.
- Choose whether or not to enable Google reCAPTCHA to protect your site from fraud and bots during checkout.
- Click on the “Save” button.

Selecting Payment Settings
BigCommerce enables you to choose from two payment methods: online, which requires a credit card or payment gateway, and offline, which doesn’t require traditional payment methods.
To set up offline payments:
- Click on the “Store Setup” option in the control panel’s left-hand menu.
- Select “Payments” to open the “Payments” screen.
- Select the offline option you want to set up from the available options (e.g., bank deposit, check, money order, and cash on delivery) by clicking on its “Set up” button.
- Provide the requested information, including the display name of the payment method, the availability by country, and the account information.
- Click on the “Submit” button to save your changes.
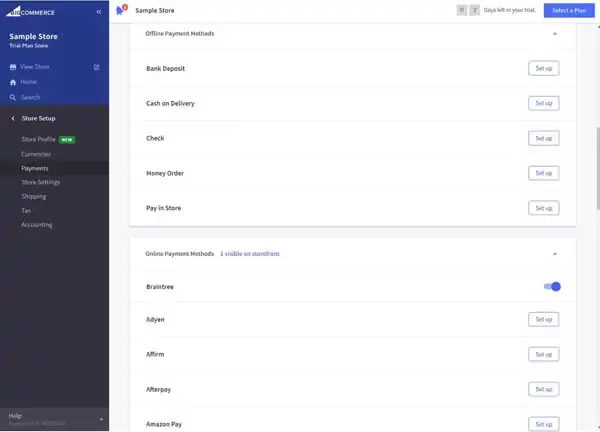
To set up online payments:
- Click on the “Store Setup” option in the control panel’s left-hand menu.
- Select “Payments” to open the “Payments” screen.
- Expand the online payment options menu.
- Choose whether or not to add a credit card option, third-party gateways, and/or digital wallet options like Apple Pay® by clicking on the “Set up” button for your desired option and providing the requested information.
- Click on the “Submit” button to save your changes.
Keep in mind you’ll need to create an account with third-party payment processors if you don’t already have one — and you’ll incur fees according to each payment processor’s policy.
Choosing Shipping Options
The BigCommerce website builder also makes it easy to set up and manage your shipping options so your customers receive their orders quickly.
To choose your shipping options:
- Click on the “Store Setup” option in the control panel’s left-hand menu.
- Select “Shipping” to open the “Shipping” screen.
- Enter your business’s shipping origin information.
- Select which shipping options you want to offer at checkout, including shipping carriers, rates, and rules.
- Click on the “Submit” button to save your selections.
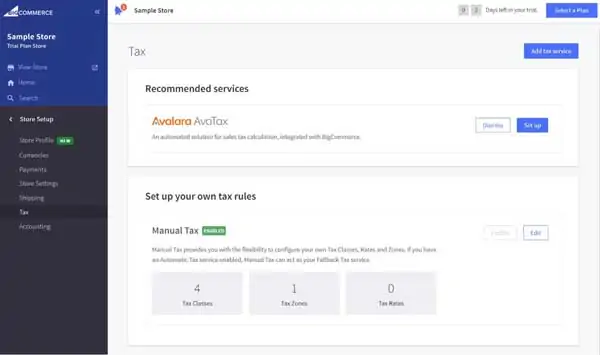
Adding Sales Tax Information
In order to comply with local laws, you must provide the requisite information so your online store can collect sales tax on customer orders.
To add sales tax information:
- Click on the “Store Setup” option in the control panel’s left-hand menu.
- Select ”Tax” to open the “Tax” screen.
- Click “Edit” to continue.
- You’ll then have the option of creating an account with third-party tax service Avalara®.
- To proceed with Avalara, click on the “Setup” button and then either log into your Avalara account or click on the “Create One Here” button to go to Avalara’s website to create an account.
- To enter your tax information manually, click on the “Dismiss” button.
- Click on the “Edit” button in the “Manual Taxes” section.
- Select your business’s tax classes, zones, and rates as well as whether or not your products include tax.
- Click on the “Save” button.
Activating Promotions
Promotions help engage customers with incentives to buy your products, making them an essential marketing tool as you work to grow your small business. BigCommerce enables you to activate two different types of promotions: “Automatic Promotions” and “Coupons.”
To add automatic promotions:
- Click on the “Marketing” option in the control panel’s left-hand menu.
- Select “Promotions” to open the “Promotions” screen.
- Select “New automatic promotion.”
- Choose a name for your promotion.
- Select a currency for your promotion.
- Choose a promotion type (e.g., free shipping or a percentage off the purchase price).
- Choose if you want to make this promotion available to everyone or a specific customer group.
- Choose a start and end date for your promotion.
- Click on the “Activate” box to start your promotion.
- Click on the “Save” button.
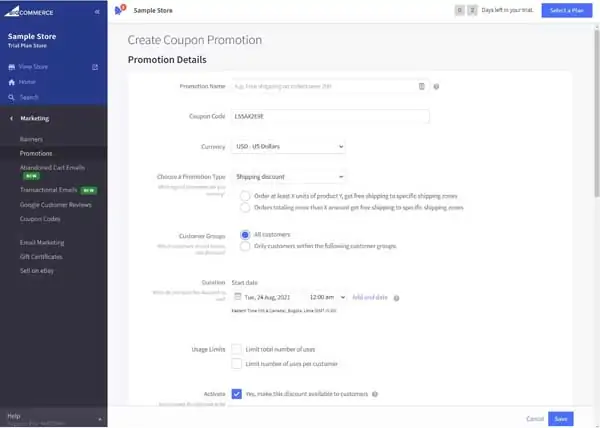
To add coupons:
- From the “Promotions” screen, select “Add new coupon.”
- Choose a name for your promotion.
- Select a coupon code.
- Choose the same options as you would for an automatic promotion, including the promotion’s currency, type, availability rules, and start and end dates.
- Choose coupon limitations, such as how many times the coupon can be used in total as well as per customer.
- Click on the “Activate” box to start your promotion.
- Click on the “Save” button.
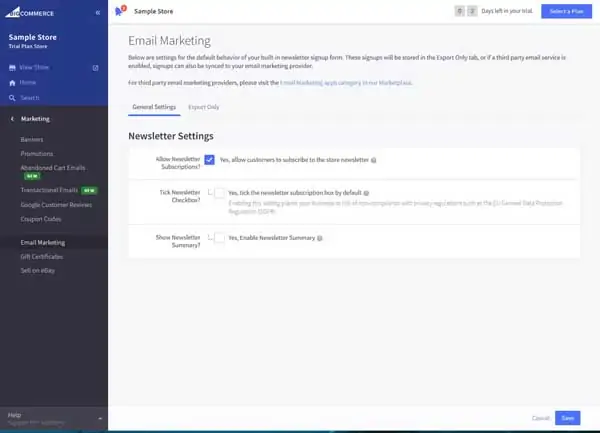
Choosing Email Marketing Options
Email marketing can provide a great way to connect with your target audience via promotions and targeted sales ads. Your BigCommerce website comes with a built-in newsletter signup form to help you launch a successful email marketing campaign.
To choose email marketing options:
- Click on the “Marketing” option in the control panel’s left-hand menu.
- Select “Email Marketing” to open the “Email Marketing” screen.
- In the “Newsletter Settings” section, choose if you want to allow customers to sign up for your newsletter, if you want to tick the newsletter subscription box for customers automatically, and if you want to show a newsletter summary.
- Click on the “Save” button.
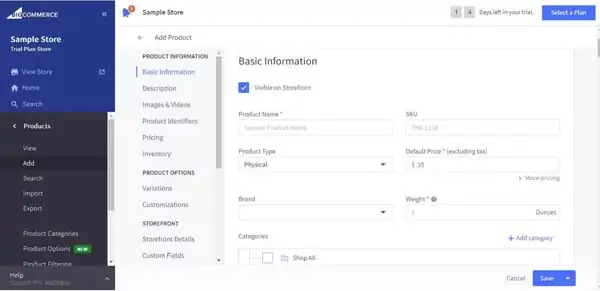
Adding Products
The BigCommerce platform gives you two ways to add products to your online store: adding products individually or importing an existing product inventory.
To add an individual product:
- Click on the “Products” option in the control panel’s left-hand menu. This’ll open a list of several product-related tools.
- Click on the “Add” tool.
- Complete the “Basic Information” screen for that product, including its name, category, brand, weight, and stock-keeping unit (SKU).
- Next, enter a brief product description of the product and upload any relevant product photos, videos, and identifiers like a bin-picking number (BPN).
![How to use BigCommerce.]()
- Add product variants to help customers find similar products as well as product customizations, including modifier options like a text box or checkbox.
- Set your storefront details and purchasability (i.e., the availability of a specific product).
- Select your shipping, fulfillment, SEO, and gift-wrapping options.
- Click on the “Save” button to add the product to your online store’s inventory.
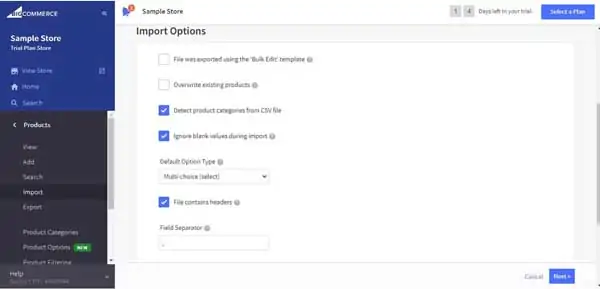
To import an existing product inventory:
- Click on the “Products” option in the control panel’s left-hand menu. This’ll open a list of several product-related tools.
- Click on the “Import” tool.
- Select a comma-separated values (CSV) file from your device and enter the import options (e.g., the field separator and enclosure).
- Click on the “Next” button to import those products to your online store’s inventory.
Adding Customers
Adding customers to your store can help you create highly targeted marketing campaigns and provide a more curated experience for your customers. BigCommerce enables you to offer promotions specifically to customers within certain customer groups.
To add customers:
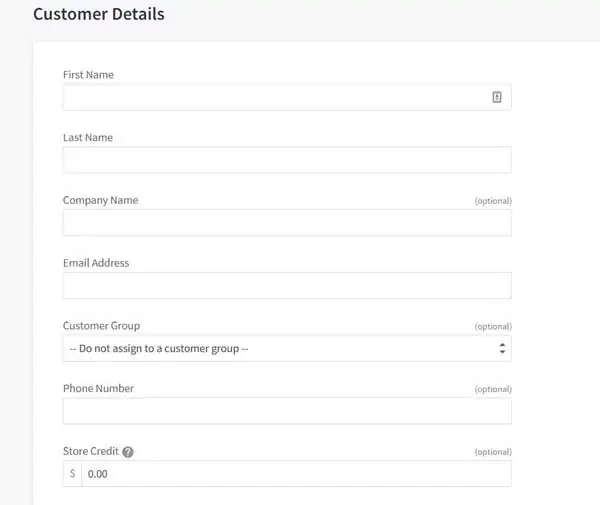
- Click on the “Customers” option in the control panel’s left-hand menu.
- Click on the “Add” button to open the “Customer Details” screen.
![How to use BigCommerce.]()
- On that screen, enter your customer details, including names, email addresses, phone numbers, and customer groups.
- You also may assign store credit to individual customers.
- Click on the “Save” button.
Adding SEO Details
SEO plays a crucial role in ensuring your website appears near the top of popular search engine results pages. By adding certain SEO details to your BigCommerce website, you’ll help ensure potential customers can easily find your business.
To add SEO details:
- Click on the “Store Setup” option in the control panel’s left-hand menu.
- Select “Store Settings” to open the “Store Settings” screen.
- Click “Website.”
- Enter a homepage title.
- Enter meta keywords and a meta description.
- Choose your “WWW” redirect preference.
- Click on the “Save” button.
Leveraging BigCommerce Analytics
The BigCommerce website builder provides full-service analytics so users can track sales and modify their business practices accordingly. To browse these, simply click on the “Analytics” option in the control panel’s left-hand menu. This’ll open a screen with a comprehensive data set, including the following 11 reports and one premium report available at an additional cost:
- Store Overview Report: This provides a comprehensive overview of your entire business across key metrics, such as abandoned carts and your purchasing funnel.
- Real Time Report: This allows you to track revenue, orders, and visitors down to the minute.
- Merchandising Report: This enables you to track your sales by product, including filtering products by SKU.
- Marketing Report: This lets you access all of your marketing activities in one, centralized location.
- Order Report: This allows you to view every order you receive — in detail — with one-click access to order information.
- Customer Report: This enables you to see how much new business you’re bringing in vs. repeat business as well as information on customer purchase behavior.
- Purchase Funnel Report: Use this to learn about the shopping behavior of your site visitors and diagnose where they experience friction in their shopping experience.
- Abandoned Cart Report: Use this to discover which products your customers most often abandon in their shopping carts to help A/B test your site’s product lineup, display, and pricing.
- Abandoned Cart Recovery Report: See which products you successfully converted into sales and the total value of those recovered sales.
- In-Store Search Report: Discover what your shoppers search for so you can adapt your business practices and product lineup to the needs of your target market.
- Sales Tax Report: Track which orders had taxes deducted, the jurisdiction of those taxes, and the rate of taxation.
- Ecommerce Insights: For an additional cost, you can access this report. BigCommerce’s team of experts will analyze your store data and make suggestions to help improve conversions and increase repeat business.
Purchasing a Plan and Publishing Your BigCommerce Website
When you’re happy with your website — including its digital storefront — it’s time to go live. While BigCommerce offers a free trial period, you must purchase a premium plan to publish your website.
Purchasing a Plan
BigCommerce offers three plans: Standard, Plus and Pro. Each plan includes distinct benefits tailored to businesses in different stages of development. For users who just started a business and want to sell products and services online, the BigCommerce Standard plan makes a cost-effective choice at $29.95 per month.
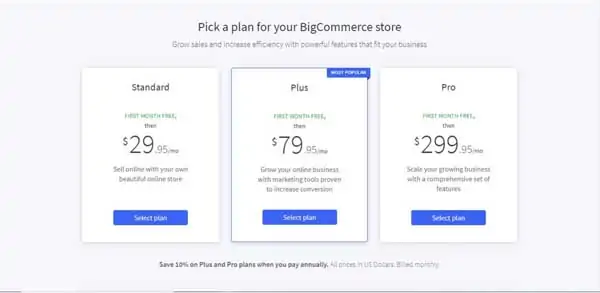
Anyone aiming to grow an existing business may instead prefer the BigCommerce Plus plan at $79.95 per month because it includes more marketing tools proven to increase conversion rates. If you want to scale up a growing business, the BigCommerce Pro plan justifies its $299.95 monthly cost with a comprehensive set of features designed for expanding companies.
To purchase a plan:
- Once you decide which plan best meets your needs, click on the “Select plan” button.
- You’ll then reach a page where you can choose your plan duration and enter your payment details. Do so and click on the “Place Order” button to check out.
- After you purchase a premium plan, BigCommerce will ask you to pick a domain name for your website.
- If someone else already claimed your preferred domain name, consider incorporating the name of your locality into your domain name to find an available option.
- Once you make your selection, you’ll automatically return to the main control panel.
Find the right plan for you by reading our BigCommerce Review and then heading to BigCommerce to make your pick.
Previewing and Publishing Your Site
After you finish customizing your BigCommerce website and purchase a plan, it’s time to preview and publish your site on the internet.
To preview and publish your site:
- Return to the BigCommerce “Page Builder” visual editor.
- Click on the “Preview” button at the top of the screen to view your website as it’ll appear to desktop computer users.
- Click on the “Phone” or “Tablet” icons — also at the top of the screen near the center — to instead see how your site will appear to mobile device users.
- If you need to make any additional changes, use the tools in the “Page Builder” visual editor to do so.
- When you complete any final edits, return to your website’s control panel.
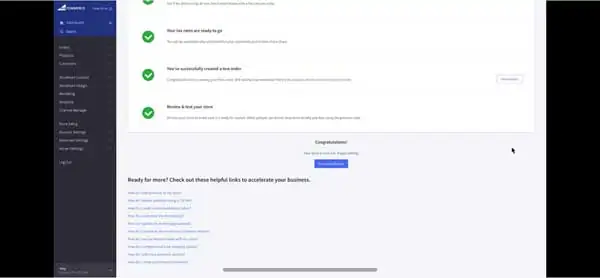
- At the bottom of the screen, click on the “Review and test store details” link.
- When you’re ready to publish, click on the “Launch store” button.
Final Thoughts
Hopefully, this guide proved helpful as you customized your BigCommerce website to promote your brand and its products. To learn more about creating and maintaining an engaging website that’ll support your small business’s growth, check out our Related Articles section below.
Get Started With BigCommerce
Build your ecommerce empire with BigCommerce. Get started today with a free trial by clicking the button below.