How to Get a Web.com SSL Certificate: A Step-by-Step Guide
One of the primary factors influencing clients and customers before they interact with a company online is the company’s cybersecurity efforts. In order to ensure your visitors have a safe experience on your website, you’ll need to optimize your website’s security using a secure sockets layer (SSL) certificate.
In this article, we will help you learn a little more about what SSL certificates are, how they work, and how you can get an SSL certificate with Web.com.
Recommended: All Web.com accounts come with security included. Ensure your business website is safe, build your site with Web.com today.

What Is an SSL Certificate?
Whenever you visit a website, a lock symbol in the address bar at the top of your browser will signify that this website includes an SSL certificate. Many browsers will prevent access to websites that are not secured with this type of certificate. Although they’re necessary to build an effective website, many small business owners don’t know what SSL certificates are or why they’re so essential to ensuring a safe browsing experience.
To protect the valuable information and traffic data of your website’s visitors, you will need to install an SSL certificate. SSL certificates encrypt data that is being transmitted between servers by turning the information into gibberish that is essentially impossible for potential con artists to exploit. This added layer of protection helps ensure that your customers’ privacy is being preserved, as well as valuable data like credit cards and other personal information.
Make sure your business website has everything it needs. Check out our How to Build a Website tutorial to learn more.
Why Do I Need an SSL Certificate?
Cyberattacks are on the rise and cybercriminals are constantly coming up with creative ways to access private information that is transmitted across the web. Even visitors who have never heard of an SSL certificate will be deterred by the warning page displayed by most browsers when visiting a website that lacks such a certificate. As a small business owner, building trust with your clients and customers should be your top priority.
Most payment processors and website builders require SSL certificates to be installed on websites that intend to collect payment information. Therefore, small business owners who plan to host an ecommerce site will need a Web.com SSL certificate before making any sales.
Additionally, having an SSL certificate will help your website’s search engine optimization (SEO) efforts. Websites without SSL security tend to be given poor rankings by popular search engines like Google or Microsoft Bing. These search engines prioritize websites that take steps to ensure that their visitors will have a secure browsing experience. Installing an SSL certificate with Web.com is quick, easy, and pays dividends when it comes to the performance of your website.
Web.com SSL Certificate Cost
If you’ve built your website using a Web.com premium website-building plan or host your website through Web.com, it will automatically include an SSL certificate. The cost for users who host their websites outside of Web.com will vary depending on the type of certificate purchased. Here is an overview of Web.com’s pricing tiers for SSL certificates:
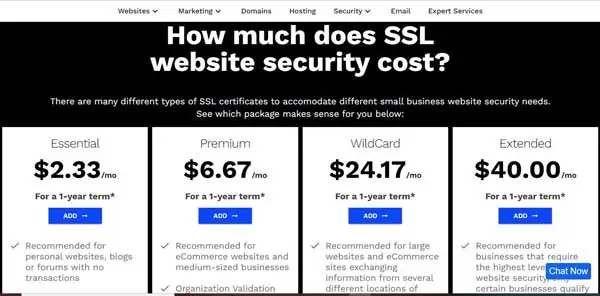
To purchase a certificate, simply select the option that works best for your small business. This will vary on the type of website the certificate is intended for. For instance, it’s recommended that large websites with ecommerce purchase the WildCard certificate for comprehensive protection.
Once you make your purchase, Web.com will apply an SSL credit to your account that you can then use to attach to your website.
Step 1: Setup Your Web.com SSL Certificate
Now that you’ve bought your SSL, you will set up your certificate.
- Log in to your Web.com account and scroll to the bottom of the page.
- Under “Ready To Setup,” locate your certificate and click “Setup” on the right side of the row.
![How to get a Web.com SSL certificate.]()
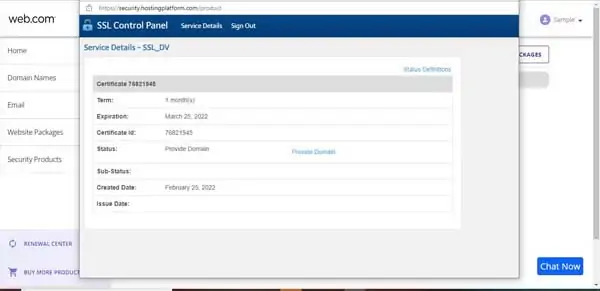
- A pop-up window will appear with information about the certificate. Click “Provide Domain” to continue.
![How to get a Web.com SSL certificate.]()
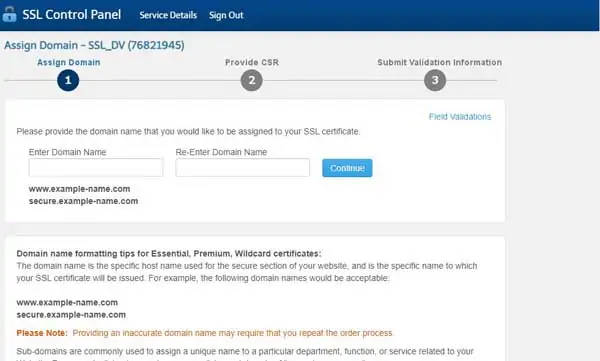
- Enter your domain name into the domain name input field, then click “Continue.”
![How to get a Web.com SSL certificate.]()

Step 2: Provide the CSR File
Before you can install your SSL Certificate, you will need to verify that you own the website. If you purchased your domain using the same Web.com account you used to purchase the SSL certificate, Web.com will automatically verify ownership for you. You can move on to the next step.
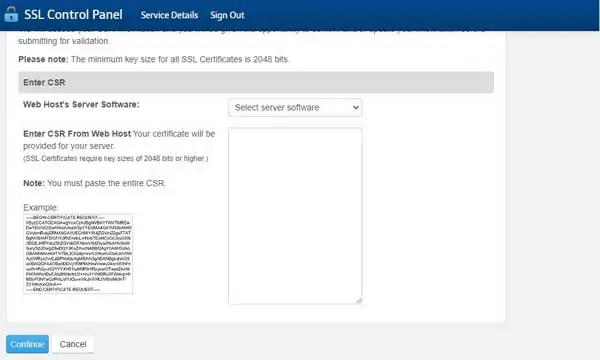
If your website is hosted through an external service, will need to generate a certificate signing request (CSR) file and provide this information to Web.com in the next screen to continue along with your hosting server — e.g., AOL, Apache, Tomcat, etc. If you’re having trouble generating a CSR, contact customer service for your hosting platform.
Once you have generated your CSR, simply copy and paste the information into the CSR input field in the SSL Control Panel pop-up window:
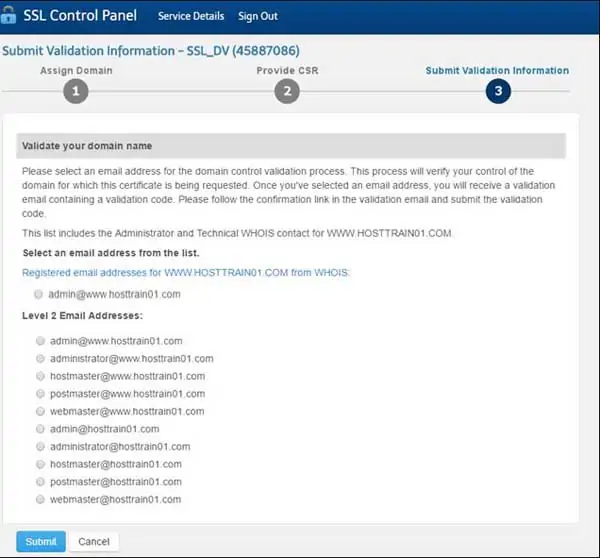
Step 3: Submit Validation Information
Once you have entered your domain and uploaded your CSR file (if applicable), you will be directed to the validation screen of the SSL Control Panel. Here, you will be asked to provide your email information. Once that information is provided, you will be sent a verification link. Validation is usually completed within one hour of opening the validation link.
Step 4: Install Your Web.com SSL Certificate
If you host your website through Web.com, there are no further steps necessary. Installation is automatic for Web.com hosting customers and your SSL certificate should now be fully functional on your website. If your services are hosted through another hosting provider and you are unsure of how to install your SSL certificate, you may contact Web.com Support for more information.
You may also wish to contact the customer support of your hosting provider to ensure seamless installation for your Web.com SSL certificate.
Step 5: Redirect Website to HTTPS Automatically
Technically, visitors will still get the unsecured hypertext transfer protocol (HTTP) version of your website when they type your “.com” into their address bar. In order to make sure their web traffic is protected, we need to redirect your website to the hypertext transfer protocol secure (HTTPS) version automatically, every time.
This final step requires you to edit your .htaccess file for your website. When it comes to editing this file, any errors could seriously break your website. We do not recommend completing this step on your own if you aren’t experienced with editing code.
Instead, we recommend that you contact Web.com Support and ask an agent to do it for you. Web.com customer service is available 24/7 and its friendly, knowledgeable agents will have no problem helping you to redirect your website traffic to HTTPS. Simply let your chat or phone agent know that you’ve recently installed a Web.com SSL certificate and would like to redirect your website to the secure version.
Step 6: Test Your Website
The final step to any tutorial is to test your work! Enter your website’s new secure address, such as https://yourwebsite.com. If successful, you’ll be directed to your website’s homepage. Depending on your browser, you may also notice a lock symbol next to the web address or a green checkmark.
If the installation failed for some reason, most up-to-date browsers will let you know that the website is not secure. We recommend that you start this tutorial over and check that each step was completed properly.
Final Thoughts
Congratulations, your website traffic is now secured with a Web.com SSL certificate. Your customers can now browse and shop knowing that their information is safe and secure. In addition to building trust, you’ll also get a nod from search engines for taking that extra step to provide visitors with a safe platform.
Get Started With Web.com
Don’t have a Web.com account yet? Begin building your business website with ease and peace of mind knowing it comes with added security. Click the button below to begin creating a company website with Web.com.