How To Make a Web.com Website: A Step-by-Step Guide
Building a website is one of the most important tasks small business owners face. But, most small business owners have neither the time nor the training to create a website from scratch. That’s why online website builders continue to gain popularity, offering a variety of features and pricing.
The Web.com website builder is one popular option for small businesses. With a multitude of site templates and drag-and-drop features, Web.com enables you to create the perfect website for your business without writing a single line of code.
Our guide will show you how to build a website on Web.com in just five simple steps. By the end you’ll have a customized business website ready to be published.
Ready to get started? Make sure you have an active Web.com account to begin building.

Before You Begin
We know you’re ready to start creating your website immediately, but it’s a good practice to take some time to plan it out first. While you can certainly begin the process without this step, a little planning will make it easier.
Think about how you want to present your business to the public in terms of your website’s appearance. With that goal in mind, you’ll find it easier to build something beautiful, functional, and representative of you and your business.
For help with planning, check out these articles:
5 Steps to Make a Web.com Website
Now that you’re prepped and ready, it’s time to dive into the five simple steps to making your business website with Web.com:
- Choose Your Plan
- Create An Account
- Choose a Website Template
- Edit Your Site
- Preview and Publish Your Website
Step 1: Choose Your Plan
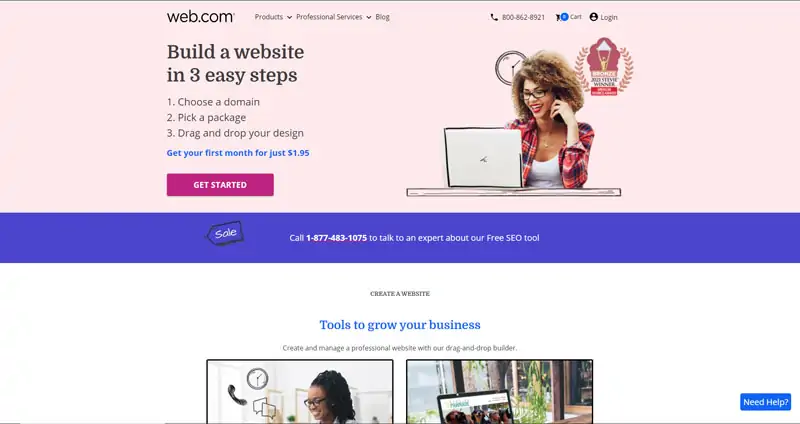
Before you can start designing your website with the Web.com website builder, you must first choose and purchase a Web.com plan. Unlike some website builders, Web.com doesn’t offer a free plan or a free trial period.
To get started, visit Web.com and click on the “Get Started” button.
The next screen will prompt you to choose your free, private domain name. If you want to attach your new website to a domain you already own, check the box next to: “I want to use a domain I already own.”
If you don’t want to choose a domain name just yet, click on the “Choose Domain Later” link.
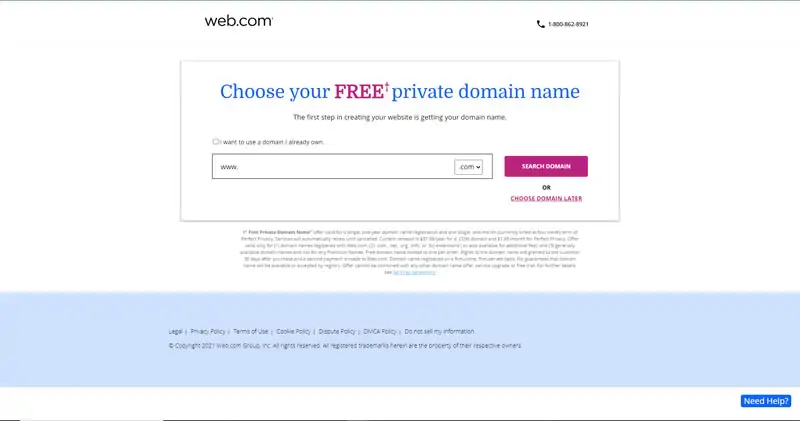
Otherwise, enter the domain you want to use in the field provided and click on the “Search Domain” button. If someone else already owns that domain, the next page will confirm that and provide a list of available names similar to the one you entered.
Once you settle on an available domain name, the next page will prompt you to pick your website package. You can choose from the Starter plan ($1.95 for the first month), the Marketing plan ($2.95 for the first month), or the Ecommerce plan ($3.95 for the first month).
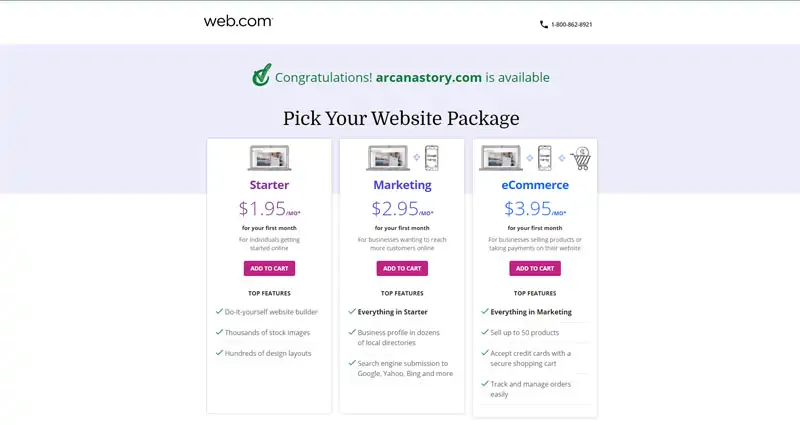
Click on the “Add to Cart” button under your preferred plan.
For more information on Web.com pricing, check out our Web.com Pricing and Plans for Small Businesses article.
Step 2: Create an Account
Once you choose a plan, you’ll arrive at the “Checkout” screen. You’ll see your purchase total at the bottom of the left column and a “Create an Account” form in the right column.
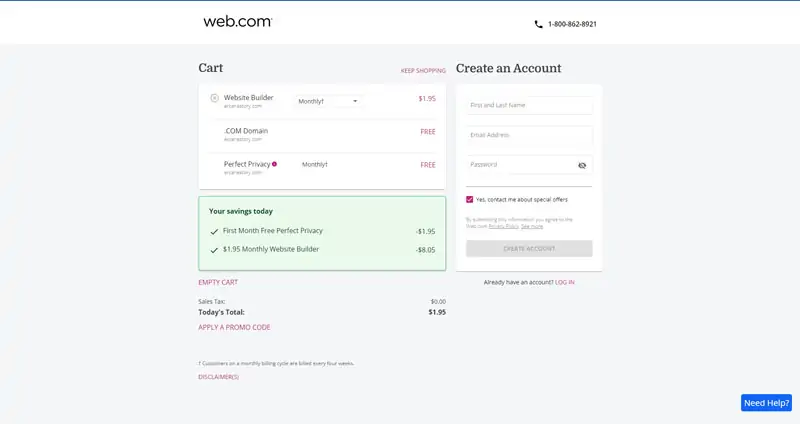
Enter your first and last name, email address, and a password. Web.com will automatically generate a suggested password or you can create your own. Then, click on the “Create Account” button.
The next screen will register your domain. Enter your name, street address, phone number, and email address, and then click on the “Continue” button.
You’ll then arrive on a payment screen. Enter your name and credit card information, and then click on the “Submit and Process Payment” button.
An order confirmation will then appear, including a purchase receipt and a note that you’ll receive your Web.com login instructions via email. Open the email from Web.com, and then click on the “Get Started” button. This’ll take you to a login page where you can enter your email address and password.
Web.com will then ask you to create a six-digit personal identification number (PIN). Enter it and click on the “Next” button. You’ll then need to enter your phone number and again click on the “Next” button. The site will then send a separate verification PIN to the phone number you entered. Enter the verification PIN, and then click on the “Verify” button.
Step 3: Choose a Website Template
After you verify your new Web.com account, you’ll arrive at the “Account Manager” page. At the top of this page, you’ll see a header with the Web.com phone number and a question mark you can click on to contact Web.com support. In the bottom-right corner, you’ll see a “Need Help?” button that also enables you to contact Web.com support.
Under the “Find All of Your Products Below” section, you’ll see these three links:
- My Domain Names: Click on this link to view information about your purchased domain and/or purchase more domains.
- My Email: Click on this link to access and manage your Web.com email.
- My Website Packages: Click on this link to open information about your Web.com plan and website details.
For now, click on the “My Website Packages” link or the “Website Packages” link in the left-hand menu. This’ll open a “Websites” page. From that page, you can click on the “Upgrade to Online Store” link to add an ecommerce plan to your account or the “Launch Website Builder” button.
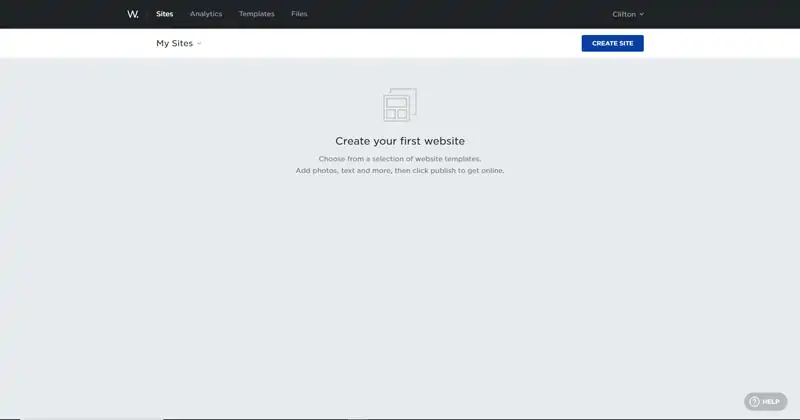
When you click on the “Launch Website Builder” button, a “Create Your First Website” page will open in a separate tab. Click on the “Create Site” button in the upper-right corner of that page.
You’ll then reach a page where you can choose a template for your website. Web.com groups its website templates into the following categories:
- All
- Businesses
- Services
- Personal
- Health
- Beauty
- Restaurant
- Portfolio

Choose the category that best suits your small business or browse the options in the “All” tab to see every template Web.com offers for your plan.
To preview a template, hover over it and click on the blue “View Template” overlay that’ll appear over the bottom of the image. You can choose to view a template in “Single Page” or “Multi-Page” versions by clicking on the tabs at the top of the preview window.
Once you choose the template you think will best fit your business’s needs, click on the “Create This Site” button in the upper-right corner.

Step 4: Edit Your Site
The “Site Editor” within the Web.com website builder will automatically open when you choose your template. A “Welcome” screen will pop up, offering tips to help you get started. Click on the “Get Started” button.
A short tutorial will then introduce you to some of the most commonly used aspects of the “Site Editor.”
You can now begin to edit the elements and layout of your website. You’ll want to enter new text, choose new photos, insert your logo, and make any other desired changes to the overall layout.
For an in-depth tutorial on how to make changes to your website, check out our How To Use Web.com guide.
Step 5: Preview and Publish Your Website
When you finish editing your website to your satisfaction, it’s time to go live.
First, preview your site to see how it’ll look to visitors. Click on the “Preview” button in the upper-right corner to open a preview window. You can now view your site as it’ll appear on a desktop computer, a laptop, a tablet, or a mobile phone. Just click on the corresponding icons at the bottom of the preview window.
If you feel satisfied with your website’s appearance, click on the “Publish” button in the bottom-right corner of the preview window.

Congratulations! Your site is now live and ready for visitors.
Final Thoughts
In an increasingly digital world, your small business website is critical to your business’s success. Web.com can help you create an eye-catching, easy-to-navigate website even if you have no coding experience.
Try Web.com
Now that you can see how easy it is to build a website with Web.com, it’s time to try it out for yourself. Get started with an hour of expert support by clicking the button below.