How To Use Zyro Business Email: A Step-by-Step Guide
Using Zyro to build your small business website will allow you to access many exciting web capabilities — key among them a professional business email account. A dedicated business email account appears more legitimate and trustworthy to customers and can help you build your brand. Zyro has partnered with the business email provider Titan to integrate email into its users’ new domains and websites.
This guide details how to use Zyro business email, including migrating existing email accounts, logging in to your Zyro business email account, sending and forwarding emails, and updating your settings and password.
Don’t have a Zyro account yet? Get started with Zyro for free so you can try Zyro for yourself!
What Is Titan Email?
Zyro partnered with the business email provider Titan to allow Zyro users to set up dedicated business email accounts. With a Titan professional email account, you can schedule meetings, manage contacts and your calendar, and gain access to 24/7 customer support. Each email plan comes with 10 gigabytes (GB) of storage.
An email address that uses your domain name, such as [email protected], presents a professional and legitimate image of your brand to the world. It also can help your business appear more trustworthy to potential and current customers. All users who sign up for an annual Zyro website builder plan have access to a free, three-month trial of Titan business email. After that, the Titan email plan will renew at $2.90 per month.
Both Zyro and Titan are standalone products you can use without the other. Titan email is available as an add-on to Zyro website plans.
Want to learn more about what Zyro offers at each premium plan level? Be sure to read our Zyro Pricing Guide.
Benefits of Using Titan Email
Having a business email account can help you build brand recognition and boost open rates for your emails. Titan email also gives you an interface with both browser and mobile capabilities so you can take your business email with you everywhere. Titan also offers a detailed contact list, allowing you to add phone numbers and company details to your email contact list.
In addition, your new Titan business email account comes with integrated video calling in the app. This enables you to conduct meetings with up to 50 people and no time limits.
Titan email also offers you the ability to “undo” a sent email just in case you ever need to rectify a mistake.
Getting Started With Zyro Email
As previously mentioned, you’ll automatically receive a business email account through Titan when you sign up for Zyro. If you want to take advantage of Zyro’s email offering, you can do so in six easy steps:
- Sign Up for Zyro
- Set Up Zyro Business Email
- Link and Migrate Existing Accounts
- Log Into Your Business Email Account
- Enable Mail Forwarding
- Change Your Password
Step 1: Sign Up for Zyro
When you sign up for Zyro, you’ll have the option to choose from among three different plan tiers: a website plan, a business plan, or an advanced business plan. While these yearly plans vary in capabilities, they all include a free subscription to Titan mail for the first three months.
Select the plan you wish to purchase and check out to complete the sign-up process. You’re now ready to start building your Zyro website.
Step 2: Set Up Zyro Business Email
Once you create your business website and you’re ready to set up your business email account, navigate to the “Email” page on the Zyro dashboard.
- Click on the “Claim Free Trial” button and then insert your existing domain — or purchase a new one.
- After setting up your domain, click on the “Manage Account” button.
- Click on the “Create New Email” button and follow the instructions to set up your email account.
Looking for more guidance on getting started with Zyro? Refer to our How to Make a Zyro Website guide for complete instructions.
Step 3: Link and Migrate Existing Accounts
If you have an existing business email account, you can migrate it to Titan mail so all your business correspondence comes to one inbox. Zyro also allows you to migrate messages and contacts into your new Zyro email account.
- Log into your Zyro account, navigate to the “Email” page, and then click on the “Manage Account” button.
- Select the “Import Email Data” tab, and then click on the “Import a Mailbox” button.
- You’ll then need to input the following details: an Internet Protocol (IP) address or Internet Message Access Protocol (IMAP) server, a remote server request, an IMAP port, a remote email address (your existing address), a remote email password (your password for that existing address), and your Titan/Zyro email address.
- Once you enter the necessary details, click on the “Begin” button to start your email migration.
Step 4: Log Into Your Business Email Account
When you’re ready to start using your new business email account, navigate to the Titan homepage and click on the “Sign In” button
- Input your email address and password, and then click on the ”Enter” button.
- From there, you’ll have access to your business email, calendar, and contacts.
Step 5: Enable Mail Forwarding
If you wish to use your Zyro business email account in conjunction with a Gmail, Outlook, or Apple Mail account, you’ll need to follow some additional steps to configure your mail forwarding.
For Gmail:
- Log into your Gmail account.
- Navigate to the “Cog” icon on the far right and click then select “Settings” from the drop-down menu.
- Navigate to the “Accounts” tab.
- Click on the “Check Mail From Other Accounts” option, and then click on the “Add a Mail Account button. A pop-up window will then appear.
- Enter the email address associated with your business, and then click on the “Next” button.
- Enter the Post Office Protocol 3 (POP3) settings for your domains as well as your Titan business email address, and then select “Add Account.” You should now see a message that says, “Your Mail Account Has Been Added.”
- If you’d like to continue setting up Simple Mail Transfer Protocol (SMTP), select “Yes” and then “Next Steps.”
- Enter the name from which you want your emails to appear, and then check the box next to “Treat as an Alias.”
- On the next page, enter your SMTP settings, fill in your Titan email address and password, and then click on the “Add Account” button. Next, you’ll need to verify your account.
- Gmail will send a verification code to your Titan email address. Input that code into the box on your Gmail page, and then click on the “Verify” button.
- Your Gmail account is now connected to your Titan email account.
For Outlook:
- Log into your Outlook account, and then navigate to the “File” tab.
- Click on the “Account Information” button, and then on “Add Account.”
- Enter your Titan email account information.
- When prompted, select “IMAP” as account type.
- Enter the password for your Titan email account again
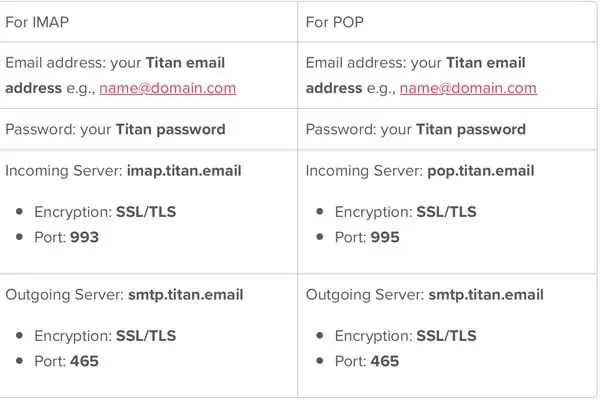
- Enter the configurations below to set up your incoming and outgoing email.
![How to use Zyro business email examples.]()
- Select “Require Logon Using Secure Password Authentication (SPA),” and then click on the “Next” button.
- Your Outlook account is now connected to your Zyro business email.
For Apple Mail:
Apple Mail comes with every Mac using OS X 10.0 or later.
- Click on the “Mail” icon in the dock at the bottom of your desktop screen, and then select “Add Account” from Apple Mail’s main menu.
- Select “Add Other Mail Account,” and then click on the “Continue” button.
- Enter the following login credentials:
- Your name as you’d like it to appear
- Your Titan email address
- Your Titan email address password
- Next, click on the “Sign In” button.
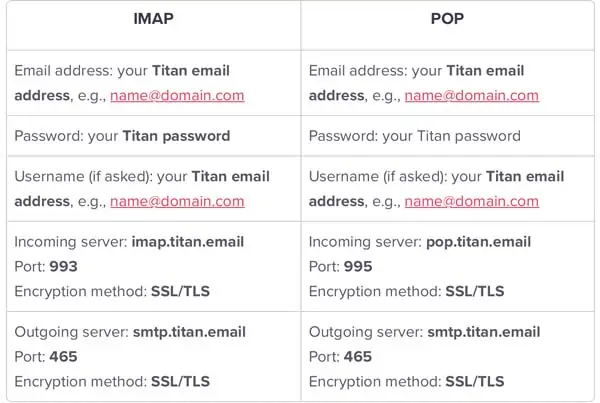
- You’ll then need to type in the following settings from the table below.
![How to use Zyro business email examples.]()
Et voila! You’re now ready to access your business email from your desktop.
Step 6: Change Your Password
You can edit your password and setting preferences through the Titan email dashboard. You’ll have two options: you can either make these edits as a non-admin or as an admin from the email control panel. As a non-admin, you’ll need to:
- Navigate to the “Settings” tab and open the “Preferences” menu.
- Select “Change Password” from that menu.
- Enter your old password, and then your new password.
- Log into your email account with your new password.
If you wish to change your password as an admin, you will:
- Log into Titan, and then click on the “Settings” tab.
- From the drop-down menu that then appears, select “Admin Control Panel.”
- You’ll now see a list of all the email addresses under your account. Hover your cursor over the one you wish to change and an option to reset your password will then appear.
- Enter an email address, and Titan mail will then send you a link to reset your password.
- Open the link, and then enter your new password into the field provided.
Final Thoughts
Following these six simple steps will allow you to set up and manage a business email account linked to your Zyro domain and website.
With Zyro business email, you now have capabilities to manage your email, calendar, and contacts all in one place.
Get Started With Zyro
Gain access to professional business email and other useful features when you build your website with Zyro. Get started with a free domain by clicking the button below.