How To Make a Zyro Website For Your Business
Few small business owners have extra time to spend creating a business website — or the budget to hire a professional designer to develop one. Fortunately, website-building tools make it possible to design a business website in an afternoon.
Established in 2019, Zyro is a relative newcomer to the website-creation market. The Zyro website builder enables you to create your business site in just a few hours using a premade, customizable template.
This guide will walk you through five easy steps to build and publish your website with Zyro.
Recommended: Zyro offers a 30-day money-back guarantee. Get started with Zyro.
Before You Begin
As a best practice, you should plan what you want your website to include — and how you want it to look — before you start building it out. While you can certainly begin the process without this step, a little planning will make it easier.
Think about how you want to present your business to the public in terms of your website’s appearance. With that goal in mind, you’ll find it easier to build something beautiful, functional, and representative of you and your business.
For help with planning, check out these articles:
5 Steps to Make a Zyro Website
Zyro makes it easy to get a professional website up and running. Follow these five simple steps to create and publish your business website in no time:
- Sign up for Zyro
- Choose a Zyro Template
- Customize Your Zyro Website
- Preview Your Zyro Website
- Publish Your Zyro Website
Step 1: Sign up for Zyro
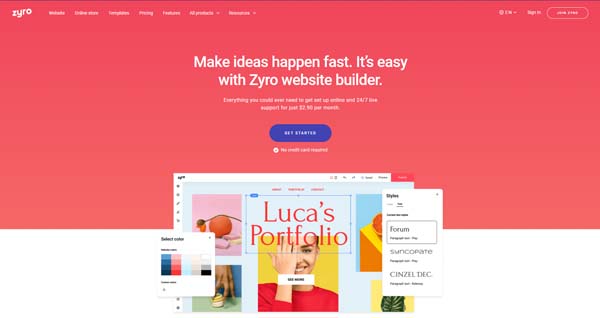
Go to Zyro.com and click on the “Get Started” button. Enter your email address, and then click on the “Continue” button. Next, create a password and click on the “Create Account” button.
Step 2: Choose a Zyro Template
After you create your Zyro account, you’ll reach a screen with three options: “Use a template,” “Use our AI website generator,” or “Import an existing website.” Note that the third option remains in the beta testing phase.
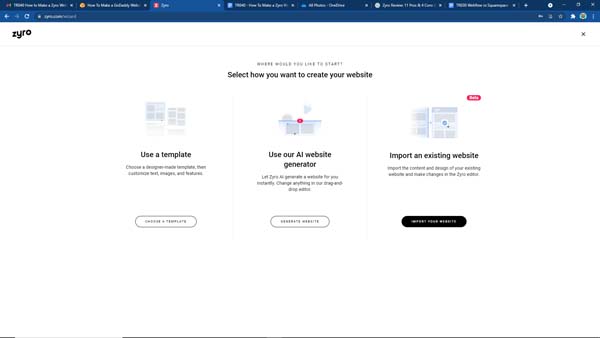
Most website-creation tools offer the first option in which users choose a premade template, and then adjust it according to their specific needs.
The second option is an artificial intelligence (AI)-generated template, you simply enter information about the kind of website you need and Zyro’s AI website generator creates a few templates from which you can choose.
Use a Premade Template
If you want to take the first option, click on the “Choose a Template” button. This leads to a page that presents a variety of responsive template options.
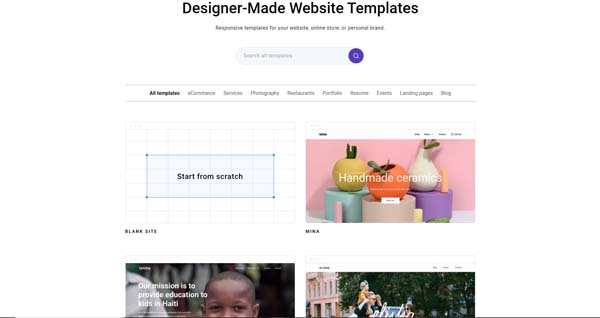
You can search through the available templates by keyword in the search bar at the top of the page or by industry via the tabs above the template images. You also can choose a blank template if you want to start from scratch.
When you hover over a template image, two buttons will appear: “Start Building” and “Preview.” To view the entire template, click on the “Preview” button. Once you select a template for your site, click on the “Start Building” button.
Use Zyro’s AI Website Generator
If you’d rather take the second option, click on the “Generate Website” button. This opens a page that asks, “What type of website are you building?” It also invites you to enter a website category in its search field. Find and click on the category that best matches your business.
The next page will then ask, “Which features should your website have?” It’ll also invite you to select all the functions you need.
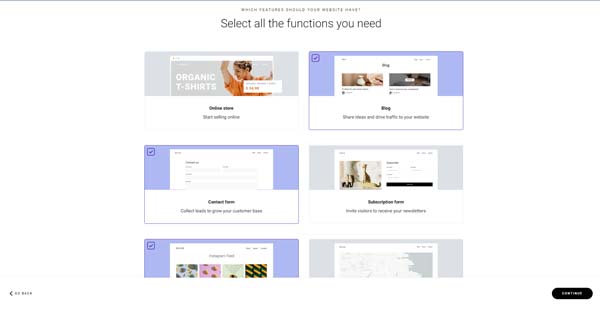
You can choose to add the following features:
- Online Store
- Blog
- Contact Form
- Subscription Form
- Instagram Feed
- Maps
- Video
Don’t worry if this list doesn’t include some of the features you want on your site; you can add more Zyro features at any time.
After you click on the checkbox in the upper-left corner of each feature you want your site to include, click on the “Continue” button in the lower-right corner.
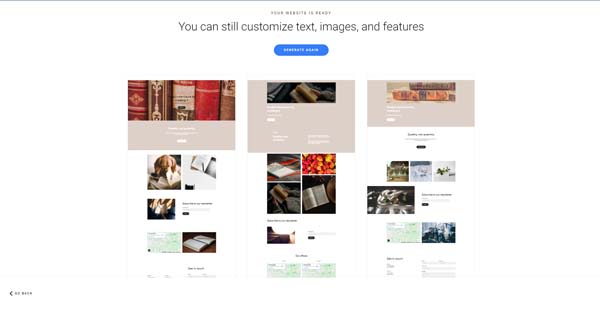
The next page will present you with three AI-generated site layouts. To select your preferred option, hover over it and click on the “Choose this design” link that’ll appear above that design.
Step 3: Customize Your Zyro Website
After you choose a template for your site, the Zyro website builder’s dashboard will automatically open. From there, you can change the current elements of your website and add new ones.
Change the Color Scheme
To choose a color scheme for your Zyro website, click on the “Paintbrush” icon — third from the top — in the dashboard’s far-left toolbar.
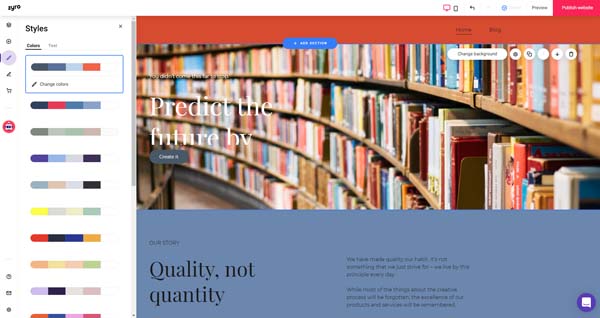
A “Styles” menu will then open with several color palette options. Click on the one you want to use, and then click on the “Change Colors” link that appears right below.
Want to learn more about color schemes for your website and branding? Check out our Great Website Color Palette guide.
Change the Font
To adjust the font used on your website, click on the “Paintbrush” icon in the dashboard’s far-left toolbar to open the “Styles” menu. Click on the “Text” tab at the top of this menu, and then click on your preferred font.
Haven’t picked out the right font for your website yet? Check out our guide to finding the Best Website Fonts.
Change the Header
To adjust your site’s homepage header, click on it to make four editing buttons appear.
Use the “Edit Navigation” button to make changes to the navigation bar.
Use the “Change Logo” button to add your business logo. Click on the slider next to the “Show Logo” link, and then you can drag and drop a logo image from your computer, search for a logo file on your computer, or choose a free image provided by Zyro.
If you don’t yet have a logo, Zyro’s Logo Maker will help you design one. Simply click on the link below the “Add Image” button.
The “Edit Styles” button (the one with a paintbrush icon) and the “Edit Header” button (the one with a gear icon) offer identical menus that allow you to adjust the layout, logo, and style of your header.
Change the Text
To update the text on your Zyro business website to align with your brand, click on a block of existing text, and then click on the “Edit Text” button that’ll appear above that block. From here, you can delete the existing placeholder text and type in your own text.
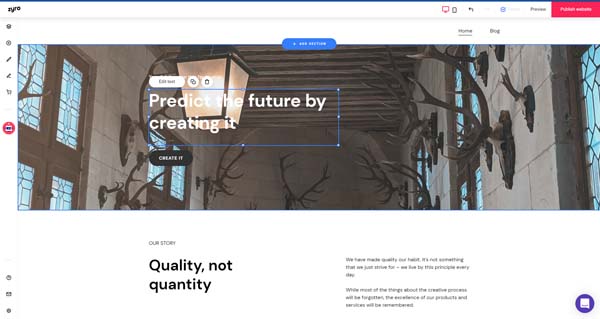
Repeat this process for all of the text blocks on each page of your website. Make sure to update the contact information and physical address details on your site so they accurately reflect your business.
Change the Images
To update the images on your business website to reflect your business’s brand, click on an image you want to replace, and then click on the “Change Image” button that’ll appear above that image. A small “Image Settings” menu will then open beside the photo.
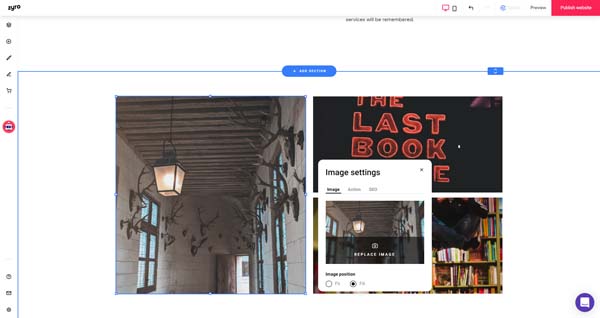
Click on the “Replace Image” button. This’ll open a window with two tabs. Click on the “Website Images” tab if you want to drag and drop a photo or browse for files on your computer. Click on the “Free Images” tab if you instead want to search through Zyro’s collection of royalty-free images for suitable photos.
Change the Backgrounds
You also can adjust the background of each block on your Zyro website. To do so, click on a background you want to change, and then click on the “Change Background” button that appears above that background. You can use either a solid color or an image as the background of each block.
To choose a solid color background, click on the “Background” tab in the “Section Settings” menu that appears after you click on the “Change Background” button. Under the “Color” tab, pick the shade you want to use.
To choose a background photo, switch from the “Color” tab to the “Image” tab, and then click on the “Add Image” button. You can drag and drop a photo, browse your computer for an image file, or use a free image provided by Zyro.
Add Sections
To add a section to any page on your website, hover your cursor near the border between the two existing sections where you want to insert the new section. Click on the “+ Add Section” button that’ll then appear.
This opens a menu of section types. Click on the type of section you want to add, and then browse through the premade layouts Zyro offers.
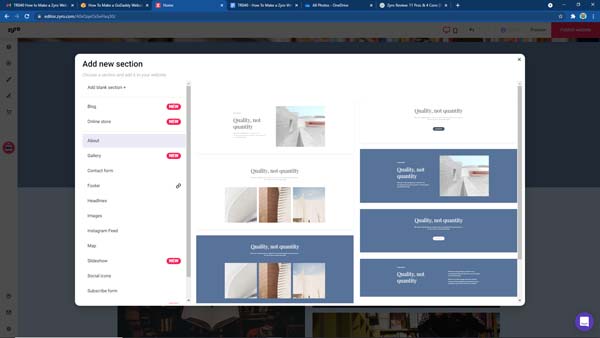
You also can add a blank section and customize it as you see fit.
Add Elements
To add elements to your site, click on the plus (“+”) icon in the dashboard’s far-left toolbar. Next, choose the type of element you want to add, drag it over to your page, and then drop it in your desired location.
You can add the following elements:
- Text
- Button
- Stripe Checkout
- Image
- Gallery
- Video
- Map
- Instagram Feed
- Contact Form
- Subscription Button
- Social Icons
- Embedded Code
Add Pages
To add a new page to your Zyro website, click on the “Pages” icon at the top of the dashboard’s far-left toolbar. The “Pages and Navigation” menu will then open. Next, click on the “Add Page” button at the bottom of this menu.
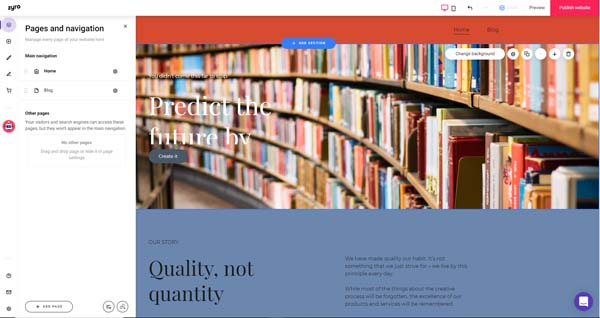
A new window will appear that’ll allow you to add a blank page or import one from another URL.
Add an Online Store
To add Zyro online store, click on the “Shopping Cart” icon in the dashboard’s far-left toolbar. The “Online Store” menu will then open. Next, click on the “Add Store Page” button on this menu to add an online store as a separate page within your site.
Step 4: Preview Your Zyro Website
Before you publish your website, you should first check how it’ll look to visitors. To do this, click on the “Preview” button in the upper-right corner of the dashboard. This action displays your site as it’ll appear to visitors using a desktop computer.
To see how your website will appear on mobile devices, click on the “Cell Phone” icon in the dashboard’s upper-right corner.
If something doesn’t look right or work as planned, return to the dashboard to make the necessary changes. Then, preview and check your site again.
Step 5: Publish Your Zyro Website
When you’re satisfied with the appearance and content of your site, it’s time to go live. To do this, click on the “Publish Website” button in the upper-right corner of the dashboard.
The Zyro website builder allows you to create a website for free, but you must purchase a Zyro plan in order to publish your site. If you haven’t chosen a plan yet, Zyro will prompt you to do so at this point.

Choose Your Plan
Click on the “Choose a Plan” button. A page listing the plan options and their included features will then open.
Zyro offers four plan tiers: “Basic,” “Unleashed,” “Ecommerce,” and “Ecommerce Plus.” With the exception of the Zyro Basic plan, each plan includes a free domain for one year. Choose a plan that fits your budget and needs, and then click on the “Select” button for that plan.
You’ll then arrive at a page that asks you to choose a subscription period. You have four options: four years, two years, one year, or monthly. Monthly subscriptions don’t include a free domain for a year.
Click on the checkbox for the subscription period you want to purchase, and then click on the “Continue to Payment” button at the bottom of the page. Enter your payment information on the next page, review your cart to ensure everything is correct, and then click on the “Pay Now” button.
To find out more about Zyro’s pricing and features, be sure to read our Zyro Pricing and Plans guide.
Choose a Domain Name
Next, the Zyro website builder will take you to a page where you can choose a domain name. Enter the domain you want to use in the search bar. If it’s unavailable, Zyro will notify you.
Once you find an available domain, Zyro will attach it to your website.
Publish Your Site
At this point, your site is ready to go live. on the “Publish Website” button in the upper-right corner of the dashboard. Congratulations! Your site is now live on the internet. Visitors can view it, and you’re ready to attract new customers with its quality content.
Final Thoughts
In just a few hours, you can create an attractive, easy-to-navigate website that’ll help your business increase its brand awareness and attract new customers. With Zyro, you can get back to running your business.
Get Started With Zyro
Zyro is incredibly easy to use and offers several useful tools for small business owners looking to create a stunning business website. Get started with a free domain name and a money-back guarantee by clicking the button below.
