How to Add Ecommerce to Zyro — Zyro Ecommerce Guide
When it comes to setting up your small business website, it’s important to know where to begin. The Zyro online store has a variety of features you don’t want to miss, including easy inventory tracking, eye-catching website templates, and 24/7 customer support.
In this article, you will learn how to set up Zyro’s ecommerce offerings. Read on to learn about each step and get your business website started today.
Recommended: Don’t have a Zyro website for your business yet? Get started with Zyro for free.
The 6 Steps to Start a Zyro Online Store
If you’re looking to create an online store, Zyro has you covered. Follow these six steps to set up a successful online store with Zyro.
- Sign up for Zyro
- Build Your Zyro Website
- Create Your Online Store With Zyro
- Publish Your Zyro Website
- Promote Your Store
- Use the Zyro Store Manager
Along with this Zyro ecommerce guide, use these other helpful articles to understand whether or not Zyro is the right tool for you and your business:
Step 1: Sign Up for Zyro
To sign up for Zyro, simply head over to Zyro.com and click on the Get Started button. Enter your email address, and then click on the Continue button. Next, create a password and click the Create Account button.
While signing up is free, you’ll need to select the Zyro Business plan to create your store and use the ecommerce tools.
Getting Started With the Zyro Business Plan
For small business owners looking to sell products with Zyro, you’ll need to sign up for the Zyro Business plan. Additionally, if you anticipate a high number of daily visitors to your business website, this plan is a good choice. With Zyro’s ecommerce tools, you can quickly start selling physical or digital products on your business website.
The Zyro Business plan includes:
- Free Domain for one year
- Free Email for the first three months
- 24/7 Customer Support via live chat, email, FAQ page, and more
- Marketing Integrations from Google Analytics, Meta Pixel (formerly Facebook Pixel), and more
- Sell Up to 100 Products on your business website
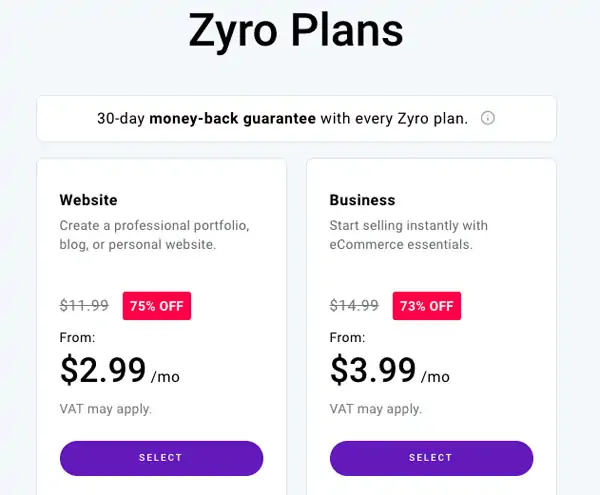
To sign up for the Zyro Business plan, you can select the Business plan on Zyro’s main page, or click on Subscriptions at the top of the page once you have signed into your Zyro account.
To learn more about what Zyro offers at each plan tier, be sure to read our Zyro Pricing and Plans guide.
Step 2: Build Your Zyro Website
Whether you’re interested in designing a website mostly from scratch or looking for an excellent template with little need for adjustment, Zyro has an option for you. While Zyro does offer specific Ecommerce Templates, you can easily add your store to any of Zyro’s website templates (see how to do this in part three, Create Your Store, below).
To begin building your website, sign in to Zyro and select Get Started in the center of your dashboard.

From there, you will select how you would like to create your website: Use a template, Use our AI website generator, or Start from scratch.
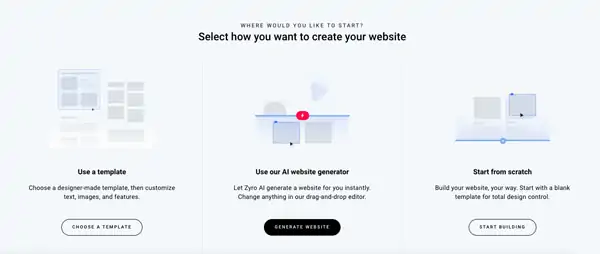
Zyro offers a wide variety of templates for any small business website. Check out How to Make a Zyro Website for a step-by-step look at customizing your website and using Zyro’s drag-and-drop features.
Step 3: Create Your Online Store With Zyro
To create your store:
- Select the Online Store section on the left side of the page.
![How to add ecommerce to Zyro]()
- Type in your store name and click Continue.
- Select your country and preferred currency for your store. Click Continue.
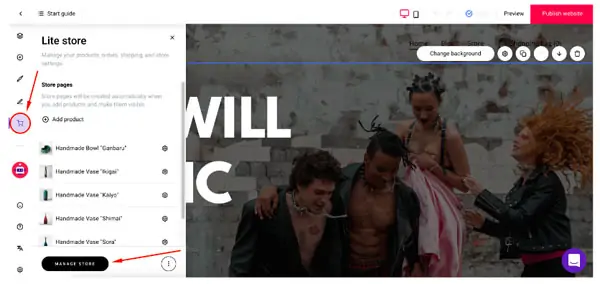
Once you have completed this final step, your store has been created. You’ll continue on to your Store Manager page, where you will find all the tools you need to complete your online store.
Add Products
To create and add products to your store, open the Products section in your Store Manager.
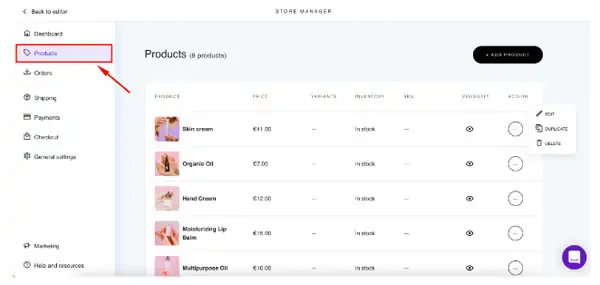
- Click Add Product. You can also upload a product image.
- Choose the product type: Digital, Service, Donation, or Booking.
- Enter the product title. Here, you can also add a subtitle and description.
- Enter the product price.
- If the product is a digital file, upload the file.
- Click Save.
A new product page is automatically created for each new product you add.
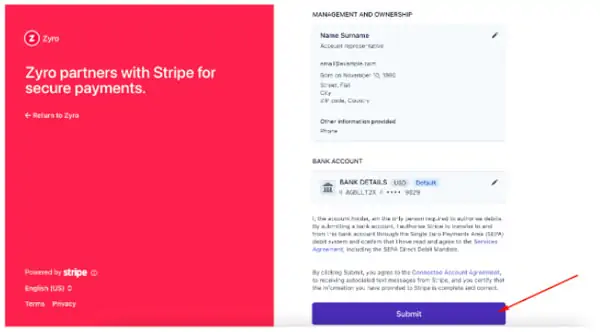
Connect Payments
To connect payments, click on the Payments tab in your Store Manager. From there, click on the Connect button.
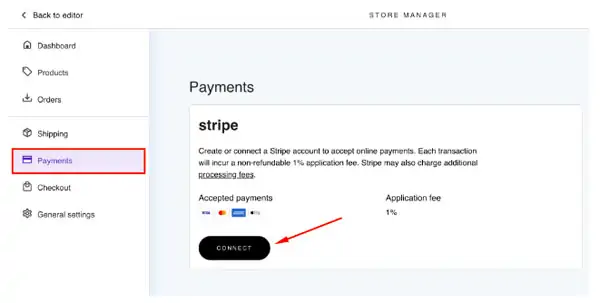
Once you have selected Connect, you will be prompted to either log in to your Stripe account or create a new account for free. Follow the steps on the screen.
When you have entered the necessary information, review the details and click Submit.
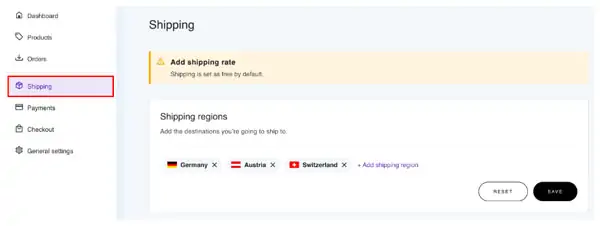
Connect Shipping
The default setting for your Zyro shipping options is free shipping to all regions. To specify the countries your store will ship to, select the Shipping tab and click Add Shipping Region.
While you are only able to select one region for your shipping settings, you can add as many countries as you would like to the designated region.
Step 4: Publish Your Zyro Website
In order to start selling, you must first publish your website. Complete the following steps to get your online business website live and accessible to customers.
Add a Domain Name
All annual Zyro plans come with a free domain. To claim and add your free domain name, select Domains and click on Get A Domain.
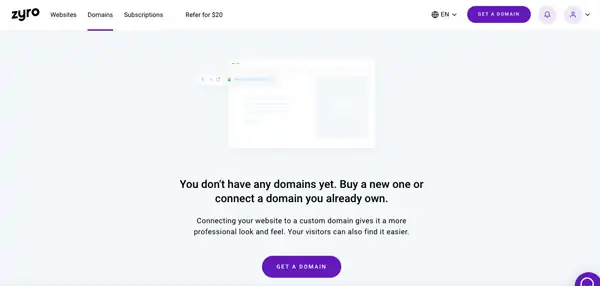
If you would like to continue with a free domain after your initial free domain period, you’re welcome to use a free Zyro subdomain.
If you’re not sure which domain name to choose, we suggest taking a look at our How to Choose a Domain Name article, or use our Domain Name Generator.
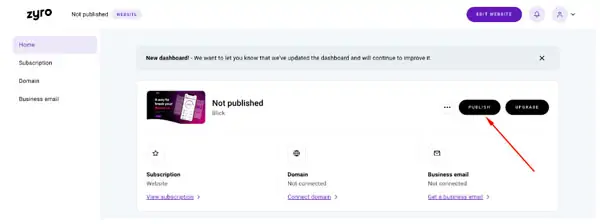
Publish Your Online Store
Once you have completed the above steps, you are ready to publish your online store.
- On your Store Manager, select Websites and click on Manage.
![How to add ecommerce to Zyro]()
- Click Publish.
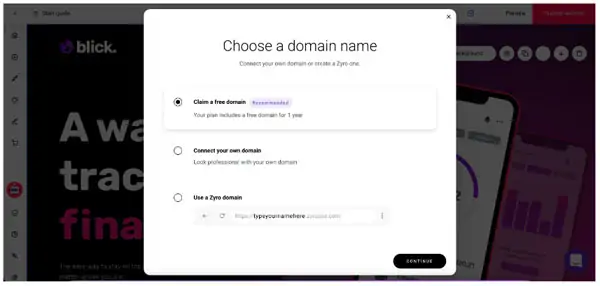
![How to add ecommerce to Zyro]()
- Here, you will be asked to connect to a domain. Once your domain is fully connected to your website template, your website will be published.
![How to add ecommerce to Zyro]()

If you are connecting a domain to a website for the first time, it will typically take up to 24 hours for the website to appear online.
Step 5: Promote Your Zyro Store
Zyro’s social media marketing features are there to help you promote your small business to a wider audience. With Zyro, you can easily connect your online store to popular marketplaces like Facebook and Instagram.
New to social media marketing for your small business? Be sure to read our in-depth guide on Social Media Marketing to get off to a great start.
Selling on Facebook
Follow the steps below to connect your store to Facebook.
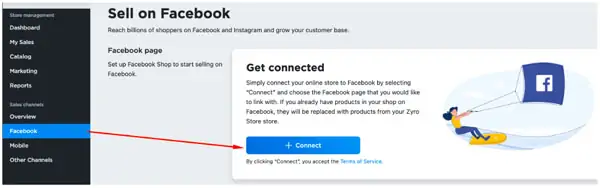
- Head over to your Store Manager page. Select the Facebook tab and click Connect.
![How to add ecommerce to Zyro]()
- A pop-up window will prompt you to log in to your Facebook account (or continue with your account if you are already logged in).
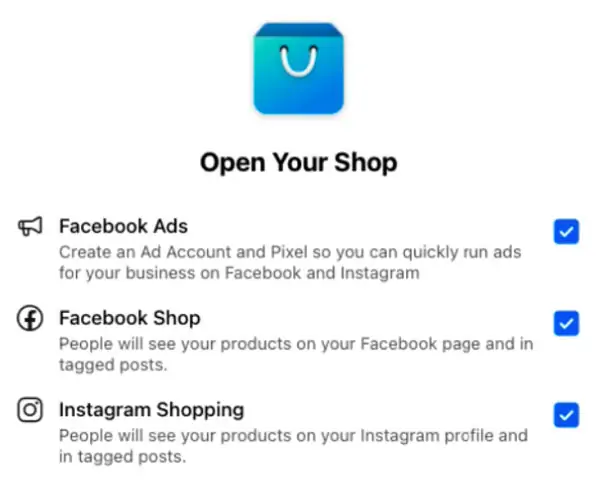
- Once logged in, the Open Your Shop page will appear. Be sure to tick the following checkboxes: Facebook Ads, Facebook Shop, and Instagram Shopping. Then, click Get Started.
![How to add ecommerce to Zyro]()
- Select your Business Manager Account and click Continue. If you don’t have a Business Manager Account, click Create New and follow the prompts.
- Next, choose the Facebook page you want to connect to, and click Continue. You can also connect other accounts at this time — be sure to add your product catalog.
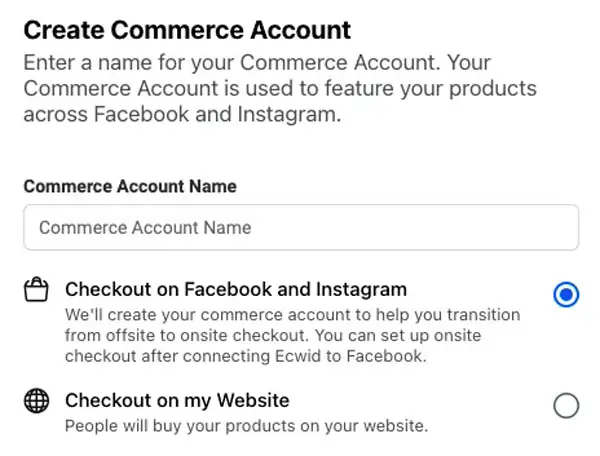
- Enter a name for your Commerce Account. Click Continue.
![How to add ecommerce to Zyro]()
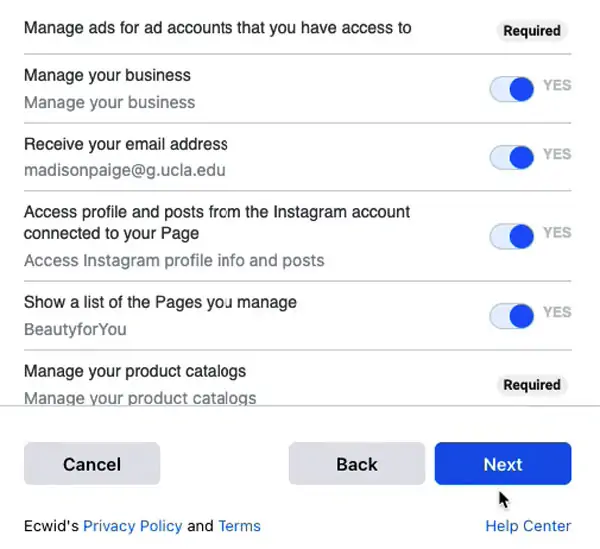
- Once you have confirmed the details for your Commerce Account, you will be asked to manage Zyro’s permissions. Zyro recommends using the default settings to ensure your store works properly. Click Next.
![How to add ecommerce to Zyro]()
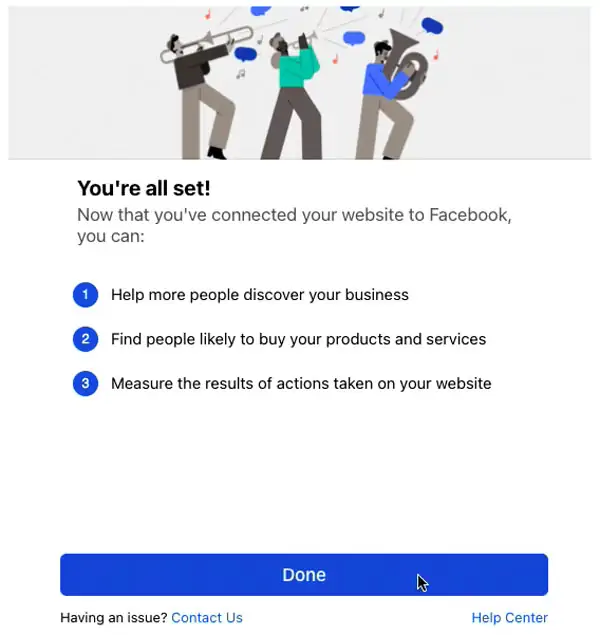
- Once your Zyro store is linked with Facebook, click Done.
![How to add ecommerce to Zyro]()
Before your store can appear on Facebook, it needs to be approved. Approval can take up to 48 hours. Once your store is approved, your products will appear on the Facebook Shop section of your Store Manager, and customers will be able to shop.
Your Facebook product catalog will automatically sync every 12 hours with your Zyro store. And you can always immediately sync your products by opening the Facebook tab of your Store Manager and clicking Sync Products.
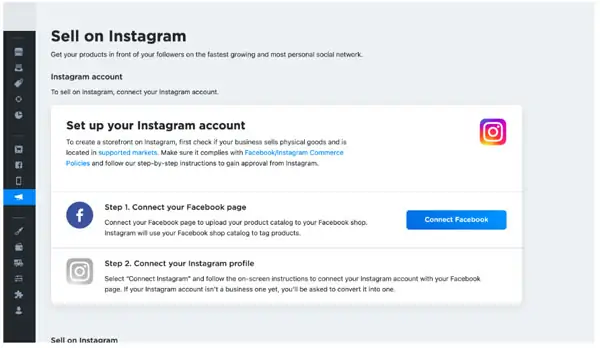
Selling on Instagram
Before you can connect your store to Instagram, you’ll need to make sure your Facebook Shop is set up, and your Instagram account is converted to a business profile. Once you have completed these steps, you can follow the instructions below.
- In your Store Manager, select the Sales tab and click on Sell on Instagram under Other Channels.
![How to add ecommerce to Zyro]()
- Next, click the Connect button to connect your Facebook and Instagram accounts to your Zyro store.
Once you have connected your accounts to your Zyro store, Instagram will automatically begin a review process for your store. This process can take from a few days to a few weeks. When your account is approved, you will receive a notice on Instagram letting you know you can begin tagging your products. Be sure to enable product tagging once your account has been approved.
Step 6: Use the Zyro Store Manager
Your Zyro Store Manager is where you can find everything you need to run your online store. On the left side of the screen, users can access their store’s Products, Shipping, Payments, and more.
Manage Inventory
To track your store’s product inventory, you’ll need to specify the stock quantity in the product settings.
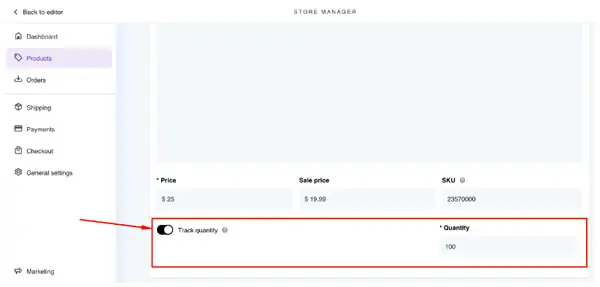
The amount shown will automatically reduce with every sale. Once the product is sold out, customers will not be able to add the product to their cart, and the Add to Bag button will automatically be disabled.
Manage Orders
You can see all of your orders on the Orders page. To view more details about an order, click on it. Once you click on the order, you will be able to:
- Change the order status
- View the order details, shipping details, and client’s contact information
- View and print the order receipt

When a new order is placed, you will automatically receive a notification email (sent to the email address listed in your store’s general settings). Your customers will also receive an email once they have successfully submitted an order.
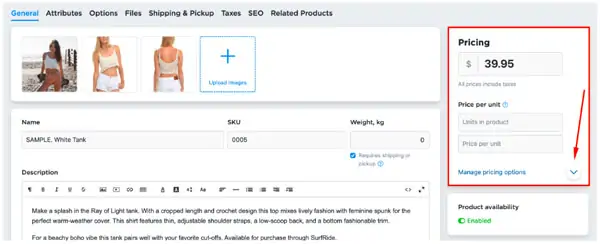
Manage Prices
To change a product’s price, click on the Products tab, select the item you want to adjust, and click Edit. Zyro offers more pricing options like “compare to” pricing, bulk discount pricing, and “pay what you want” pricing. To access these pricing options, click Manage pricing options and select your preferred option.
For a more in-depth look at how to use the Zyro dashboard, be sure to read our How to Use Zyro article.
Moving Forward
Congratulations! You have successfully set up an online store with Zyro. If you want to change your site’s appearance or add new products, now you know how to utilize Zyro’s website building and ecommerce features. We recommend bookmarking this page so you can return to it should you ever need to troubleshoot your online store.
Build Your Online Store With Zyro
As you can see, Zyro comes with tons of features allowing most any small business owner to add ecommerce functionality to their website with ease. Get started for free by clicking the button below.