How to Build a Website for a Local Business
As a local business owner, having a website is key to expanding your reach. But building a business website can seem quite challenging, especially when you factor in time, cost, and technical knowledge.
Knowing where to start, which website builder is best, and what tools to use will help you gain the confidence to launch your own site, without needing any coding skills or hiring a fancy designer.
This guide will take you through the process of signing up for the right business website builder and publishing your professional business website in just a few steps. For further resources, be sure to check out our Best Website Builder Review guide to learn more.
Recommended: GoDaddy is our website builder of choice for local businesses, get started with a GoDaddy free trial.
How to Use This Guide
This guide will walk you through the steps required to properly get your website off the ground. The necessary main steps are:
- Determine the goals of your business website.
- Select a business website builder. Our recommended builder for local businesses is GoDaddy.
- Identify the pages that your website needs and begin building.
- Find any additional tools that will help you keep track of or expand your website.
We recommend that you bookmark this page while building your business website to use as a reference.
What Is the Goal of Your Website?
The first step of building any business is finding the goals to help you thrive. These goals generally concern what your business aims to do and how you can best go about providing this service. Having these goals will help you decide the design of your website, but will also aid in measuring your overall success.
For a deeper look into how to find the goals of your business and website, check out our What Makes a Good Website guide.
Identifying Your Business’s Goals
For a service-based business owner, your goals might seem fairly straightforward. If you’re an auto body shop or mechanic, your goal is to provide repair services to locals for their vehicles. However, incorporating a sense of longevity and trust is also important.
Cultivating a secure base of returning customers is an important goal. Not only will these individuals remain loyal to you and your services, but happy customers are one of the best ways to organically spread the word about your business. This will help feed into another good goal to have — reaching new clients. Expanding your client base will help your business reach new heights.
Business goals can also include sustainable and environmentally-friendly practices, the desire to open more locations for your business, and finding ways to give back to your local community. All of these easily tie into the main goal of securing a base of customers who will keep your business growing.
Using Your Website to Accomplish Your Business Goals
Once you identify your website and business goals, it will be significantly easier to figure out how to use your website to achieve them. Even if you do the majority of your business in-person, having a website that accurately and effectively represents you and your services will make new customers feel welcomed and comfortable.
There’s several ways to use your website to accomplish your goals. From providing customer reviews, ways to contact and reserve services, to facilitating an online chat to answer questions. All of these tools are vital to encouraging customers to have confidence in you and try your services.
Having a professional website to achieve your goals can sound like a giant concept. But, once you understand the symbiotic relationship of your website and business goals, figuring out how to make the best website to support this will come naturally.
For a deeper look at finding the goals of your business and website, read our What Makes a Good Website article.
Which Website Builder Is Best ?
There are a few popular website builders nowadays, like Wix, GoDaddy, and WordPress. Choosing the best website builder is difficult, check out our Best Website Builder Review to learn why we’ve chosen GoDaddy for this particular type of website.
| Best Website Builders | |
|---|---|
GoDaddy
4.7/5 |
Best Website Builder Overall
|
Web.com
4.5/5 |
|
Squarespace
4.4/5 |
|
|
Wix
4.4/5 |
|
Shopify 4.3/5 |
Best for Ecommerce
|
WordPress 4.1/5 |
|
Working With GoDaddy
For a local, service-based business, we recommend using GoDaddy to create your ideal website. Not only is GoDaddy one of the more affordable website builders around, its all-in-one approach to providing most everything your website will need makes it incredibly easy to use.
In reality, you can have a functioning website in a matter of minutes with GoDaddy. Adding specific content is a breeze, and it has intuitive features like scheduling widgets and sitewide analytics that directly relate to the needs of a service-based business. Check out our GoDaddy review to learn more.
How to Build a Local Business Website With GoDaddy
It’s easy to get started with GoDaddy. This next section will walk you through the process of signing up for a GoDaddy account and getting familiar with the basic controls of the builder.
For an in-depth look at how to get started with GoDaddy, check out our How to Make a GoDaddy Website guide.
Getting Started With GoDaddy
The first part of getting started with GoDaddy is the simple and quick sign-up process. We’ll walk you through this and help you get comfortable using the GoDaddy dashboard and main controls.
Having a domain name ready to go will help make this process easier. If you need help finding yours, use our domain name generator to help choose a domain for your business.
Signing up with GoDaddy:
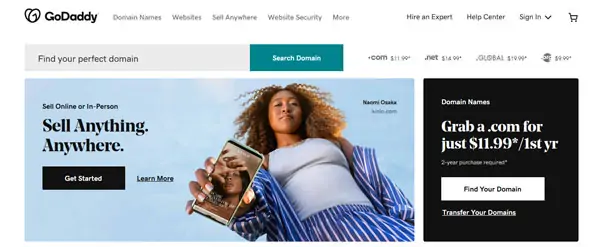
- Head to GoDaddy and click the “Start for Free” button.
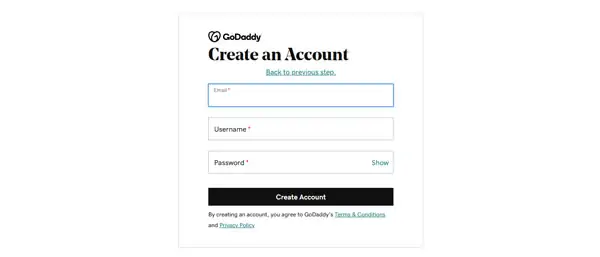
- From here, a screen gives you the option of creating an account using your Facebook, Google, or your Email information. For the sake of this tutorial, we will choose “Continue with Email.”
- Next will be a screen where you can enter your email, username, and password. Fill these boxes in and click the “Create Account” button.

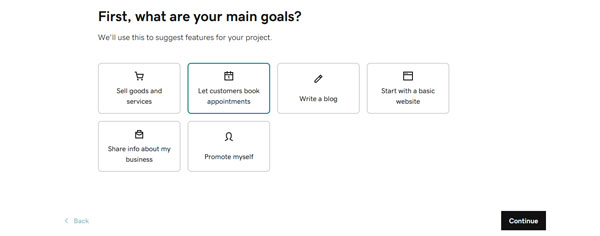
- You will then be asked about the goals of your website. Since this tutorial is for a local, service-based business, we are selecting “Let Customers Book Appointments.” Make your selection and click “Continue.”
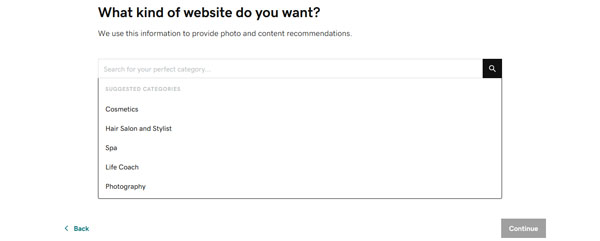
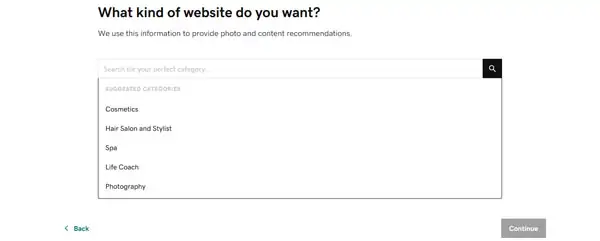
- On the next page you will be asked what type of category your service business website will best fall under. GoDaddy will offer several suggestions, and a search bar is provided if your business or industry isn’t immediately displayed. For this guide, we selected “Hair Salon and Stylist.” Click the “Continue” button when you’ve made your choice.
- You will then be asked to type in the name of your store and website. Don’t worry, it’s easy to update this section later should you ever need to. Click the “Continue” button when you’re ready to move forward.
- GoDaddy will then create a mock website filled with stock images based on the industry you chose.


Congratulations, you’ve got a GoDaddy account and are ready to begin editing your site! Next, we will show you how to get comfortable using the GoDaddy website dashboard and builder.
Using the GoDaddy Website Builder
Within the GoDaddy site editor it’s easy to update any content to match your brand. This will be a brief overview; for a more detailed guide on how to get the most out of the GoDaddy website builder, read our How to Use GoDaddy article.
Using the GoDaddy site editor:
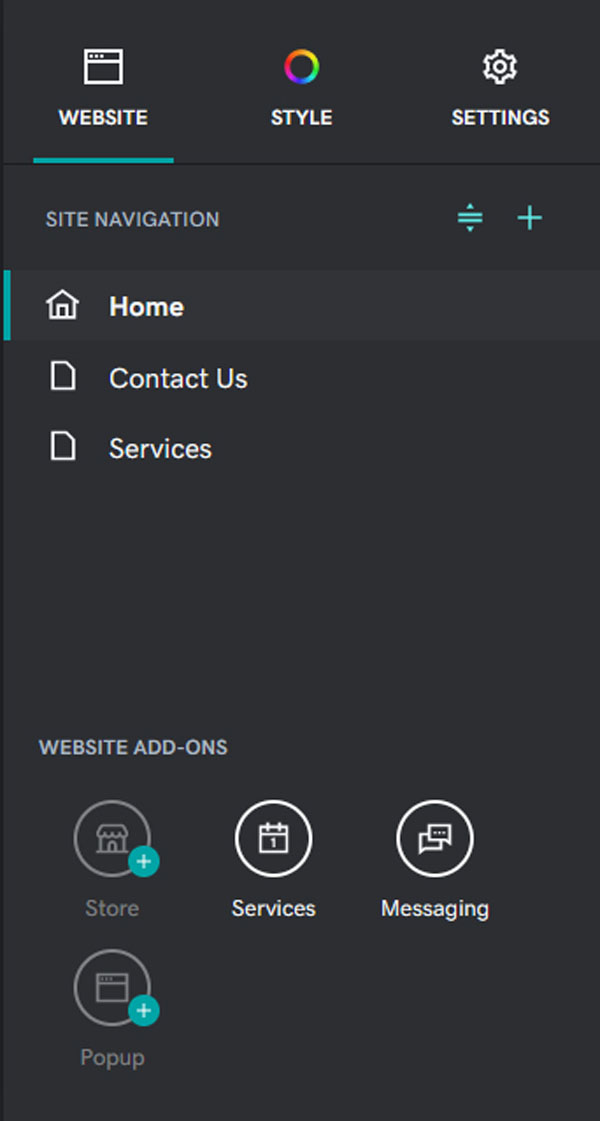
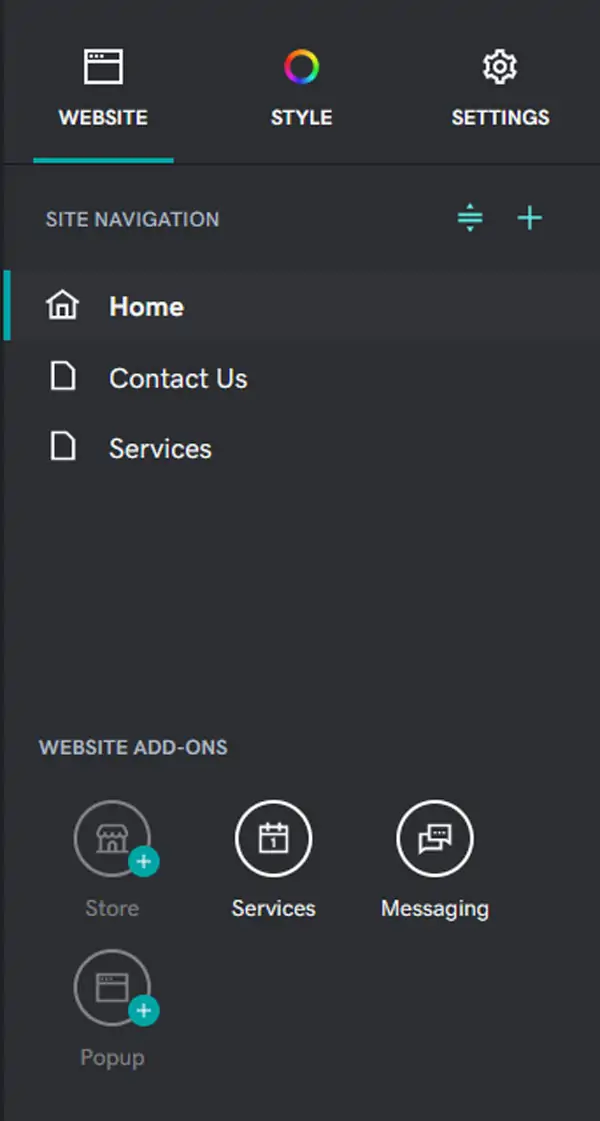
- There are several ways to navigate the GoDaddy site editor. Using the right-side menu, you can quickly alter the style of your website, adjust settings, flip between which pages are being edited, and include website add-ons.
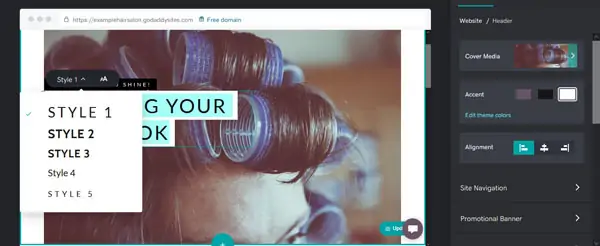
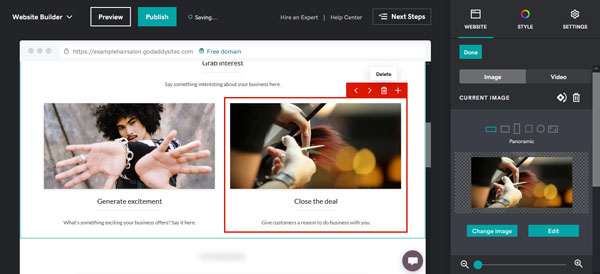
- Editing text or images within the GoDaddy website builder is as easy as clicking on any element you wish to alter. To edit text, simply click the text you’d like to update. This will open a new menu on the right-side of the GoDaddy site editor, allowing you to update font alignment, accent colors, text, and more.

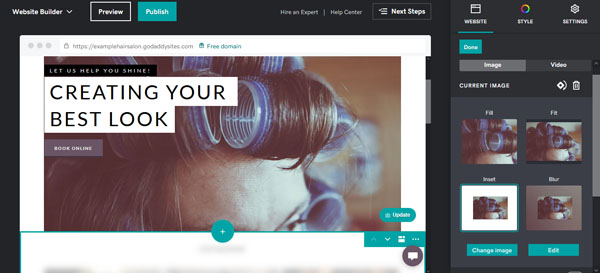
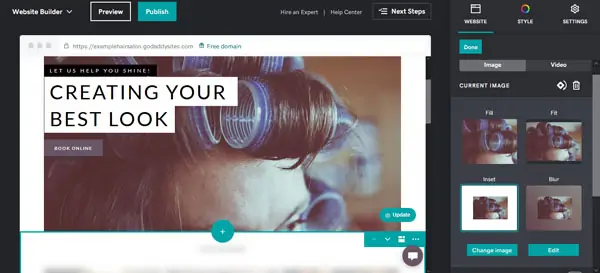
- To update images click on the blue “Update” button in the bottom right corner of any image. This will open a video and image editor within the right-side menu of the GoDaddy site editor. From here you can adjust the layout of the current image, upload a new image, and include an image description.
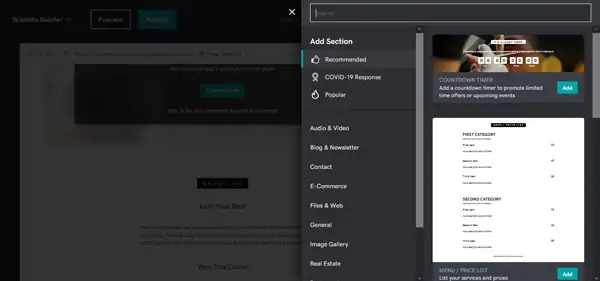
- To add a new section, hover over any blue “+” between sections until “Add Section” appears.

- Click this “Add Section” button to be taken to a menu where you can choose from different types of sections to place, as well as peruse visual examples of each.
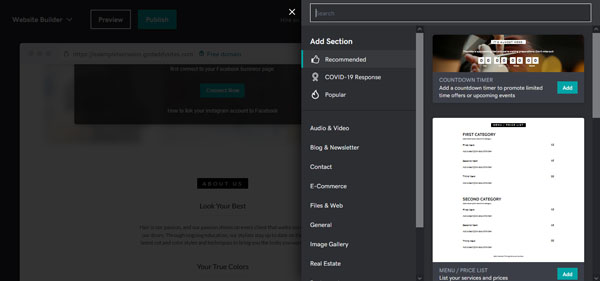
- Once you’ve found a section you like, click the blue “Add” button to instantly place it on your site.
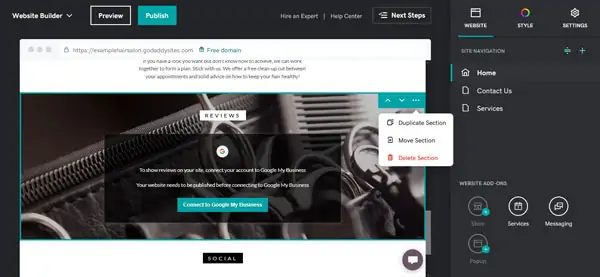
- To move a section, hover over the section to highlight it. In the right-hand corner of the highlighted section you’ll find up and down arrows. Clicking on either of these will move this section further above or below other existing sections on the page.
- To delete a section, hover over the section to highlight it. In the same right-hand corner as the arrows, there will be three dots. Select these to open a drop-down menu. From here you can duplicate this section, move this section, and at the bottom will be an option to delete the section.
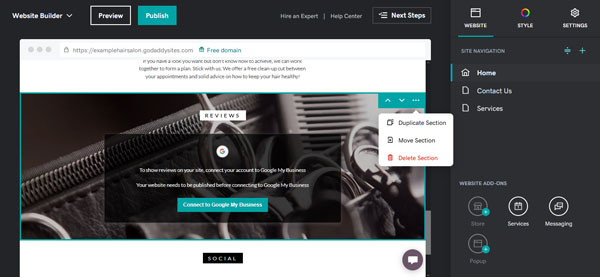
- Clicking “Delete Section” will open a pop-up window confirming you want to remove this section. Press the red “Delete” button to complete this process.
Now that you’re more familiar with some of the basics of the GoDaddy website builder, play around to keep getting a feel for it. To help you with this, we’ll walk you through how to add four essential pages with helpful tools to your new website.
What Pages Does a Local Business Website Need?
Almost every local business website will need a Homepage, Contact Us page, About Us page, and a Services page to get started. This section will cover setting up these necessary pages, as well as how to find essential tools to really make them shine.
Homepage
Your homepage provides the first impression of your website and business, make sure it is effective and has everything it needs. We’ll walk you through how to create a homepage and connect essential tools to make it pop.
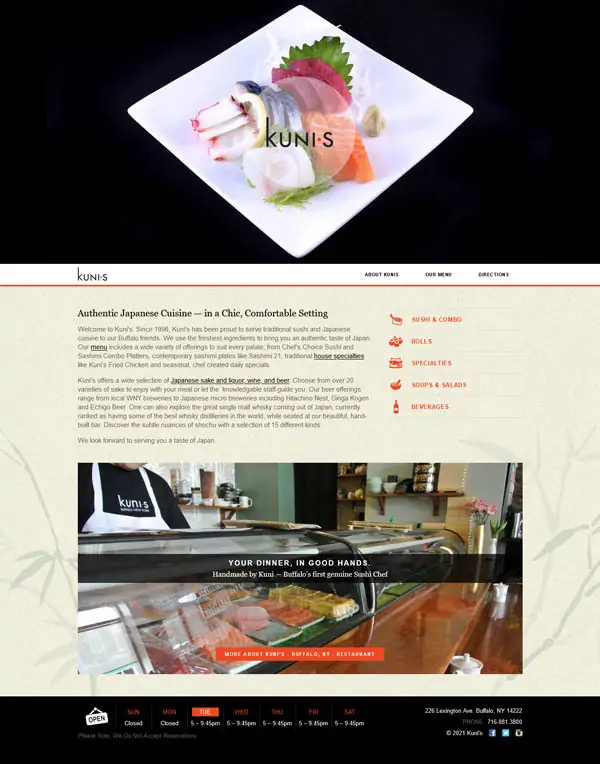
Below is an example of a successful homepage built with GoDaddy for a Buffalo, New York local restaurant, Kuni’s. For a deeper look on what makes this homepage successful, and how to make yours the best it can be, read our How to Design a Successful Homepage article.
How to create a Homepage with the GoDaddy website builder:
- Within the right-side menu of the GoDaddy site editor, make sure “Home” is selected. This allows you to edit the homepage of your site.

- Select the subhead text of “Let us help you shine” and update it to fit your specific brand.
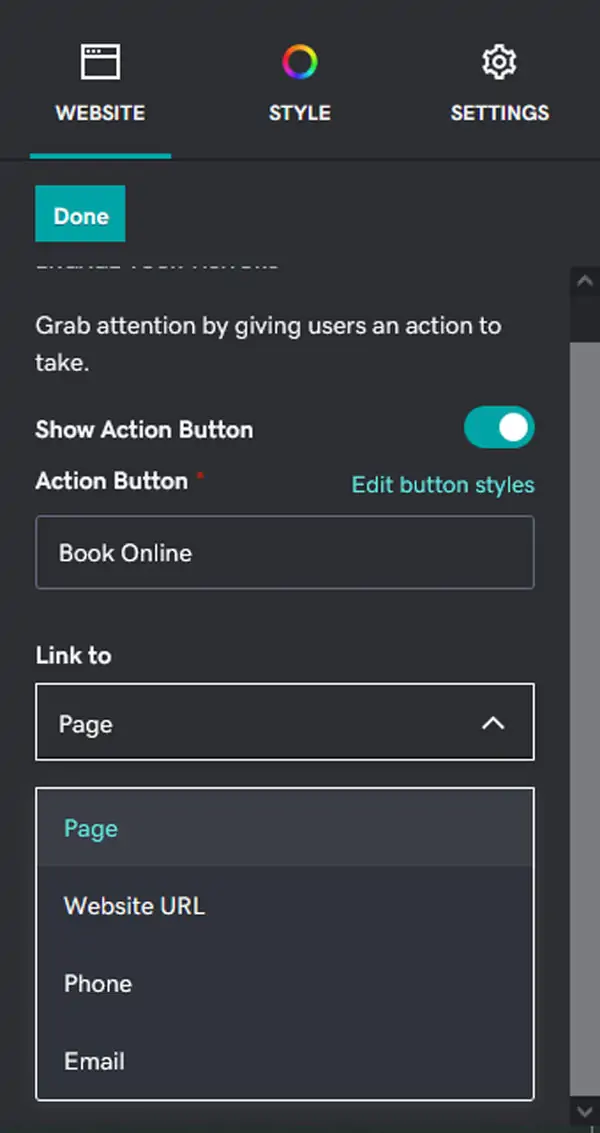
- Alter the headline text below this by clicking it and typing a strong call to action (CTA) to encourage customers to book with you.
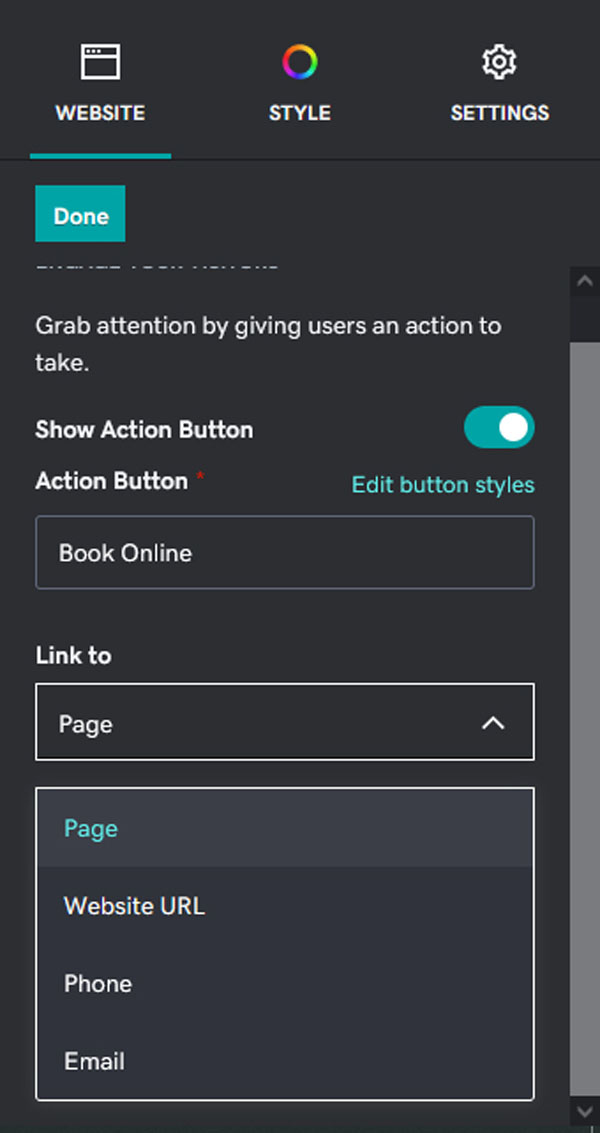
- Click the “Book Online” CTA button to open a corresponding menu within the right-side of the GoDaddy site editor.
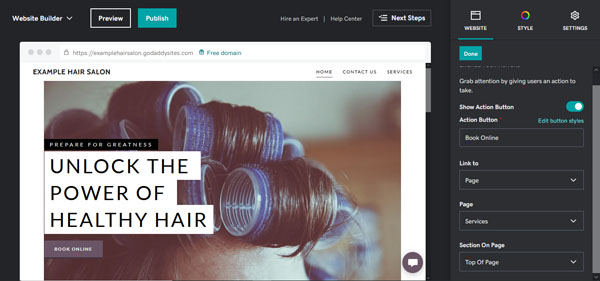
- Within this right-side menu, you can alter the text of the CTA button and where it links to. The default settings of this button take visitors to the top of your “Services” page. To update where this button links to, simply click on the down arrows within any section to find alternatives.
- Once you’ve updated this button, select the “Done” button at the top of the right-side menu.
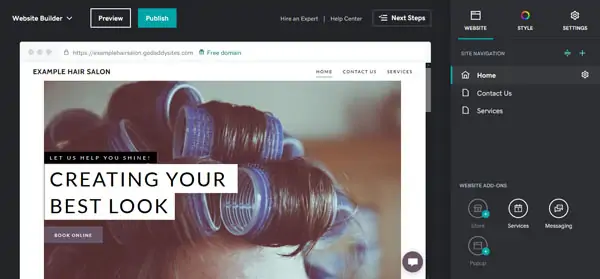
- Continue scrolling down within your GoDaddy site editor to update other portions of your homepage. Click to edit portions, delete and add sections, and any other actions you may need to take.

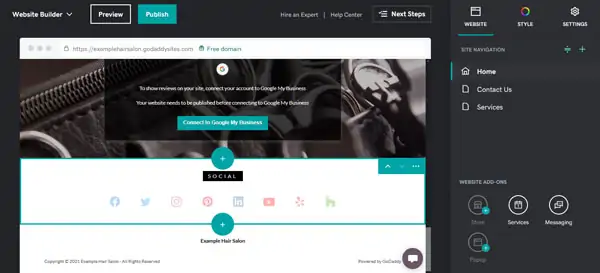
Now that you have the basics, we’ll walk you through adding several essential tools to your homepage. These will include connecting an Instagram account, linking social media icons, and adding a chat box feature.
Adding essential tools to your homepage:
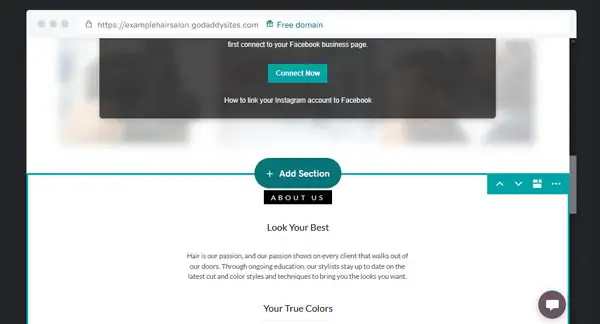
- Within most any GoDaddy template for a service-based business, there should be a section to connect Instagram already included. If not, follow the instructions for adding a new section and place a “Social” section within your homepage.
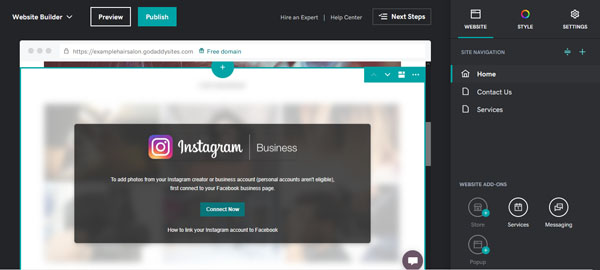
- From your “Social” section, click the “Connect Now” button to open a separate page.
- On this new page, click the “Connect with Instagram” button to be taken to a Facebook login screen. From here simply log into Facebook or create a new business account.
- Another screen confirming you want to continue will appear. Click the “Continue as Your Username” button to proceed.
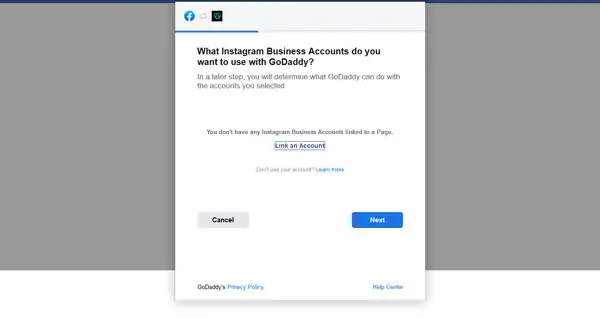
- If you don’t have your Instagram business account linked to your Facebook page, you’ll be prompted to create one.

- Click “Link an Account” and then click the “Next” button to continue.
- Follow the instructions and prompts to allow GoDaddy access to your Facebook and Instagram pages. When the process is complete, click “OK” to successfully connect your Instagram Business page to your GoDaddy homepage.
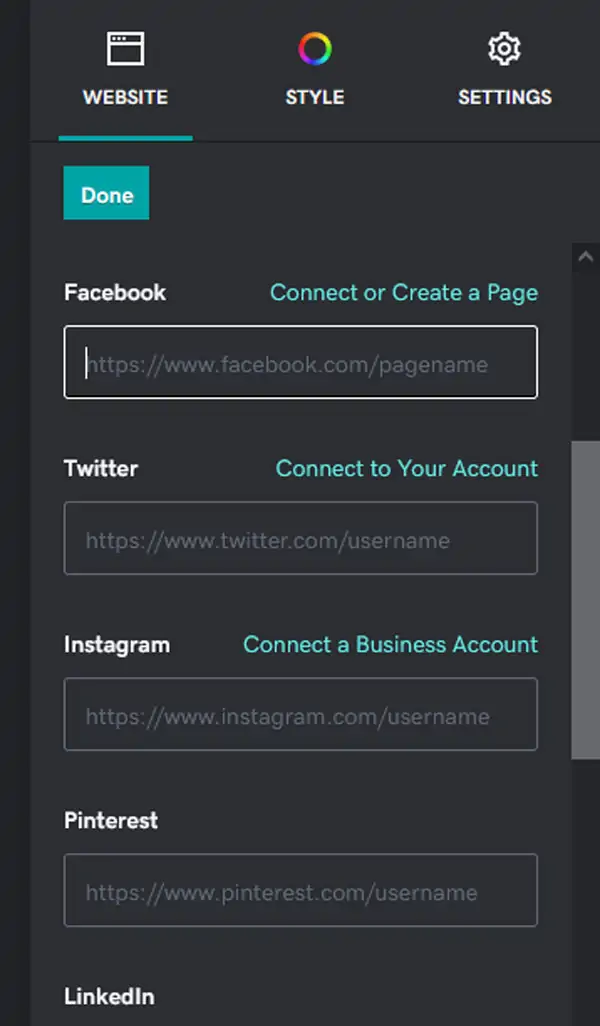
- Now that you’ve connected your Instagram to your GoDaddy website, it’s time to add your social icons. These icons are great tools as they connect your site visitors to your social media platforms with a simple click.
- Within the homepage section of your GoDaddy site editor, add a “Social” section, or scroll down to this section if it’s already placed within your template.
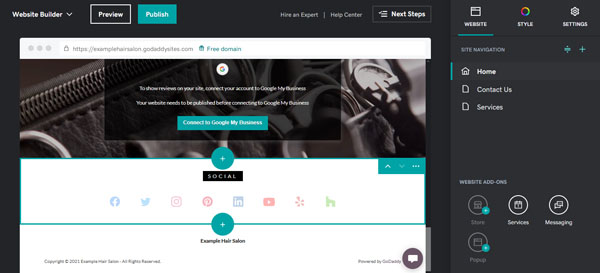
- Click this section to open up the corresponding editing menu within the right-side of the GoDaddy site editor.

- From here you can type in the links to any of your social media platforms, from Facebook, Twitter, to LinkedIn and Houzz.
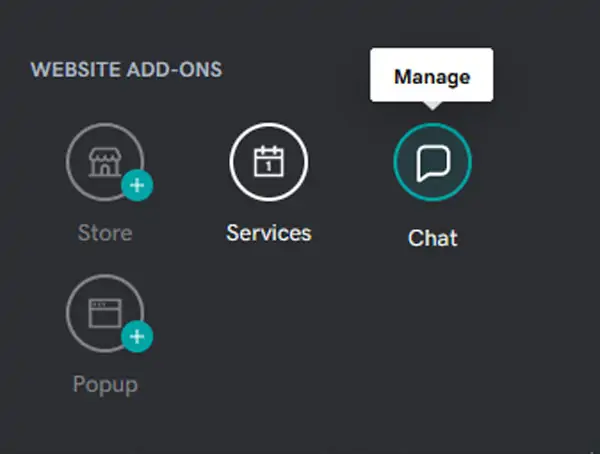
- Once you’ve connected your social media icons, it’s time to set up the chat feature. This tool makes it easy for customers to interact, ask questions, fill out a survey, and more.
- Most GoDaddy business templates will come with a chat-box feature ready to be set up. If you don’t see a little chat-box icon within your GoDaddy site editor, make sure “Chat” is selected underneath “Website Add-Ons.”

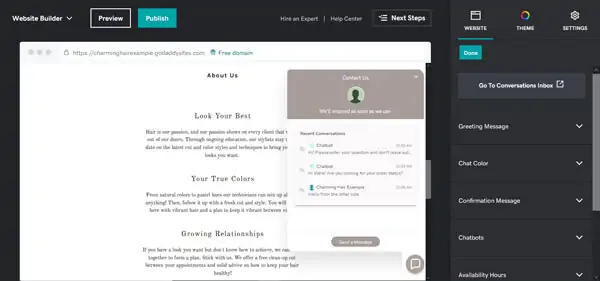
- Click the chat-box feature within your GoDaddy site editor. This will open up a sample chat and the corresponding right-side menu for editing. From this right-side menu, you can update the greeting message, alter the color, and more.

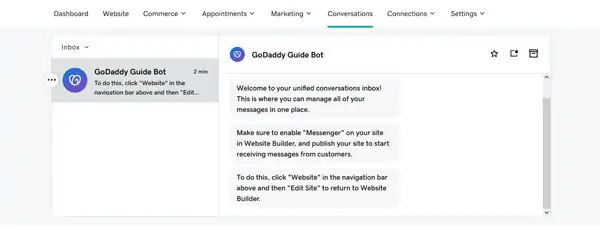
- GoDaddy has recently upgraded its chat feature, allowing its users to now have access to chatbots, mobile chat, and more. Plus, it’s easy to keep track of all chat conversations and controls via the new “Conversations Inbox.”
- To begin setting this feature up, click “Go To Conversations Inbox” in the right-side editor. This will open a separate window, taking you to the “Conversations” portion of your GoDaddy dashboard.

- From here, the GoDaddy Guide Bot will walk you through instructions for how to set up this feature, how to use this all-in-one inbox, and more.

You now have a homepage with three essential tools to really set it apart. However, a successful website needs more than just one page. Continue on to set up your Contact Us page and more.
Contact Us Page
Your Contact Us page is where visitors should find several ways to get in touch with you and your business. We’ll walk you through how to create a Contact Us page and what essential tools can help improve the customer experience.
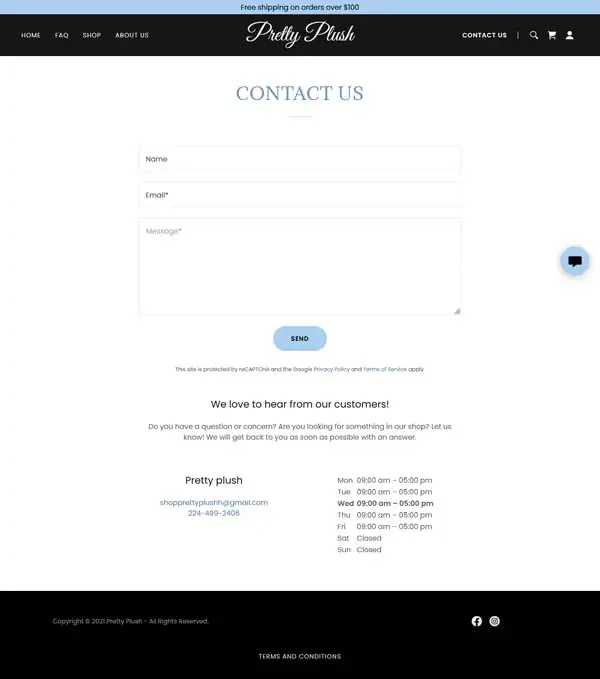
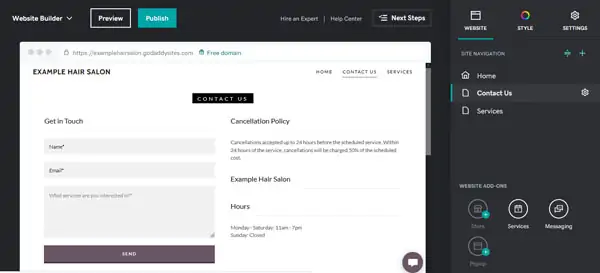
Below is an example of a successful Contact Us page built with GoDaddy for beauty sleepwear company Pretty Plush. For a deeper look at what makes this page successful, and how to make your Contact page the best it can be, read our How to Design a Successful Contact Us Page article.
How to create a Contact Us page with the GoDaddy website builder:
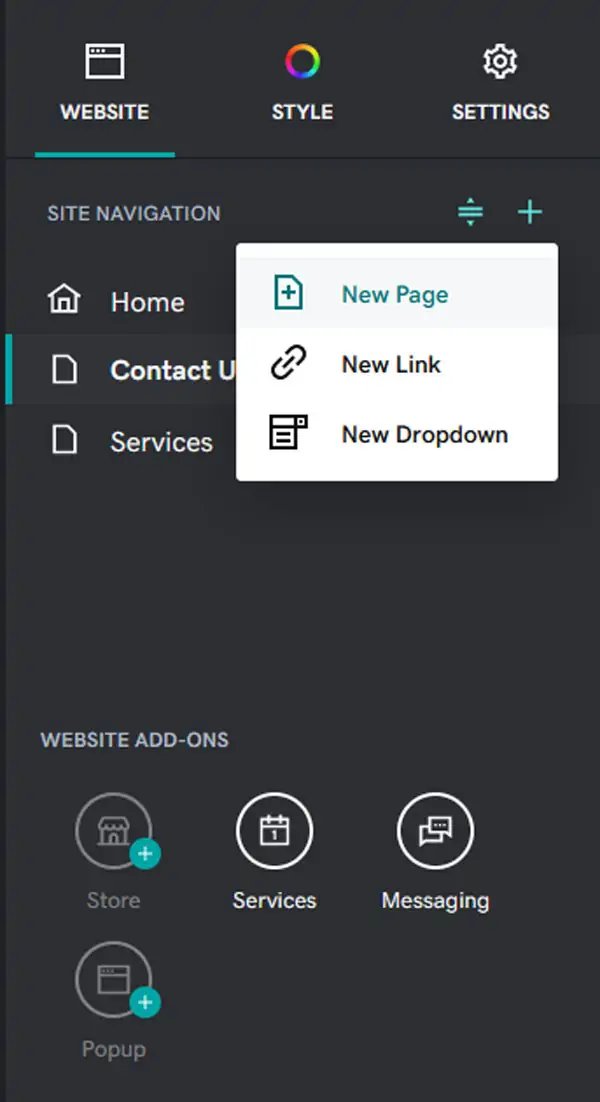
- GoDaddy should include a Contact Us page in its templates. Within the right-side menu of the GoDaddy site editor, click on “Contact Us” to be taken to your editable contact page.

- If you need to create a “Contact Us” page, click the blue “+” in the upper right corner of the GoDaddy editor. From the drop-down menu, select “New Page.”
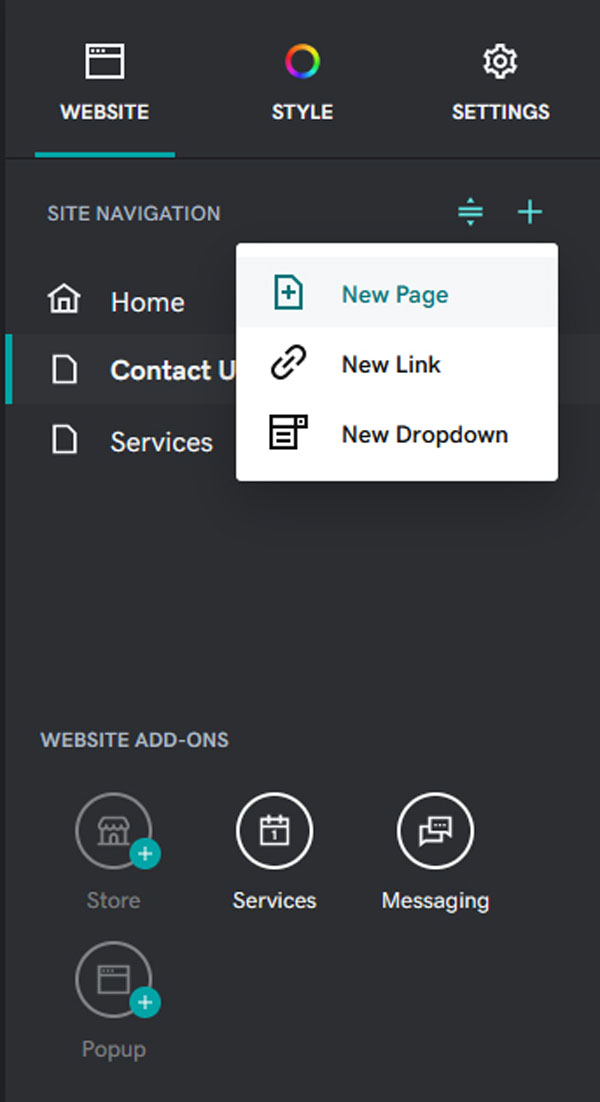
- From the next menu, select “Contact Page” and then “Create Page” to instantly place this new “Contact Us” page within your GoDaddy site editor.
- Edit any of the sections within your “Contact Us” page by simply clicking them. To update any text, a helpful textbox editor will appear.
- You can also use the right-side menu to update text, add a WhatsApp chat button, and edit your displayed hours of operation.

Now that you have the basics, we’ll discuss including a couple of essential tools to your Contact Us page. These will include setting up your contact form and adding a map widget.
Adding essential tools to your Contact Us page:
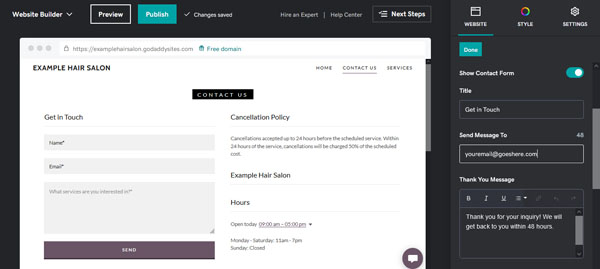
- GoDaddy will most likely include a contact form within any generic “Contact Us” page template. To begin editing this tool, click on “Contact Form” in the right-side menu of the GoDaddy site editor.
- From the “Contact Form” editor of the right-side menu, you can update the title of this form, as well as connect it to your email account. You can also update the “Thank You” message.
- Scrolling further down in the right-side contact form menu, you can further edit your contact form fields.
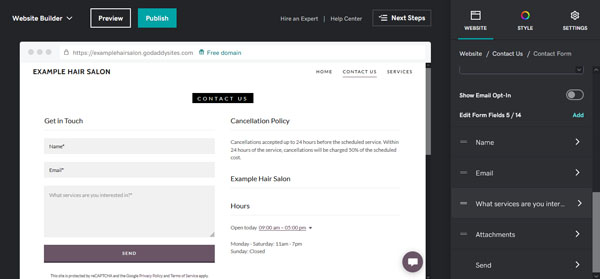
- Find the section you’d like to edit, and click the arrow to go to its corresponding menu.
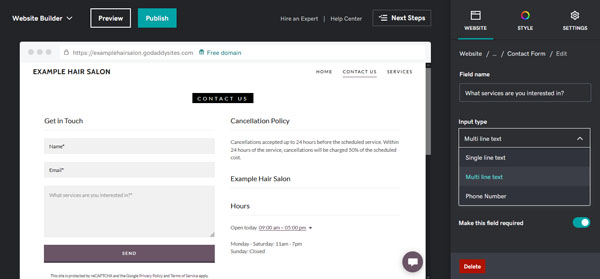
- From there you can update the field name, alter the input type, ensure it is a field that visitors must fill out, or even delete it. Once you’ve finished making your updates, click the “Done” button.
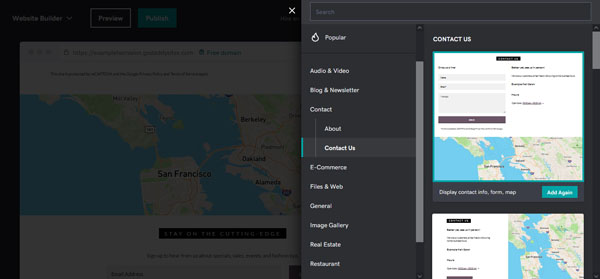
- Now that your contact form is all set up and ready to go, it’s time to add a map widget. These allow customers to find your location easily and improve their overall experience on your site. If your “Contact Us” page didn’t come with a map widget already placed, adding one is as simple as adding a new section.
- To place a map widget, click “Add Section.” From the pop-up menu, select “Contact” and then “Contact Us.”
- From the list of suggestions on the right, scroll through to find an option with a map that best suits you. Click “Add” to instantly place this within your “Contact Us” page.
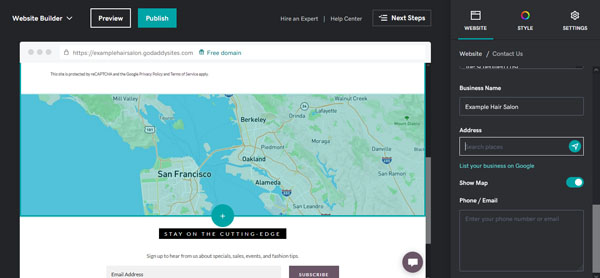
- Click your newly placed map section to open the corresponding right-side menu. Type in the address to your business and ensure the toggle to display the map on your site is switched on.
- Once you’ve completed all these changes, click the “Done” button to have them all saved within the GoDaddy site editor.


Now that you’re getting more familiar with the GoDaddy website builder, these next few pages should be a breeze to set up. The next page to complete is the About Us page.
About Us Page
Your About Us page is where visitors can get to know you and any employees or partners your local service business might have. We’ll walk you through how to create an About Us page and what essential tools can help encourage customer engagement.
Below is an example of a successful About Us page built with GoDaddy for polymer clay jewelry company Little Miss Poly. For a deeper look at what makes this page successful, and how to make your About page the best it can be, read our How to Design a Successful About Us Page article.

How to create an About Us page with the GoDaddy website builder:
- This page might be within some GoDaddy templates, but possibly not all of them. To add an “About Us” page to your site, follow the same instructions as setting up a new “Contact Us” page, but instead choose “About” instead of “Contact.”

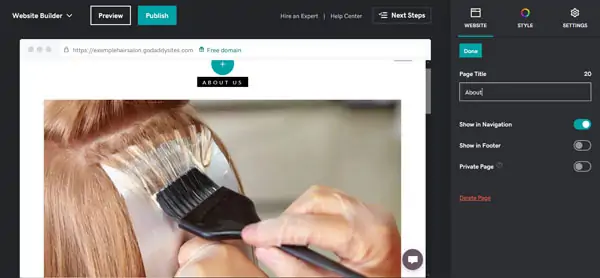
- Once your new page is placed you can begin editing. Within the right-side menu, you can update the page title and ensure it appears in your site’s navigation menu or footer. You can even make this page private or delete it altogether if need be.

- The beauty of using the GoDaddy website builder is the templates are curated to the type of business you specify, so adding pages includes helpful layouts and stock images specific to your industry.
- To update any of the images within this template, simply click them. This will open an editing menu on the right side of the GoDaddy site editor. Within this menu, you can alter the layout of the image, rotate the image, edit the image, or upload a new one entirely.

- If your new “About Us” page has too many sections, it’s simple to delete any unnecessary ones. Click the section you’d like to remove. Within the top right of the section, find the garbage can icon. Hovering your mouse over this icon will change the highlighted section from blue to red.
- Click the “Delete” garbage can icon. A pop-up window will ask if you’re sure you want to delete this content. Click the red “Delete” button to remove the section from your site.


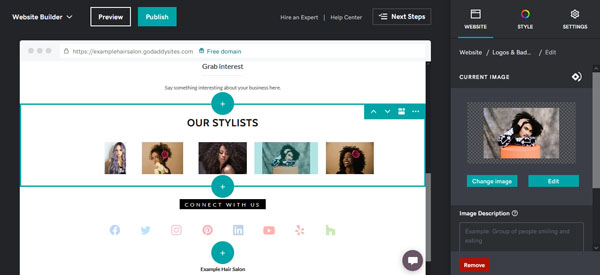
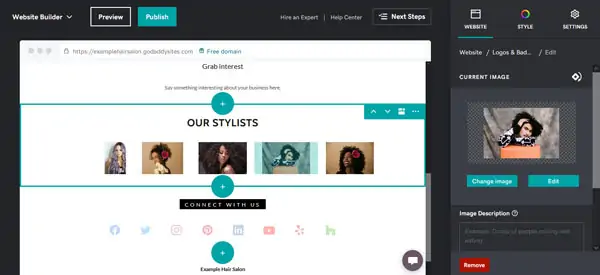
Once you have a good feel for the layout and content of your About Us page, it’s time to add essential tools. These include adding an “Our Partners” section to connect visitors with your employees or individuals renting space you provide for their services. We will also walk you through linking these images to other pages of your site, as having internal links boosts overall engagement and improves customer experience.
Adding essential tools to your About Us page:
- For most service-based businesses, GoDaddy will have “About Us” templates that include an “Our Partners” section. If your template doesn’t come with one already, this is simple to add.
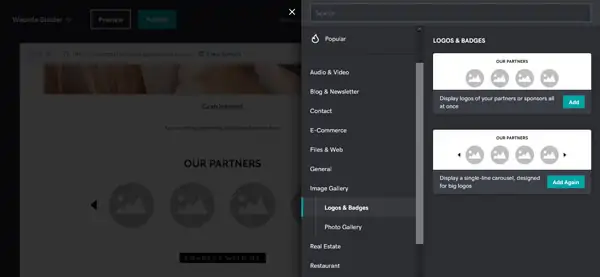
- Hover over where you’d like to palace this section within your template and click “Add Section.” Scroll down to “Image Gallery” and select “Logos and Badges.”
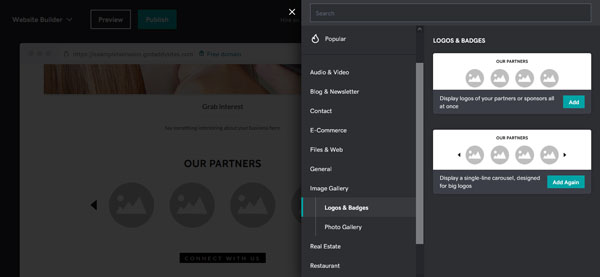
- You can choose either to display logos of your partners and sponsors or opt for a single-line carousel. For this guide, we are using the single-line carousel section. Click “Add” to instantly place this within your GoDaddy site editor.
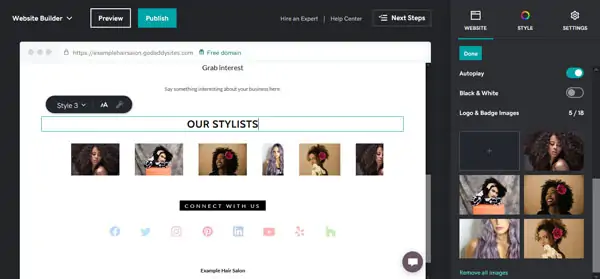
- To edit this new section, click within it. Using the right-side menu you can alter the title and begin adding images. To add images, click on the black square with a “+” in the middle.
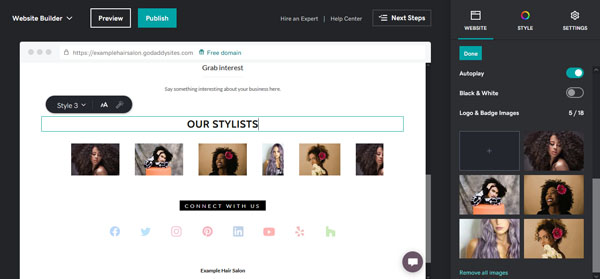
- This will take you to a separate screen where you can choose from GoDaddy’s image library, or upload your own images. Make sure all images you upload are professional and you have the right to post them on your website.
- Once you’ve gotten your photos uploaded, it’s time to connect links to them. Connecting links is a great way to direct visitors to the page specific for this stylist or employee, or even to your “Services” or “Contact Us” page to schedule an appointment.
- To connect a link to an image, click on the image. This will open an editing menu within the right-side of the GoDaddy site editor. From this menu, you can add alt text, edit the image, and more.
- Scroll down until you see the “Add Link” toggle and slide it to the right. This will open a drop-down menu that will specify where this link will go.
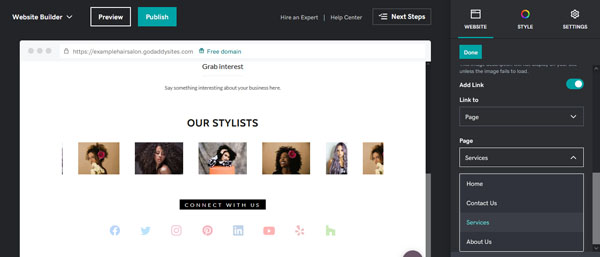
- You can choose which page on the site to link it to. For this tutorial, we will link it to the “Services” page. Click the “Done” button and these changes will automatically be saved.

Since we’ve connected a link to the Services page, it’s time to fully set this page up. Having an accurate and intuitive Services page is vital to most any local, service-based business and knowing what features you need to make yours truly stand out is important.
Services Page
Your Services page is where visitors can learn more about what you offer, read reviews, and schedule appointments. We’ll walk you through how to create a Services page with these essential tools.
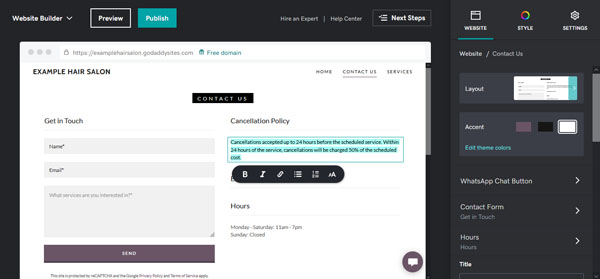
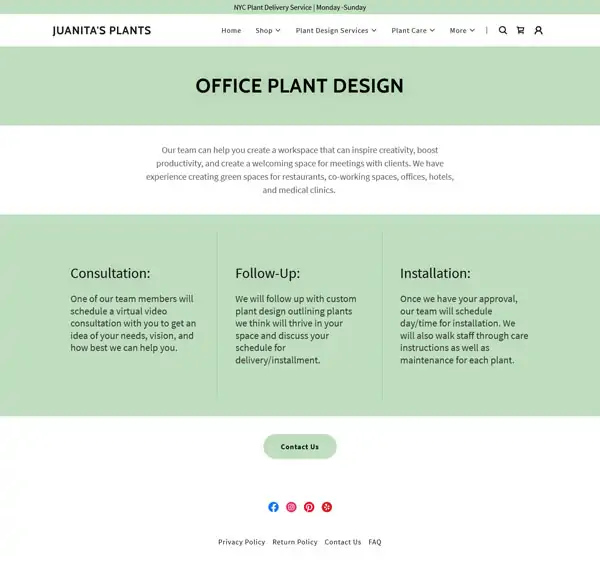
Below is an example of a successful Services page built with GoDaddy for plant design and delivery service Juanita’s Plants. For a deeper look at what makes this page successful, and how to make your Services page the best it can be, read our How to Design a Successful Services Page article.
How to create a Services page with the GoDaddy website builder:
- Within most any service-based business template for GoDaddy, they will automatically include a “Services” page. If your template does not have one, follow the steps we’ve previously gone over for placing a new page.
- Begin editing by clicking on any section and using the right-side menu to create unique content specific to your business.
- Add more sections to fully customize this page. Be sure to include information on your team, location, what services you provide, and what customers should expect if they book with you.

As you should have a good feel for the GoDaddy website builder by now, adding the necessary information to this page should come naturally. However, there are two major tools you can add to this page to make it more successful — setting up online appointments and connecting customer reviews.
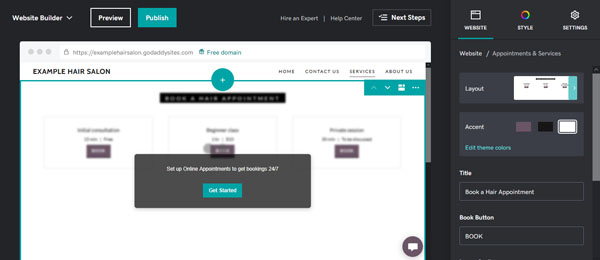
Adding essential tools to your Services page:
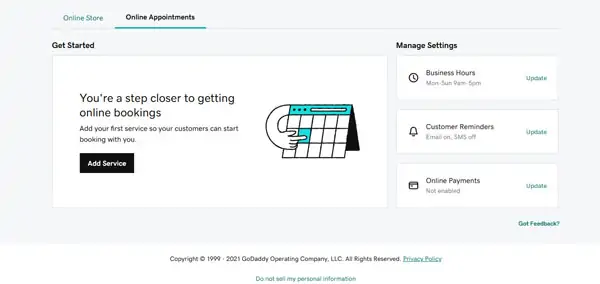
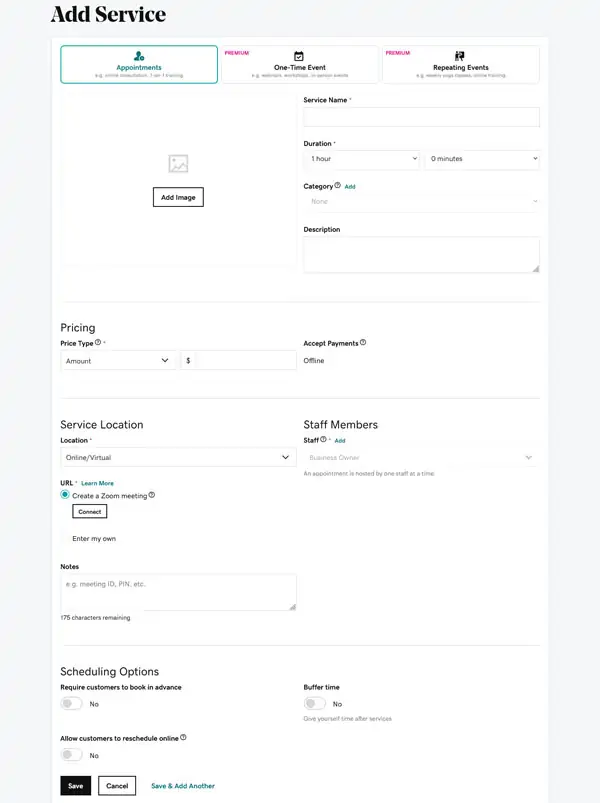
- Most GoDaddy “Services” page templates will have a section to begin setting up online appointments already within the site editor.
- To begin, simply click the “Get Started” button. From here, you’ll be taken to a separate screen for managing your GoDaddy Online Appointments.
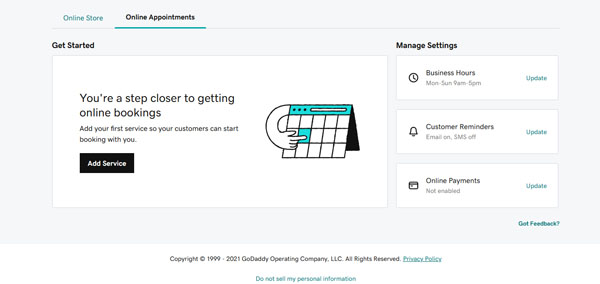
- Click “Add Service” to be taken to the GoDaddy Add Service screen. From here you can add an image of the service, make it a one-time or repeating event, as well as name and describe the service, and set the duration and price. There’s a feature to set the location, make this a virtual appointment via Zoom, as well as other scheduling options.

- Add everything you need to set up your unique appointment service, and click “Save” to have this appointment feature connected to your page and website.
- Now it’s time to add rave reviews. Adding reviews builds a sense of trust and encourages visitors to become customers. With the GoDaddy website builder, it’s easy to add a section that allows you to add reviews.
- Hover over any section and click the “Add Section” button. From the pop-up menu, scroll down to “Social” and click to expand the drop-down menu. From here select “Reviews” and then push the “Add” button to place this reviews section into your GoDaddy site editor.
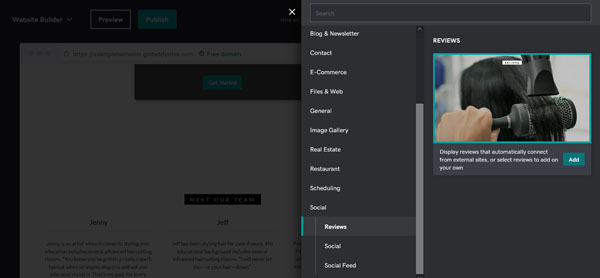
- If you’ve connected your Facebook account to GoDaddy, this section will already be set up for you to either add reviews from your Facebook business page, or you can manually enter them.
- If you haven’t linked your Facebook account to GoDaddy, click the “Connect to Facebook” button within your new section and follow the instructions. These steps will be very similar to the connecting Instagram steps.

Pat yourself on the back — you now have a four-page website for your local service business. Plus, these pages have added features and tools to help you stand out.
Other Pages a Local Service Business Website Might Need
Along with the above pages, your website will most likely need a few more to be the best it can be. Read these helpful articles to learn what these pages are and what they’ll need:
What Other Tools Does Your Website Need?
Now that we’ve gone over the necessary pages and their essential tools, it’s time to discuss sitewide tools. These features can be used to better track data, organize email campaigns, and other software to boost your business and customer experience. We’ll be going over three main areas: analytics, email campaigns, and customer relationship management (CRM) technology.
Track Analytics With the GoDaddy Website Builder
Site analytics can seem overwhelming at first, but they are a strong tool for measuring the success of your business and website. They also help point out what your website is doing well, and where you need improvement.
Tools that help you track these will perform several functions. These can track sitewide clicks to see what customers are most drawn to, as well as collect information from surveys you’ve created on your site that customers can fill out.
One of the best tools to use for this is Google Analytics. Read our article on How to Add Google Analytics to GoDaddy to help you better achieve the goals of your website.
Sending Email Campaigns with GoDaddy
Email campaigns are one of the strongest tools a small business owner can use. These can range from regular newsletters to offering customers discounts. Having an email collecting tool can help you keep track of important data, expand your reach, and more.
The beauty of the GoDaddy website builder is that it’s an all-in-one platform. It offers its own services that can help you collect emails, create newsletters, and send out reminders and coupon codes. Check out our article on How to Use GoDaddy Email to begin setting up and using this intuitive feature.
Manage Customers & Contacts with the GoDaddy Website Builder
CRM can feel complicated, but it’s really just any type of tool or feature that helps you as a small business owner better organize your analytics and data. There are several trustworthy platforms like HubSpot, Zoho, or Salesforce that can help you get organized.
These management systems help you stay on track, help you better understand those pesky analytics, and increase communication between you, your employees, and customers. For a deeper look at how to set up your GoDaddy site with everything it needs, read our How to Use GoDaddy article.
Learn more about what a CRM system can do for you and your business by checking out Startup Savant’s What Is CRM guide.
Moving Forward
Success! You should now have a well-designed local business website with all of the tools your service-based business needs to be successful.
If you didn’t follow along, you can also bookmark this page, sign up for GoDaddy, and follow this local business website tutorial at a later time.
If your site is up-and-running, don’t forget to double-check all of its content and test your website on any many devices as possible for errors.
Get Started With GoDaddy
We recommend GoDaddy for any small business owner looking to create a professional website for their local business. TRUiC readers receive a discount on any GoDaddy plan of their choice by clicking the button below!