How To Make a GoDaddy Website: A Step-by-Step Guide
Did you know it takes an average of 14 weeks for a website designer to build a website for you? Who has time for that? By using GoDaddy, one of the industry’s best website builders, you can have a fully-functional website up and running in a fraction of the time.
This step-by-step guide will walk you through the process of creating a simple, yet professional GoDaddy website in just a few hours. By the end, you’ll have a four-page website that’ll suit nearly all service-based — and many local — small businesses.
Recommended: This guide walks you through how to build a GoDaddy website – make sure you sign up for GoDaddy to follow along.

Before You Begin
We know you’re ready to start creating your website immediately, but it’s a best practice to take some time to plan it out first. While you can certainly start the process without this step, a little planning will make it easier.
Along with this guide, check out these other helpful articles to help you determine if the GoDaddy website builder is the right tool for you and your business:
Now, let’s get started with our 8 step guide:
Step 1: Sign up for GoDaddy
Step 2: Set up the Page Structure
Step 3: Upload Your Logo
Step 4: Update the Header Area
Step 5: Update the Homepage
Step 6: Update the “About,” “Services,” and “Contact” Pages
Step 7: Publish and Test Your Website
Step 8: Publish To Your Domain
Step 1: Sign up for GoDaddy
The first step in building a new website for your small business involves creating a GoDaddy account. It’s free to sign up and build your website, but we recommend upgrading so you can use all of GoDaddy’s features.
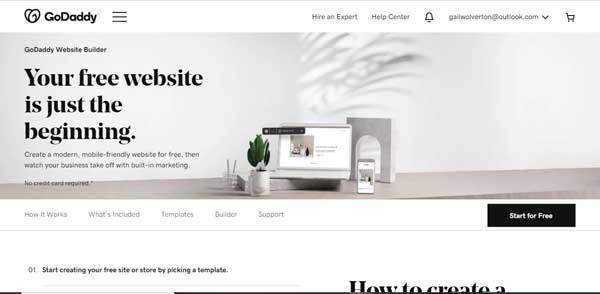
Visit GoDaddy and click on the “Start for Free” button to sign up.
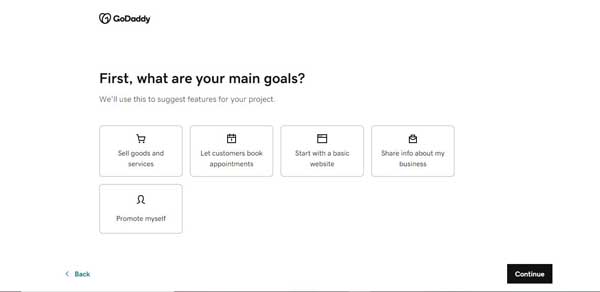
Once you sign up, GoDaddy will ask you to choose the main goal of your website. For the purposes of this guide, we’ll select “Sell goods and services” as our site’s primary goal. If you choose this option, you’ll then need to answer a few quick questions about which platforms you intend to use to sell your goods and services and how much revenue you anticipate generating annually.
After this, the GoDaddy website builder will ask to choose the industry category that matches your business. Choose wisely because the industry you pick will influence the GoDaddy template initially chosen for you.
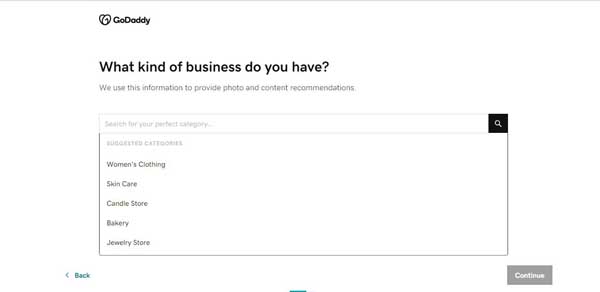
Because we’ll create an auto repair shop website for the purposes of this tutorial, we searched for that industry (and found it available). If your industry isn’t available, choose the closest category.
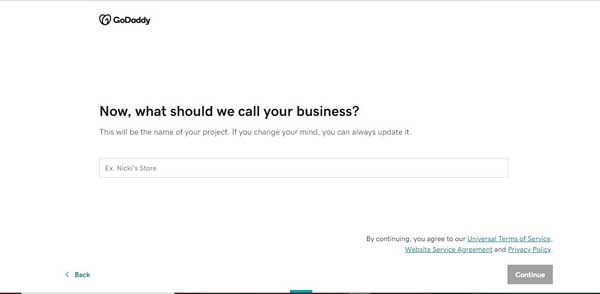
Next, GoDaddy will ask for your business name to serve as the name of your new website. Enter your business name, and then click on the “Continue” button.
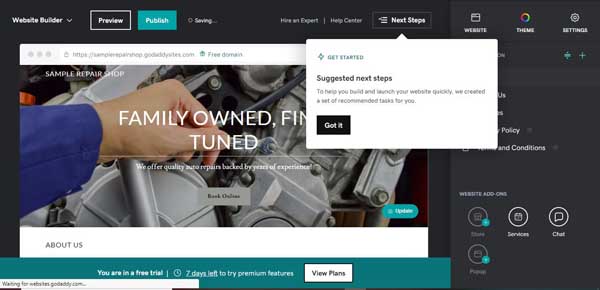
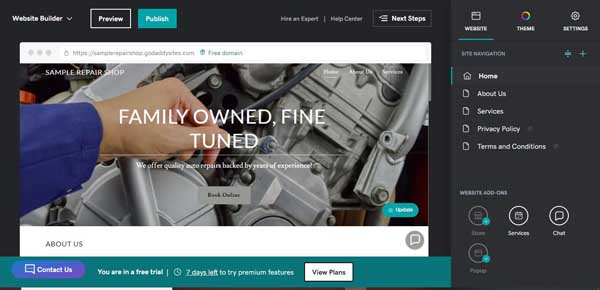
That’s all it takes to create a generic website with the GoDaddy website builder. But, you still need to customize the words and images to match your specific business.
TRUiC TIP: If you don’t know the name of your business yet, use our Business Name Generator to select one.
Upgrade Your GoDaddy Site
Ideally, you’ll upgrade now so you can access the premium features the GoDaddy website builder provides as you create your website.
For most businesses, we recommend the GoDaddy Standard plan. It provides everything most service-based businesses need, including the search engine optimization (SEO) tools vital to ensuring people find a business via online search.
If your business needs a website capable of supporting recurring appointment scheduling, then choose the GoDaddy Premium plan. If your site will include an online store, then you need the GoDaddy Ecommerce plan.
Select a plan and complete your purchase.
Want to learn more about the pricing and plans offered by GoDaddy? Check out our GoDaddy Pricing and Plans guide.
Change the GoDaddy Template
The GoDaddy website builder automatically creates a site for you based on what it thinks works best for your industry. If you prefer a different look and feel, you can easily change the template.
You’ll edit your website from the GoDaddy website builder’s dashboard.
To change your GoDaddy template, click on the “Template” tab in the upper-right corner of the dashboard. Then, click on the “Try a New Look” button.
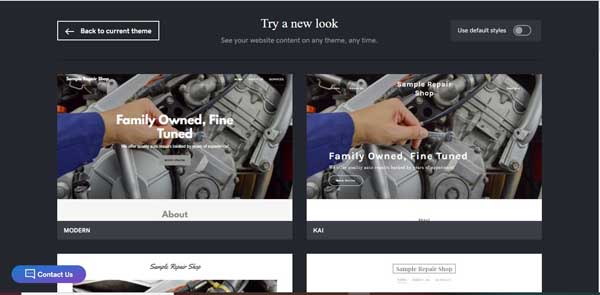
Scroll through the available GoDaddy templates, and then click on the “Select” button when you find one you like. We chose the “Modern” template for our example auto repair shop website because we like how the business name appears in the upper-left corner with the main navigation menu on the right.
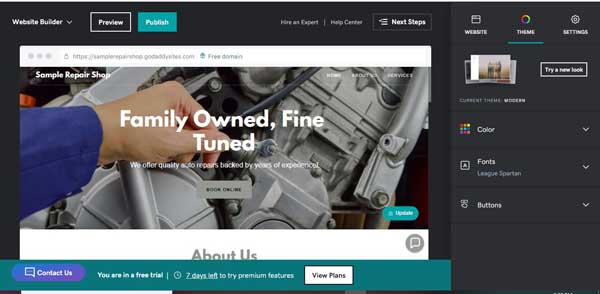
You can click on the “Color,” “Fonts,” or “Buttons” drop-down arrows if you want to further customize your template. Read our How To Use the GoDaddy Website Builder article for more detailed instructions.
Step 2: Set Up GoDaddy Pages
In the GoDaddy website builder, each industry’s website template comes with its own set of pages. The next step in building a great website involves creating a page structure that best serves your specific business needs.
For a more in-depth discussion about how to set up your website structure, check out our How To Structure a Website article. Most small, service-based businesses need these four pages:
- Homepage: As the first page people visit on your site, it should provide an overview of your business.
- About Page: This page offers more information about you, your team, and/or your business.
- Services Page: This page describes the services your business offers.
- Contact Page: This page features your business’s contact information, such as its phone number, email address, physical address, hours of operation, and a contact form.
Click on the “Website” tab in the upper-right corner of the dashboard to see your site’s existing page structure listed under the “Site Navigation” header.
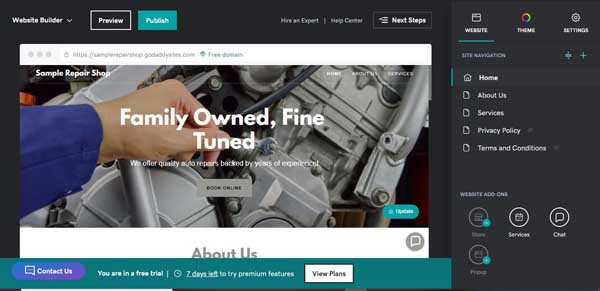
For the purposes of this tutorial, we want our GoDaddy example website to include the following pages: “Home,” “About Us,” “Services,” and “Contact.” That means we need to delete the “Privacy Policy” and “Terms and Conditions” pages, add a “Contact” page, and then rearrange the order of the remaining pages.
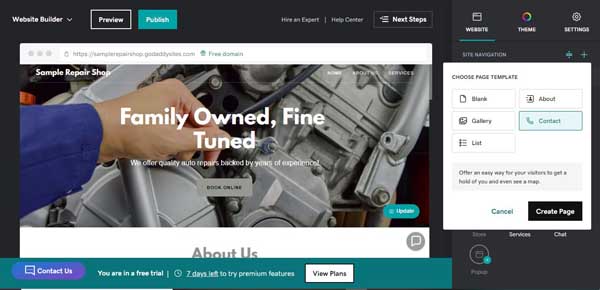
To add a “Contact” page:
- Click the plus sign (“+”) icon to the right of the “Site Navigation” header.
- Click on the “New Page” button.
- Click on the “Contact” page template box.
![How to make a GoDaddy website.]()
- Click on the “Create Page” button.
- Choose a title for your page, and then click on the “Done” button to add the page to your website.
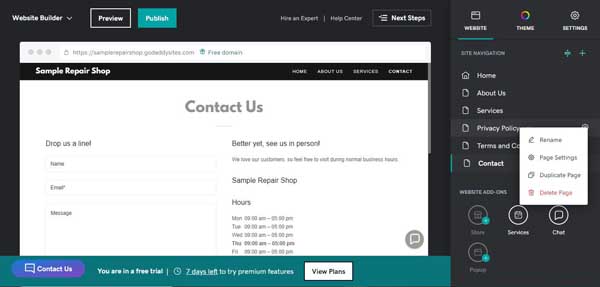
To delete pages:
- Hover over the page you wish to delete in your site’s existing page structure (listed under the “Site Navigation” header).
- When a “Gear” icon appears to the right of that page’s name, click on it to open a drop-down menu.
![How to make a GoDaddy website.]()
- Click on the “Delete Page” option and confirm you really want to delete this page
To reorder the pages:
- To the right of the “Site Navigation” header, you’ll find an icon that looks like an equal sign (“=”) with an arrow above and below. Click on that icon to reorder the pages.
- Click on the “Contact” page, and then drag it to the bottom of the list.
- Click on the “Done” button.
Step 3: Upload Your Logo to GoDaddy
After creating a GoDaddy account, choosing a template, and adding the pages you’ll need, it’s time to customize your site to match your business. Let’s start with your logo.
Your website’s navigation bar can either display your business name or your logo. Our chosen template places our business name in the upper-left corner of our example website.
TRUiC TIP: If you don’t have a logo yet, use our Free Logo Generator to create one.
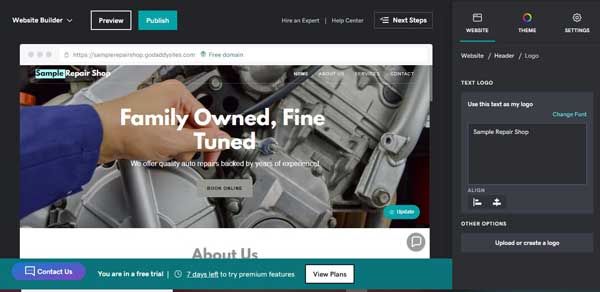
To add your business logo:
- Click on your business name in the upper-left corner of your website. A menu with logo options will then appear on the right side of the screen.
![How to make a GoDaddy website.]()
- Click on the “Upload or create a logo” button.
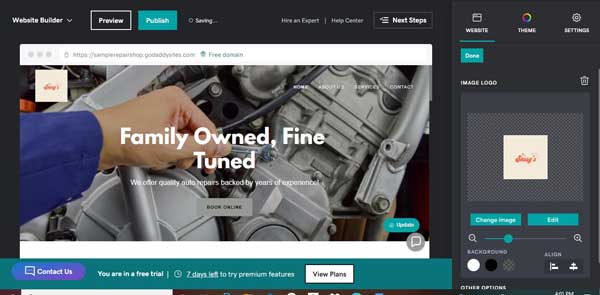
- Select your logo — preferably a transparent, portable network graphics (PNG) file — from your computer.
- Click on the “Insert” button. Your logo will then appear in the upper-left corner.
![How to make a GoDaddy website.]()
- Click on the “Done” button.
Step 4: Update the Header Area
The header area represents the most important part of your website. Site visitors will make a quick assessment of your business based on what they see when they first arrive on your website. This assessment happens before visitors even start to scroll down the page so they’ll leave your site if they don’t like what they see.
The main elements of the header area include:
- A large image that covers the top of the page
- A headline (and subhead if your template allows)
- A CTA button
Read on to learn how to tailor each of these elements to your business.
Change the Header Image
The header image that appears at the top of your website is the most important image on your site. It should give readers a clear picture of your business’s purpose and offerings.
Good ideas for header images include:
- An external view of your business
- A picture of your business in action
- Happy people using your product(s) or service(s)
- A picture of your product(s) or service(s)
Pick a Header Image
Ideally, you’ll use one of your own high-quality photos of your business for your header image. But, many business owners don’t have such images when they first start out.
If you don’t have your own personal photo to use, GoDaddy offers free images specific to your industry, just make sure the image has a horizontal orientation. It’s always good practice to ensure you have the legal right to use whatever images you display on your website. Don’t just search for images via Google and use them. Make sure you have permission to use an image on a website.
Replace the Existing Header Image
Once you choose your preferred header image, it’s time to replace the image currently occupying that space with the new one.
To replace the existing header image:
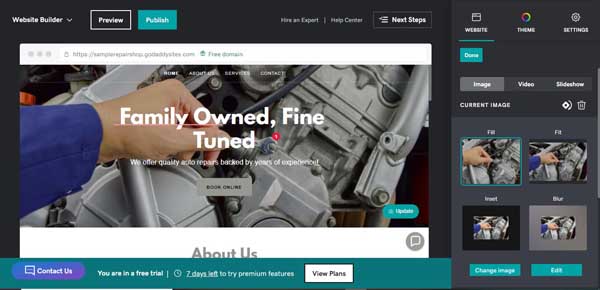
- Click on the existing image, and then click on the “Cover Media” button to open the “Image” menu on the right side of the screen.
![How to make a GoDaddy website.]()
- Click on the “Change image” button.
![How to make a GoDaddy website.]()
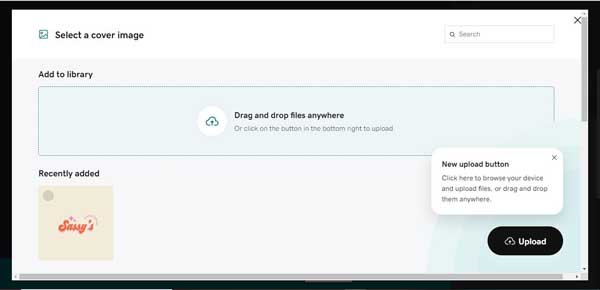
- From here, you can either click on the “Add images” button to upload your own image or scroll down to view stock images related to your industry.
- Follow the prompts to select a new image, and then click on the “Upload” button.
- In the field below the “Describe this image” header within the “Image” menu, enter a description of the photo. Screen readers will use this description to assist visually impaired visitors to your website.
- Click on the “Done” button.
Change the Headline
You want the headline to clearly convey what your business has to offer visitors. Be descriptive, but avoid anything that sounds too cute.
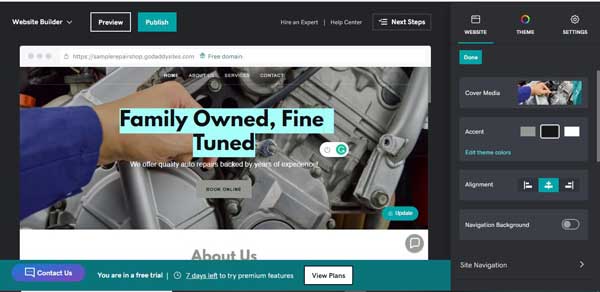
To change the headline, triple-click on the headline to highlight it and then type in your new headline.
Add a Subhead
The “Modern” template we chose for our example website doesn’t have a subhead, but, if it did, changing it would follow the same process as changing the headline. Just triple-click on the existing text, and then type in a new subhead.
Update the CTA Button
The CTA button that appears in the header area of your website’s homepage should take your visitors one step closer to becoming customers.
Some ideas for effective CTA buttons include:
- Call ###-###-####
- Contact Us
- Schedule Now
- Buy Now
To change the CTA button:
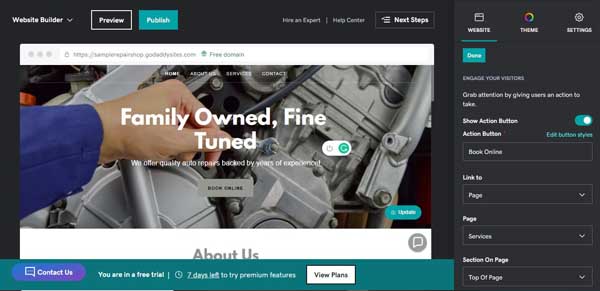
- In the menu on the right side of the dashboard, scroll down and click on the “Action Button” tab. This’ll open a submenu with several options you can edit.
![How to make a GoDaddy website.]()
- In the text field under the “Action Button” header, change the text to whatever you want to appear on the button.
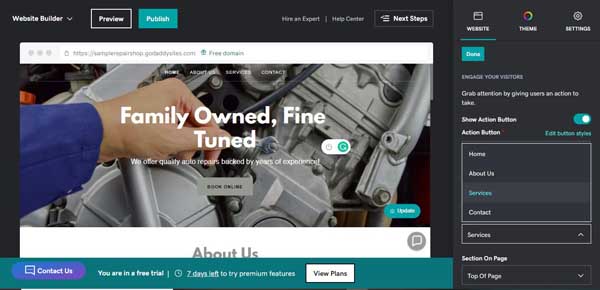
- Click on the “Link to” drop-down menu to reveal the four types of items to which you can link a CTA button: a page on your website, the website URL of a page not on your website, a phone number, or an email address.
![How to make a GoDaddy website.]()
- Choose the type of item to which you want to link your CTA button, and then update the fields that appear based on your choice.
- Click on the “Done” button.
Step 5: Update the Homepage
The sections that appear on your website’s homepage will differ based on the industry you chose when you signed up with GoDaddy.
To get your website up and running quickly, we recommend you leave the sections GoDaddy provided and simply update the text and images to match your business.
Change the Text
To change the existing text on the homepage, click on that block of text. You can then edit the text either directly on your website or in the right sidebar.
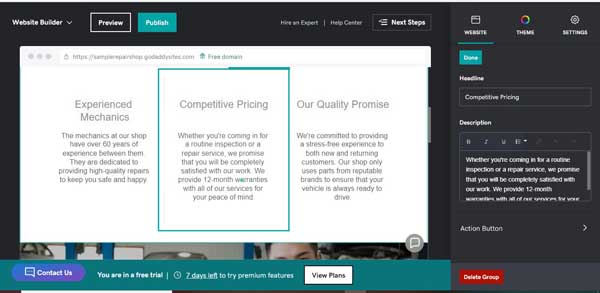
When you finish making edits, click on the “Done” button to save your changes.
Replace the Images
To create an effective website, you’ll want to ensure its images show how your business helps customers.
Always verify that no one holds a copyright for the images you display on your site. The best way to ensure this is to use your own photos. You also can download royalty-free photos from Unsplash.com, Pexels.com, or Pixabay.com.
To replace an existing image:
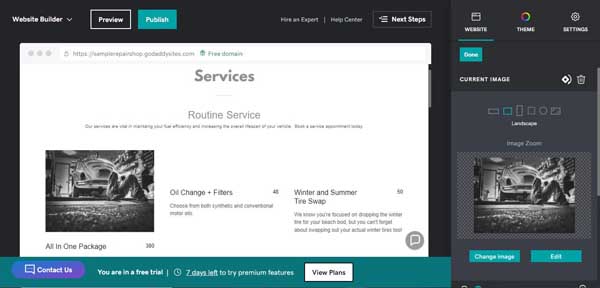
- Click on the image you want to replace to open the “Current Image” menu on the right side of the screen with several editing options.
![How to make a GoDaddy website.]()
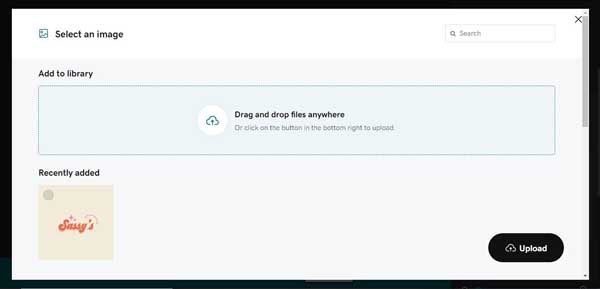
- Click on the “Change image” button in that menu.
![How to make a GoDaddy website.]()
- From here, you can either click the “Add images” button to upload your own image or scroll down to view stock images related to your industry.
- Follow the prompts to select a new image, and then click on the “Upload” button.
- In the field below the “Describe this image” header within the “Image” menu, enter a description of the photo. Screen readers will use this description to assist visually impaired visitors to your website.
- Click on the “Done” button.
Link to Customer Reviews to GoDaddy
Most GoDaddy templates include a section that displays your business’s current reviews from Facebook, Google Business Profile (formerly Google My Business), Yelp, and/or Yotpo on your website. For example, the “Modern” template we chose for our example auto repair shop website connects to Google Business Profile reviews.
To connect to external reviews:
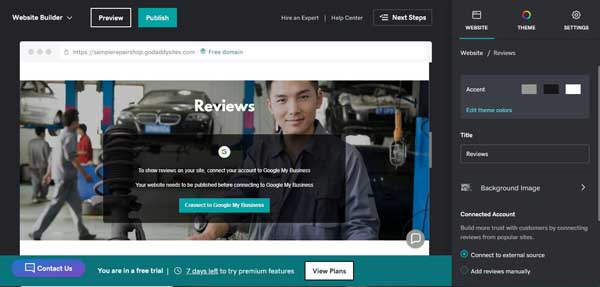
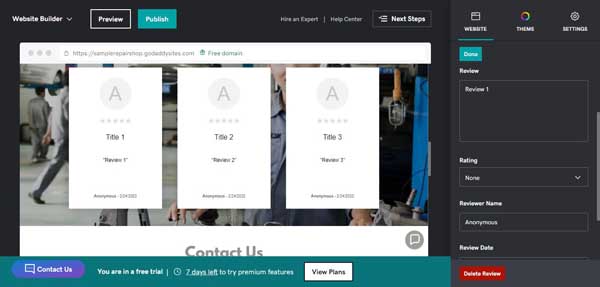
- Click on the “Reviews” section of your website’s homepage to open a menu on the right of the screen with reviews-related options.
![How to make a GoDaddy website.]()
- Change this section’s colors, title, and background image, as desired.
- Under the “Connected Account” header, choose one of these two options:
- Connect to external source (e.g., Google Business Profile)
- Add reviews manually
To connect to an external source:
- Click on the radio button next to “Connect to external source.”
- Click on the drop-down menu and select the platform you use (e.g., Google Business Profile, Facebook, Yelp, or Yotpo).
- Click on the “Connect to [your chosen platform]” button.
- Follow the prompts to connect to the platform.
To add reviews manually:
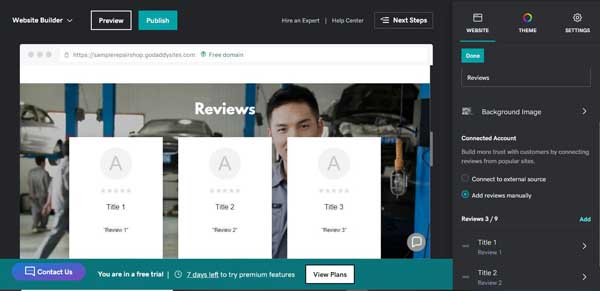
- Click on the radio button next to “Add reviews manually.”
![How to make a GoDaddy website.]()
- The default setting includes three reviews, but you can showcase up to nine. Click on the first review, which appears as “Title 1” in the menu on the right side of the screen.
![How to make a GoDaddy website.]()
- Enter the review information in the menu on the right. This includes:
- Uploading a photo of the reviewer.
- Adding the title and body of the review.
- Picking a star rating.
- Entering the reviewer’s name and date they wrote the review.
- Including a link relevant to the review, if desired.
- Click on the “Done” button.
Set up the “Subscribe” Section
Most GoDaddy templates include a section that’ll allow your website to collect visitors’ email addresses so they can receive your newsletter or other marketing emails.
To set up the “Subscribe” section:
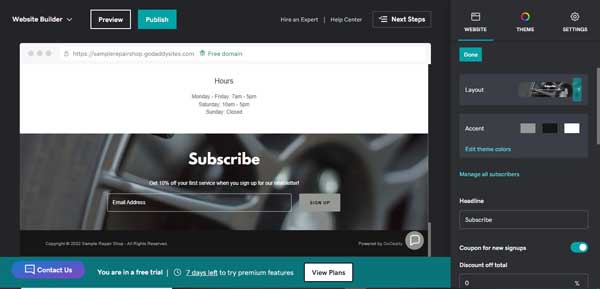
- Click on the “Subscribe” section of your website to open a menu on the right side of the screen with several editable options.
![How to make a GoDaddy website.]()
- Click on the “Layout” box if you want to change the appearance of this section.
- Update the “Headline” and “Description” for the “Subscribe” section.
- Add a “Thank You Message” that’ll appear to any visitor who subscribes to your email distribution list.
- Leave “Email Address” under the email header in this menu. This invites visitors to enter their email address in the text field.
- Leave “Sign up” as the button label so visitors know they’re signing up to receive emails.
- Click on the “Done” button.
To learn more about connecting with current subscribers and sending marketing emails, check out our How To Use GoDaddy’s Email article.
Update the GoDaddy Footer
The footer is one of the most important — yet often overlooked — parts of a website. Visitors to your site expect to find certain information in the footer, including:
- A copyright date
- Links to your “Privacy Policy” and “Terms of Service” pages
- Your business’s contact information
- Social media icons linked to your business’s social media accounts
To update the footer:
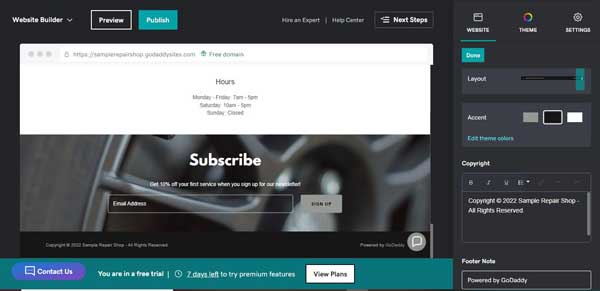
- Click on the footer to open a menu on the right side of the screen with several footer options.
![How to make a GoDaddy website.]()
- To change the footer’s background color, click on an “Accent” color box.
- Enter the relevant information for all the fields you want your site’s footer to display, such as your “Business Name,” “Address,” and/or “Phone Number.”
- Click on the “Social Accounts” tab, and then either enter the links for your business’s social media accounts or click on the link to connect your accounts.
- Click on the “Done” button.
Step 6: Update the “About,” “Services,” and “Contact” Pages
Now that you have a completed homepage, it’s time to finish your site’s “About,” “Services,” and “Contact” pages.
You already learned how to edit text and replace pictures on your site’s homepage, so follow those same steps on these three pages to update the existing content to match your business.
To edit a page, click on that page in the menu at the top of the screen and then replace the text and images.
For detailed directions on using the GoDaddy website builder, check out our How To Use the GoDaddy Website Builder guide.
Step 7: Publish and Test Your Website
After you finish updating your new GoDaddy website with text, images, and other information relevant to your business, it’s time to publish and test the site. In the beginning, test it on your assigned subdomain so you can make sure your website looks just like you want before publishing it on your business’s domain.
Publish To a Subdomain
To publish your website, click on the “Publish” button at the top of the dashboard’s screen. If you don’t have a GoDaddy domain, this pop-up window will then appear:
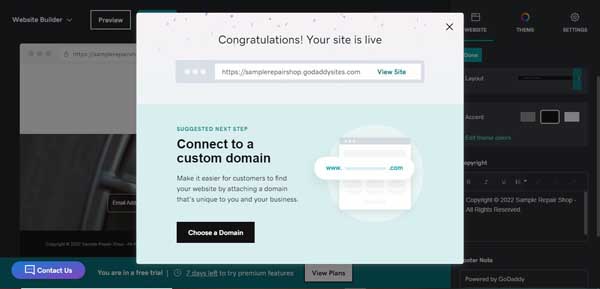
Click on the “View Site” button to see your website on your free GoDaddy subdomain. You may leave your website on this free subdomain, but we encourage all businesses to use their own custom domain for a more professional look.
Test Your GoDaddy Website
Open your GoDaddy website on a variety of devices with varying screen sizes, such as an iPhone, an Android phone, a laptop, and a large desktop computer. See how it looks on each device and open it using different internet browsers as well.
Click on every button to ensure they all work as expected. Ask a friend to read through and test every page on your website to look for typos and broken links.
If something doesn’t work as planned, return to the GoDaddy website builder to make the necessary changes. Then, publish and check your site once again.
Step 8: Publish To Your Domain
Congratulations! You’ve finished creating a website for your business using the GoDaddy website builder. Now you need to publish your website to your permanent domain.
It’s easiest to use a domain purchased from GoDaddy, but you also can connect to a domain you obtain from another domain host.
TRUiC TIP: If you need help choosing a domain for your business, check out our helpful Domain Name Generator.
Publish To an Existing Domain on GoDaddy
If you already purchased a domain from GoDaddy, connect your new website to that domain.
To use a GoDaddy domain you already own:
- Click on the “Publish” button.
- Click on the “Choose a Domain” button in the pop-up window that then appears.
- Select the domain you want to use, and then follow the prompts to connect it to your site.
Purchase a Domain From GoDaddy
If you haven’t purchased a domain yet, GoDaddy makes this process very easy.
To purchase a domain from GoDaddy:
- Click on the “Publish” button.
- Click on the “Choose a Domain” button in the pop-up window that then appears.
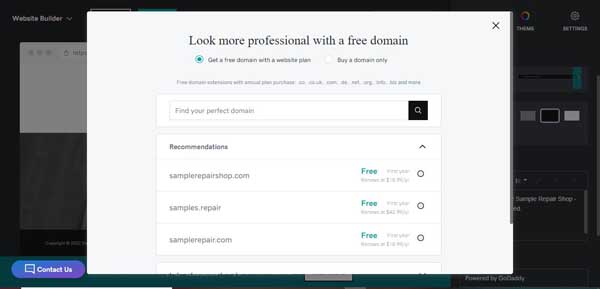
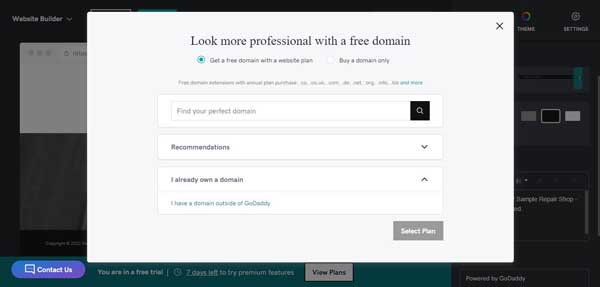
- Click on the radio button next to “Get a free domain with a website plan” or “Buy a domain only.”
![How to make a GoDaddy website.]()
- GoDaddy will then suggest several domain names from which you may choose.
- If you like one of them, click on the “Buy” button and complete the purchase process.
- If you don’t like the suggestions, enter some keywords in the “Search” bar at the top of this pop-up window. You can then choose your preferred domain from the resulting options and complete the purchase process.
Connect To a Domain Purchased Elsewhere
If you purchased your domain from another domain name registrar, you’ll need to connect your new website to that domain or you can transfer your domain to GoDaddy.
To connect to a domain purchased elsewhere:
- Click on the “Publish” button.
- Click on the “Choose a Domain” button in the pop-up window that then appears
- Scroll down to the “I already have a domain” tab, click on it, and then click on the “I have a domain outside of GoDaddy” option.
![How to make a GoDaddy website.]()
- Enter the external domain name you want to use. GoDaddy will check to ensure it’s a valid domain and outline the steps you must take to make modifications to the “A record” at your current domain host. For instructions on how to modify the “A record,” check with the company that hosts your domain.
Final Thoughts
As you can see, it’s easy to build and launch your business website with GoDaddy. We’ve tested it, and you can even get one up and running in five minutes!
GoDaddy keeps all of its tools and features under one roof, making it easy for you add special features and unique functionality to your site without having to go through a third party. There’s tons of ways to grow your business with GoDaddy. If you want a deeper dive into how to add some of these tools, be sure to read our How to Use GoDaddy guide.
Get Started With GoDaddy
Find the right plan for your business website and save big with our TRUiC exclusive discount. This deal is automatically applied when you click the button below.
