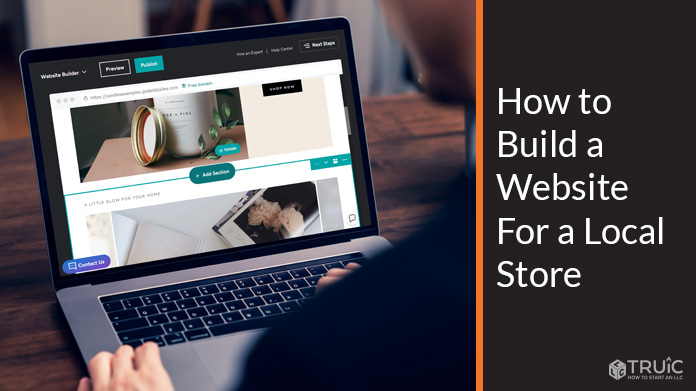
How to Build a Website for a Local Store
As a local business owner providing goods for your community, having a website is important for reaching new customers. But creating a business website can seem difficult to figure out when you factor in time, cost, and technical knowledge.
Knowing where to start, which website builder is best, and what tools to use can help you find the confidence to launch your business site, without any coding skills or expensive designers.
This guide will take you through the process of signing up for the right website builder and publishing your local business website, in just a matter of a few steps. Should you need more resources, refer to our Best Website Builder Review guide to learn more.
Recommended: GoDaddy is our favorite builder for local stores – get started with a GoDaddy free trial.
Summary of This Guide
This article will take you through the necessary steps to properly get your website off the ground. The main required steps are:
- Determine the goals of your local website.
- Select a website builder. Our recommended builder for this type of website is GoDaddy. Save on your subscription through this link.
- Identify the pages your website needs and begin building.
- Find any additional tools that will help you keep track of or expand your local website.
As you may want to revisit this guide while working through these steps, we recommend that you bookmark this page while you begin crafting your website.
What Is the Goal of Your Local Website?
The first step of launching a successful local business is finding the goals that’ll help you thrive. These goals generally guide what your business aims to do and how to best go about running a successful local store. Having these intentions will help you decide the design of your website, and will also aid in measuring your overall success.
For a deeper look into how to find the goals of your business and website, check out our What Makes a Good Website guide.
Identifying Your Business’s Goals
As a local business owner, your goals might vary from those of an online retailer or even a local service provider. For example, if you’re a local vintage clothing retailer, your goal might be to find new vendors for your shop, keep customers updated on events, and find ways to source unique items. Incorporating a sense of permanence and growth is important to both your goals and target audience.
Cultivating a secure base of returning customers is an important goal. Happy customers are one of the best ways to organically spread the word about your business and bring in new shop visitors. This directly relates to another good goal to have — reaching new shoppers. Expanding your customer base will help your small business blossom.
Business goals for a local store can also include sustainable and environmental practices, opening more than one shop location, and finding ways to give back to your local community. These all tie right back into the main goal of securing a base of customers who will keep your business growing.
Using Your Website to Accomplish Your Business Goals
As you identify your website and business goals, it will become easier to understand how to use your shop’s website to achieve them. Even if the majority of your business is performed in-store, having a website that accurately and effectively represents you and your business will make new customers feel informed, welcomed, and comfortable.
There’s a variety of ways to use your store’s website to accomplish your goals. You might consider providing customer reviews, including a map to make it easier to find your location, and having an online chat feature to answer questions. All of these tools are excellent ways to encourage customers to check out your business.
Having a professional website to achieve your goals can sound like an overwhelming task. But, once you understand the mutual relationship between your website and business goals, making a website to support this will come naturally.
For a deeper look at finding the goals of your business and website, read our What Makes a Good Website article.
Which Website Builder Is Best?
There are lots of fantastic website builders available, like Shopify, GoDaddy, and WordPress. Finding the best website builder can be a challenge. Check out our Best Website Builder Review to learn why we’ve chosen GoDaddy for this particular type of website.
| Best Website Builders | |
|---|---|
GoDaddy
4.7/5 |
Best Website Builder Overall
|
Web.com
4.5/5 |
|
Squarespace
4.4/5 |
|
|
Wix
4.4/5 |
|
Shopify 4.3/5 |
Best for Ecommerce
|
WordPress 4.1/5 |
|
Working With GoDaddy
For a small business owner running a local store, we recommend using GoDaddy to create your ideal website. GoDaddy is not only one of the more affordable options, but also one of the easiest to use. GoDaddy provides an all-in-one approach to its services, ensuring most everything you’ll need to build and run your website is under the GoDaddy umbrella. And, the drag-and-drop functionality of the GoDaddy website builder is intuitive and easy.
With GoDaddy you can have a functioning business website in a matter of minutes. Adding specific content is a breeze, and intuitive features are included, like map widgets and ways to instantly connect your social media feeds to keep customers informed. Check out our GoDaddy review to learn more.
How to Build Your Website With GoDaddy
It’s easy to get started with GoDaddy. This next section will walk you through the process of signing up for a GoDaddy account and getting familiar with the basic controls of the builder.
For an in-depth look at how to get started with GoDaddy, check out our How to Make a GoDaddy Website guide.
Getting Started With GoDaddy
The first step to getting started with GoDaddy is to complete the simple and quick sign-up process. We’ll walk you through this and help you get comfortable using the GoDaddy dashboard and main controls.
Having a domain name ready to go will help make this process easier. If you need help finding yours, use our domain name generator to choose a domain for your business.
Signing up with GoDaddy
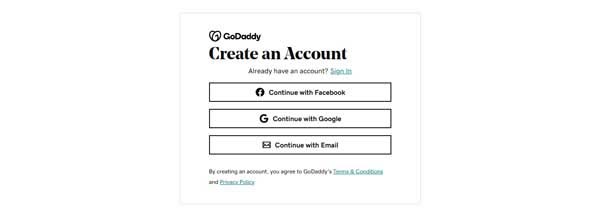
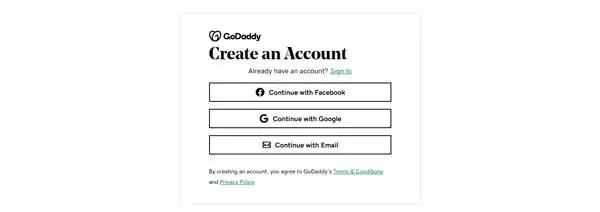
- Head to GoDaddy and click the “Start for Free” button.
- From here, a screen gives you the option of creating an account using your Facebook, Google, or your email information. For the sake of this tutorial, we will choose “Continue with Email.”
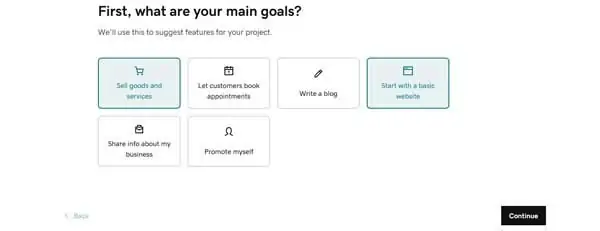
- You will then be asked about the goals of your website. Since this tutorial is for a local store, we are selecting both “Sell goods and services” and “Start with a basic website.” Make your selections and click the “Continue” button.
- Next will be a screen where you can enter your email, username, and password. Fill these boxes in and click the “Create Account” button.

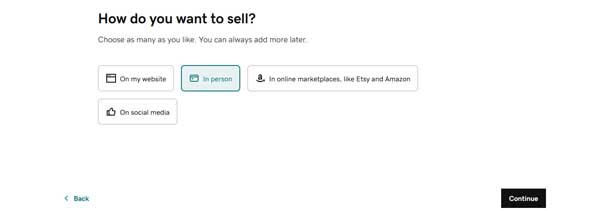
- On the next page, you will be asked “How do you want to sell?” For the sake of this guide, we will select “In-Person.” Click the “Continue” button to move forward.
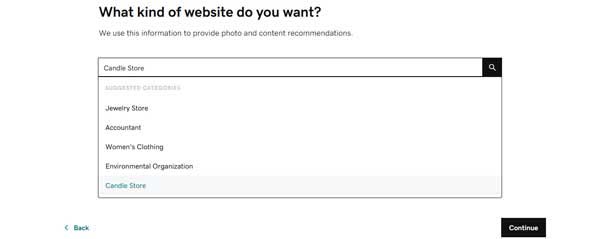
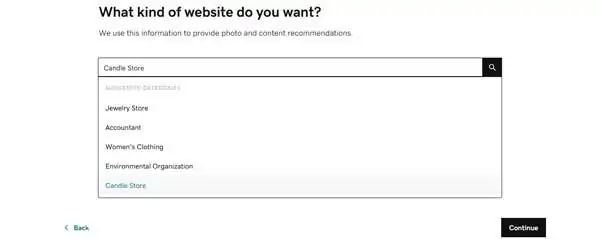
- You will then be asked what kind of website you want. GoDaddy uses this information to fill in your template with images specific to your industry. Use the search bar if your business type isn’t readily displayed. For this tutorial, we selected “Candle Store.” Click the “Continue” button once you’ve made your selection.
- You will then be asked to type in the name of your store and website. Don’t worry, it’s easy to update this section later should you ever need to. Click the “Continue” button when you’re ready to move forward.
- GoDaddy will then create a mock website filled with stock images based on the industry you chose.


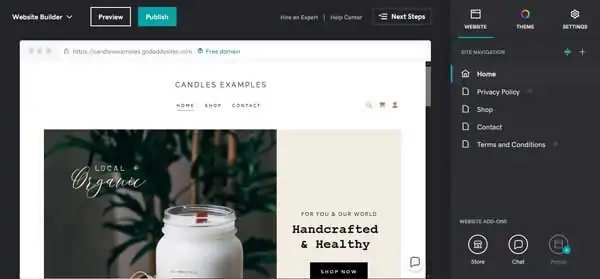
Nice work! You now have a GoDaddy account and are ready to start editing your site. Next, we will show you how to get comfortable using the GoDaddy website dashboard and builder.
Using the GoDaddy Website Builder
Within the GoDaddy site editor, it’s easy to update any content to match your small business. This will be a general overview, for a more detailed guide on how to get the most out of the GoDaddy website builder, read our How to Use GoDaddy article.
Using the GoDaddy site editor:
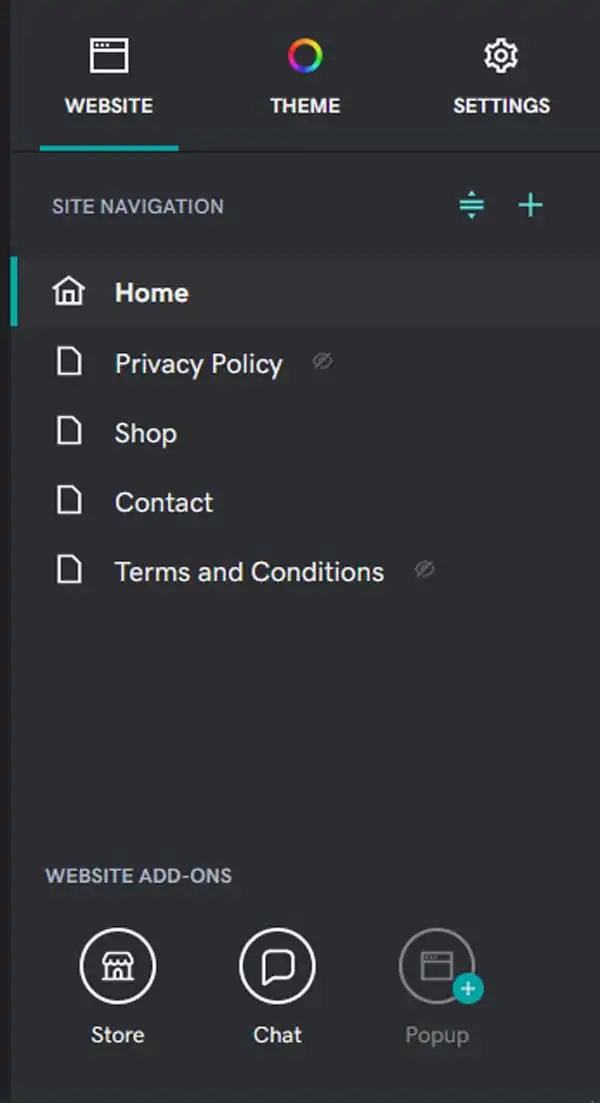
- There are several ways to navigate the GoDaddy site editor. Using the right-side menu, you can quickly alter the style of your website, adjust settings, flip between pages to edit, and include website add-ons.
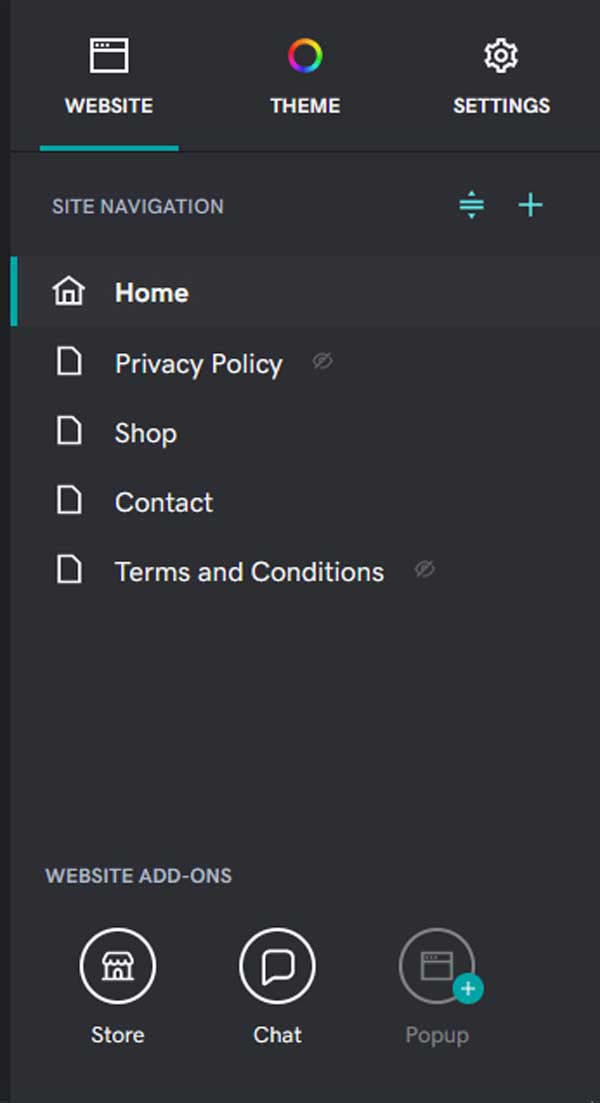
- Editing text or images within the GoDaddy site editor is as easy as clicking on anything you want to change.
- To begin editing text, simply click the text you’d like to update. This will open a new menu on the right-side of the GoDaddy site editor, allowing you to update the accent theme colors, text alignment, and more.
- You can also edit the style and text from the textbox that appears within the main GoDaddy site editor, next to the text you’ve selected.
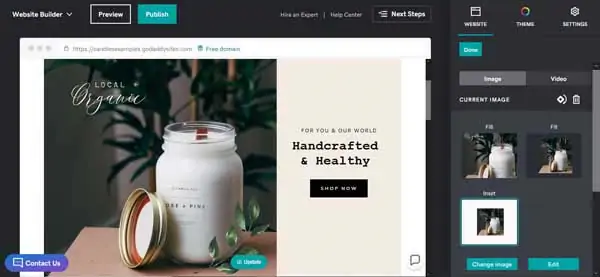
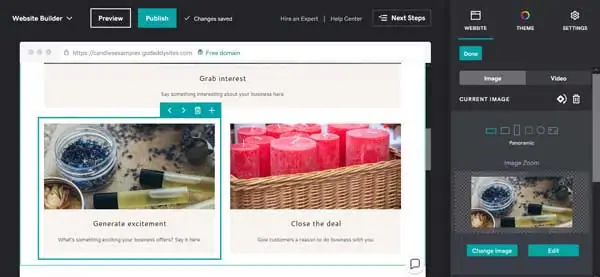
- To update images click on the blue “Update” button in the bottom right corner of any image. This will open a video and image editor within the right-side menu of the GoDaddy site editor.
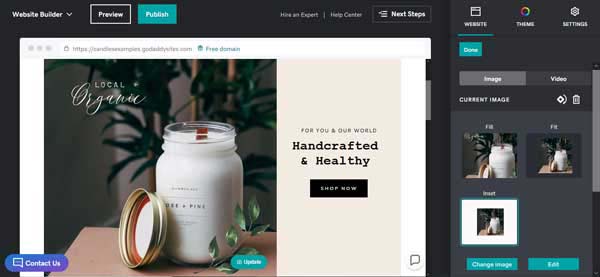
- From here you can adjust the layout of the current image, upload a new photo, and include an image description.
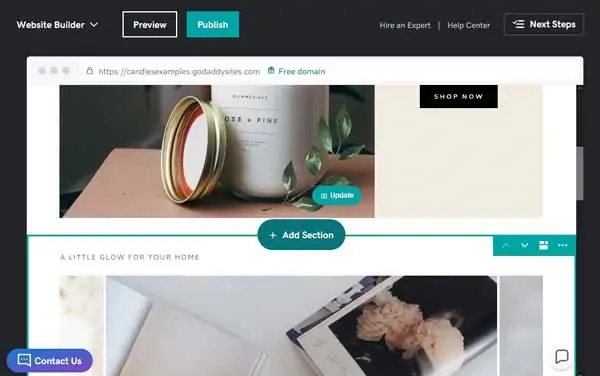
- To add a new section, hover over any blue “+” between sections until “Add Section” appears.

- Click this “Add Section” button to be taken to an “Add Section” menu where you can select from varying section types, as well as see examples of each.
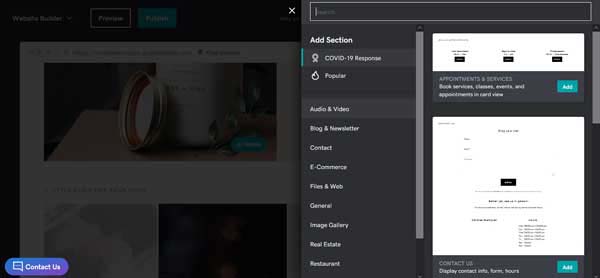
- Once you’ve found a section you like, click the blue “Add” button to instantly place it on your site.
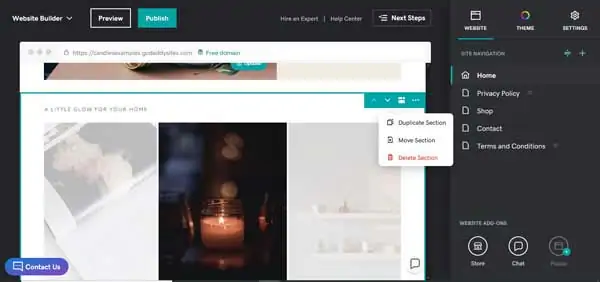
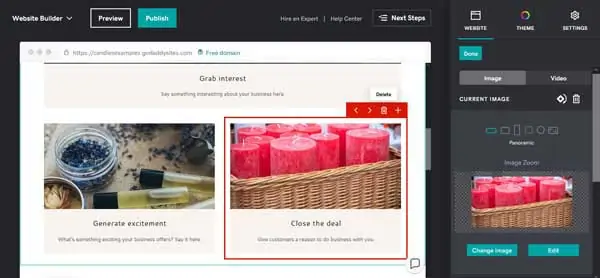
- To perform an action on a section, hover over the section to highlight it. In the right-hand corner of the highlighted section, you’ll find up and down arrows and three dots. Click on the three dots to open a drop-down menu.
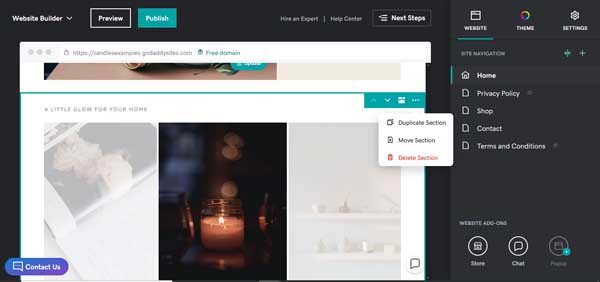
- From this drop-down menu, you can duplicate, move, or delete this section. Clicking “Delete Section” will open a pop-up window confirming you want to perform this action. Press the red “Delete” button to complete this process.
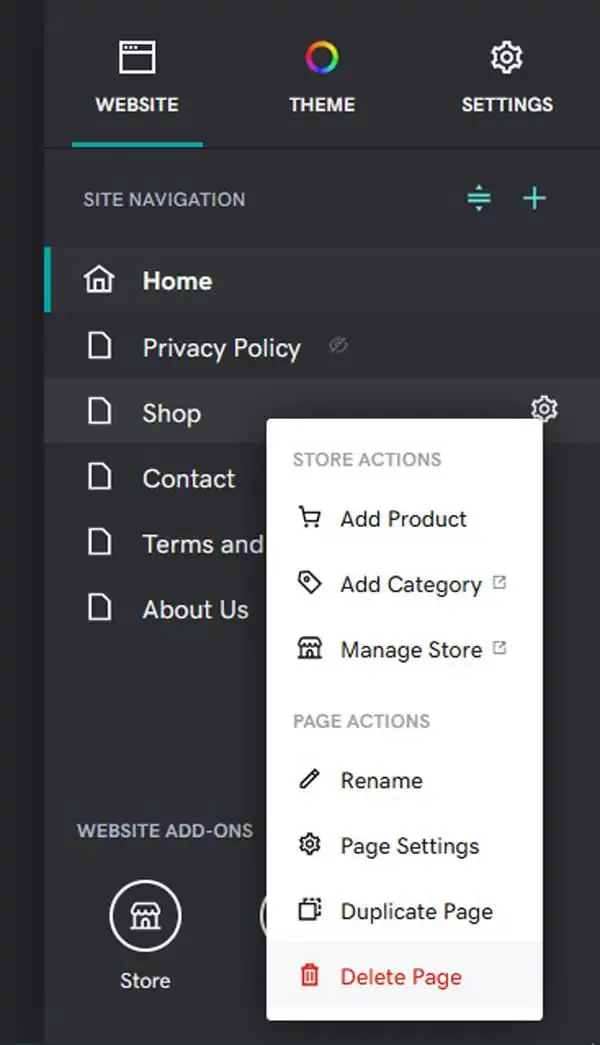
- In some cases, the template GoDaddy provides can have too many pages. The next steps will take you through the simple process of removing an unnecessary page from your GoDaddy site.
- Within the right-side menu of the GoDaddy site editor, hover over the page you’d like to delete. When the “Settings” icon appears, click it to open the following drop-down menu.
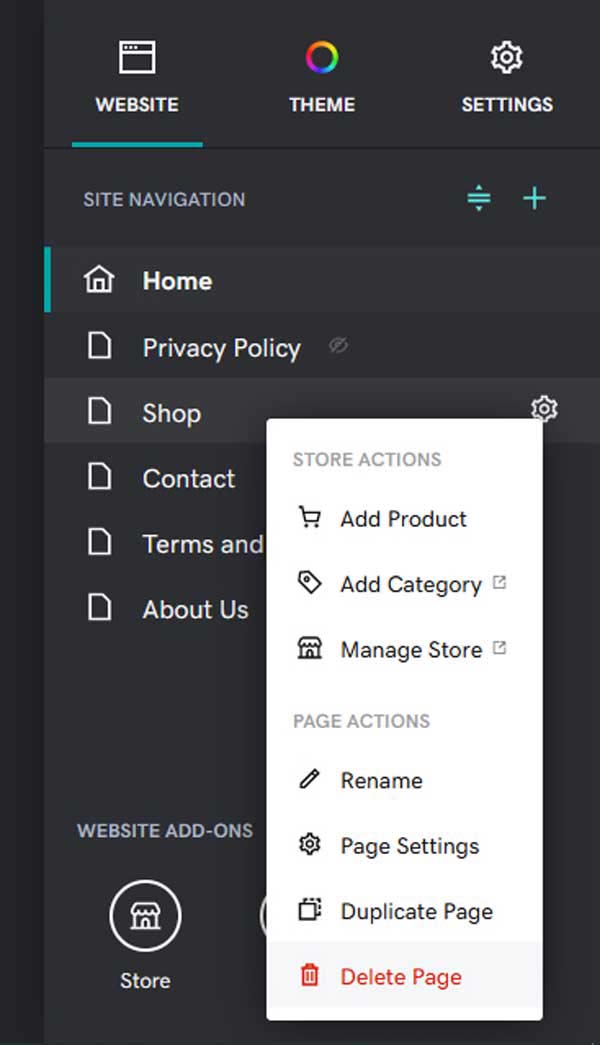
- At the bottom of the menu will be an option to “Delete” this page — select this. A pop-up window asking if you’re sure you want to complete this action will appear. Click the red “Delete” button to remove this page.

Now that you’re more familiar with some of the basics of the GoDaddy website builder, take some time to get comfortable with it. To help you, we’ll walk you through how to add four essential pages with helpful tools to your new website.
For a deeper look at how to use the GoDaddy website builder, check out our useful How to Use GoDaddy guide
What Pages Does a Local Store’s Business Website Need?
Most any website for a local store will need a Homepage, Contact Us page, About Us page, and a Blog page to get started. This section will cover setting up these necessary pages, as well as how to find useful tools to really make them shine.
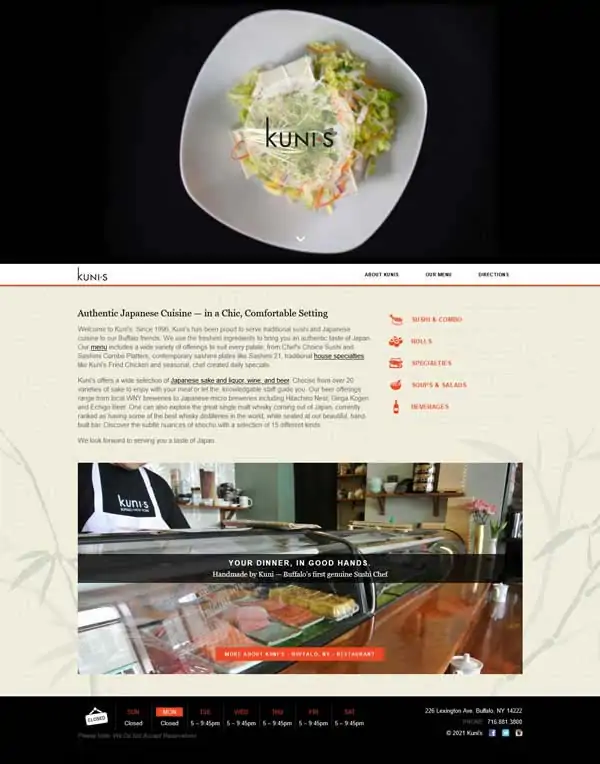
Homepage
Your homepage is the first impression for your website and business, it’s essential to ensure it’s effective and has everything it needs. We’ll walk you through how to create a homepage and connect the tools needed to make it shine.
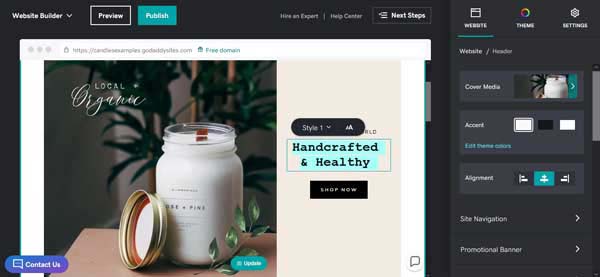
Below is an example of a successful homepage built with GoDaddy for sushi restaurant, Kuni’s. For a deeper look on what makes this homepage successful, and how to make yours the best it can be, read our How to Design a Successful Homepage article.
How to create a Homepage with the GoDaddy website builder:
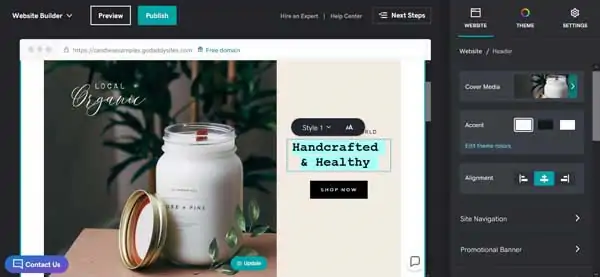
- Within the right-side menu of the GoDaddy site editor, make sure “Home” is selected. This allows you to edit the homepage of your site.

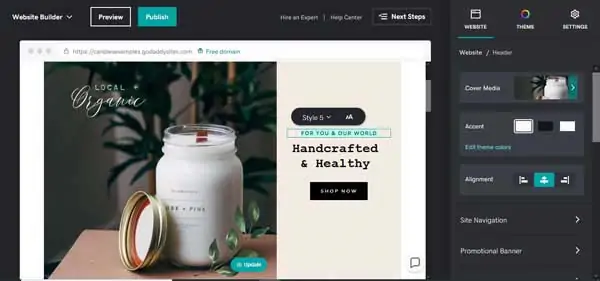
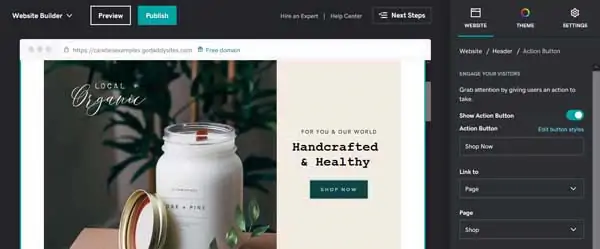
- Select the subhead text of “For Your & Our World” and update it to fit your specific brand.
- Alter the headline text “Handcrafted & Healthy” by clicking it and typing a strong call to action (CTA) that fits your brand and encourages customers to try your shop.
- Click the “Shop Now” CTA button to open a corresponding menu within the right-side of the GoDaddy site editor.
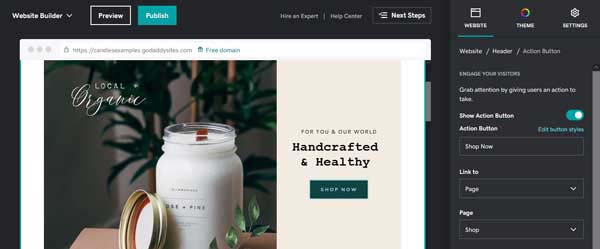
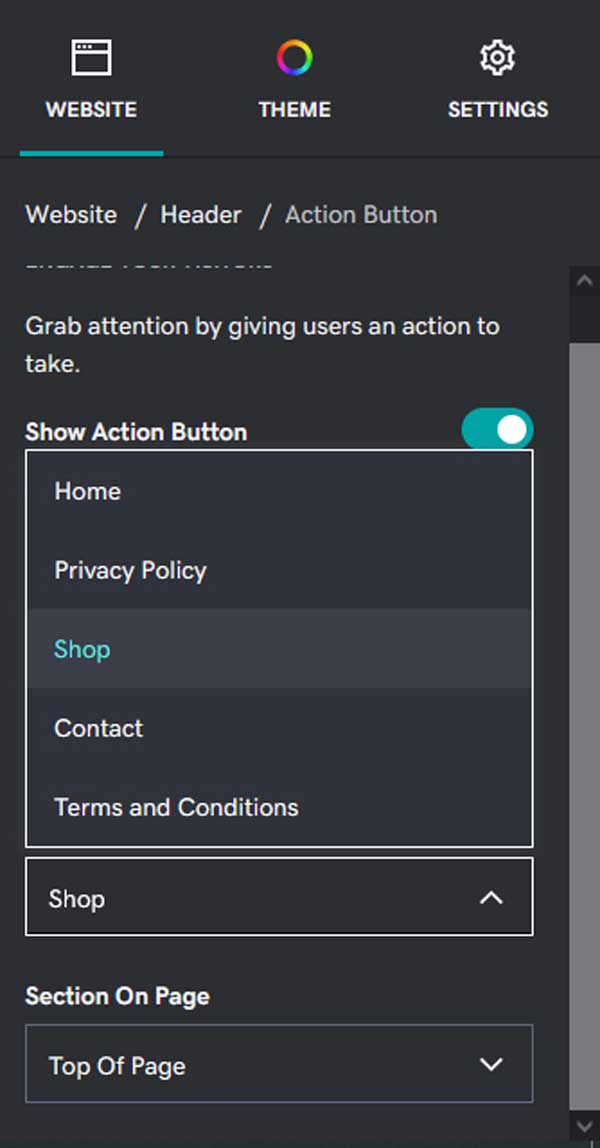
- Within this right-side menu you can alter the text of the CTA button and where it links to. To update where this button links to, simply click on the down arrows within any section to find alternatives.
- Once you’ve updated this button, select the “Done” button at the top of the right-side menu.
- Continue scrolling down within your GoDaddy site editor to update other portions of your homepage. Click to edit, delete, or add sections, and any other actions you may need to take.

Now that you’ve been introduced to the basics, we’ll walk you through adding several essential tools to your homepage. These will include connecting an Instagram account, linking social media icons, and adding a chat-box feature.
Adding essential tools to your Homepage:
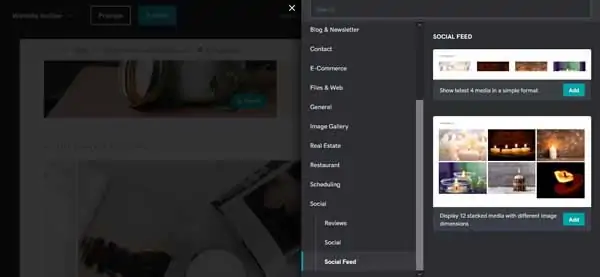
- Connecting your homepage to your Instagram is easy with GoDaddy. Hover between two sections and click the “Add Section” button to open the “Add Section” menu.
- Within the “Add Section” menu scroll down to “Social” and select “Social Feed.”
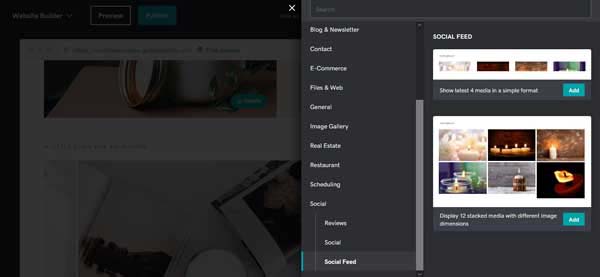
- There will be an option to place a section with either four posts, or 12 stacked media posts. Choose which option you prefer and click the “Add” button to place your new “Social” section.
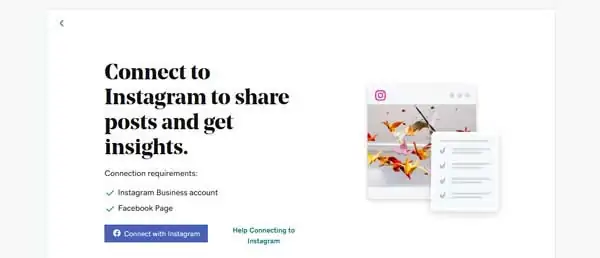
- To connect your new “Social” section to your Instagram business account, click the “Connect Now” button. You will be taken to a separate page to finish this process.

- Click the “Connect with Instagram” button to be taken to a Facebook login screen. From here simply log in to Facebook or create a new business account.
- There will be a screen asking you to confirm the account you’d like to connect to. Click the “Continue as Your Username” button to proceed.
- Please note, you must have both a Facebook account and an Instagram Business account to complete this process. If you don’t have either or both of these, you’ll be prompted to create one.
- Follow the instructions and prompts to allow GoDaddy access to your Facebook and Instagram Business pages. When the process is complete, click the “OK” button to successfully connect your Instagram Business page to your GoDaddy homepage.
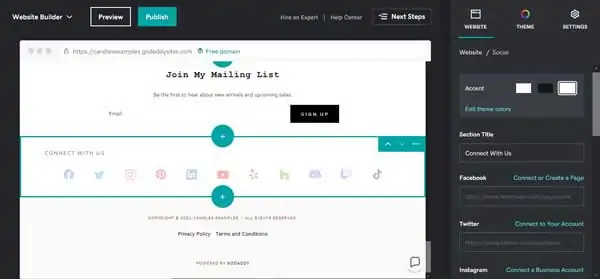
- Now that you’ve connected your Instagram to your homepage, it’s time to add your social icons. These are great tools that connect your site visitors to your social media platforms with a simple click.
- Follow the steps to add a “Social” section to your homepage. Within the “Add Section” menu under “Social” there should now be a “Social Icon” section ready to be placed.

- Click the “Add” button to place this section within your homepage. Click this section to open up the corresponding editing menu within the right-side of the GoDaddy site editor.
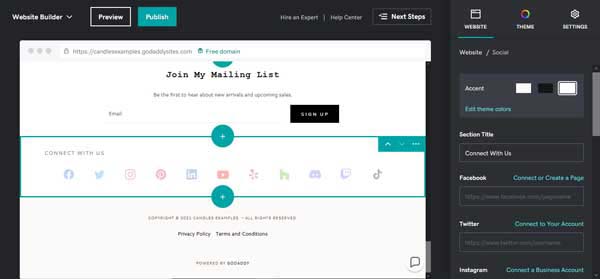
- From the menu on the right, you can type in the links to any of your social media platforms, from Facebook, Twitter, LinkedIn, Yelp, and more.
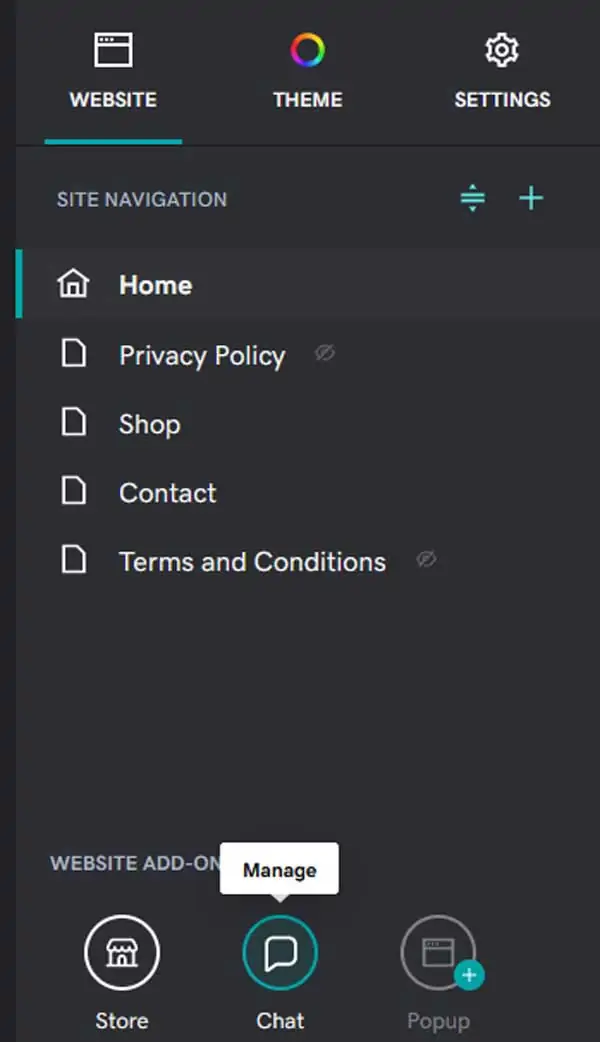
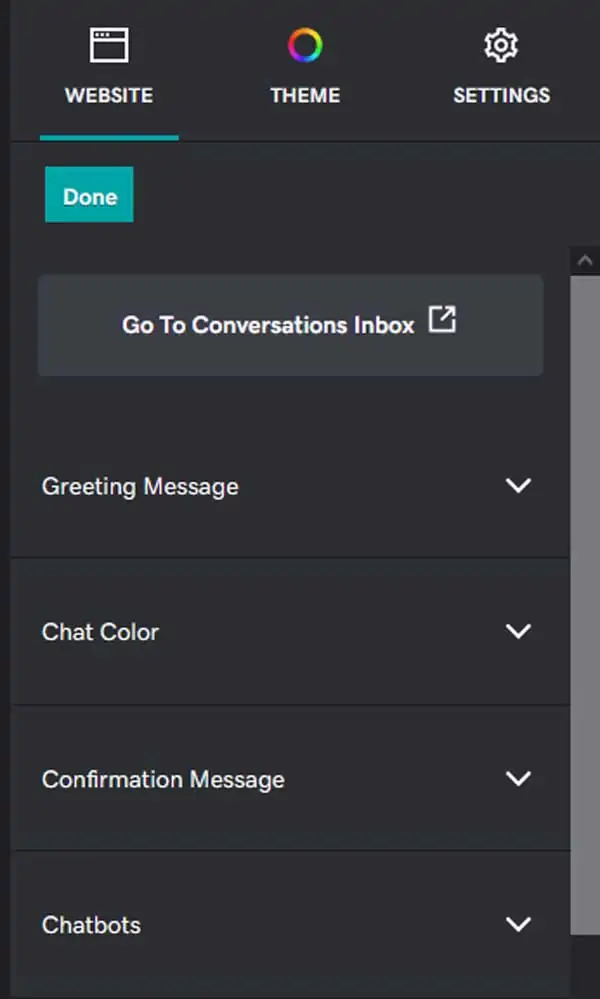
- Once you’ve connected your social media icons, it’s time to set up the chat-box feature. This tool makes it easy for customers to interact, ask questions and can provide a direct way for them to contact you.
- Most GoDaddy business templates will come with a chat-box feature ready to be set up. If you don’t see a little chat-box icon within your GoDaddy site editor, make sure “Chat” is selected underneath “Website Add-Ons.”
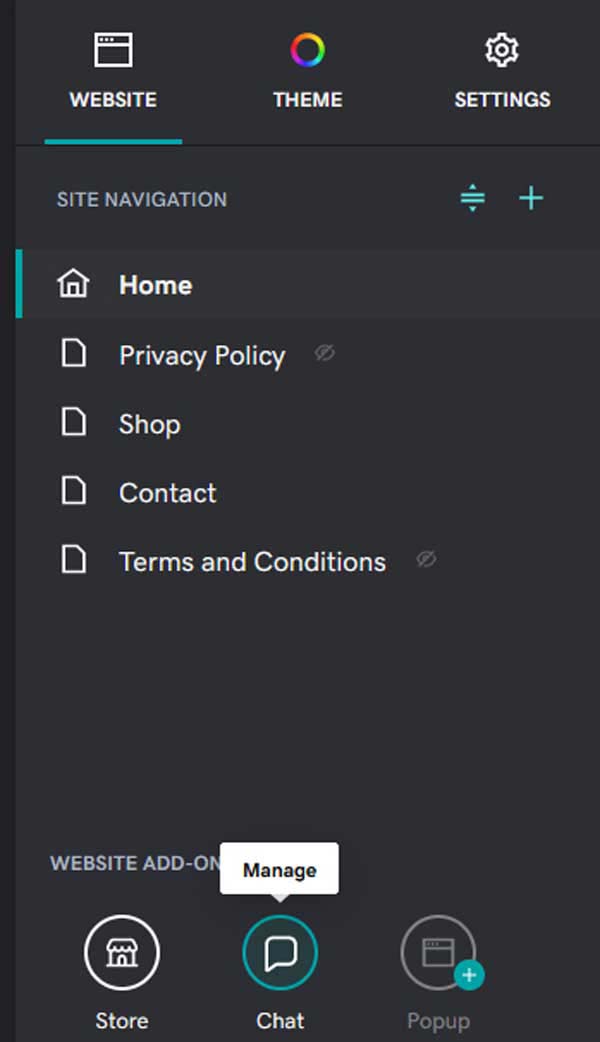
- Click the chat-box feature within your GoDaddy site editor. This will open up a sample chat-box form and a right-side menu you can edit from.
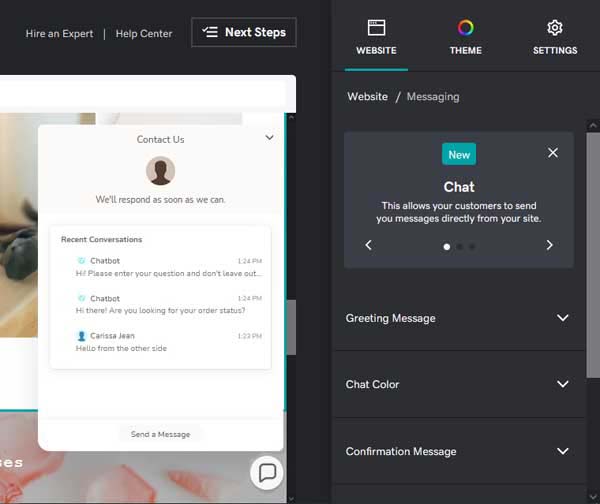
- GoDaddy has updated the capabilities of its chat-box feature. There is now an all-in-one way to chat directly with customers, have a bot handle the bulk of the back and forth, and even manage this feature via your mobile device.
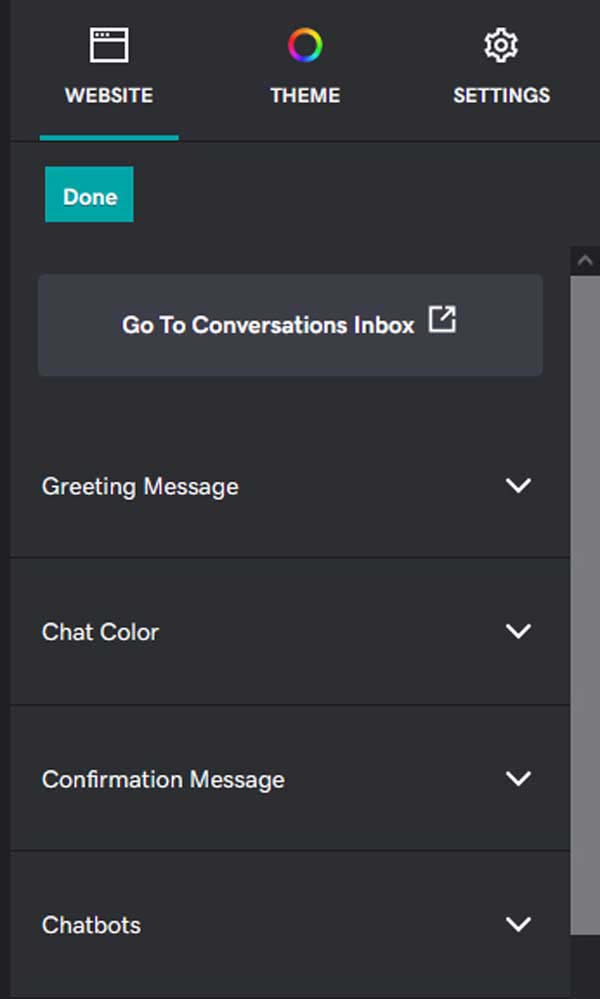
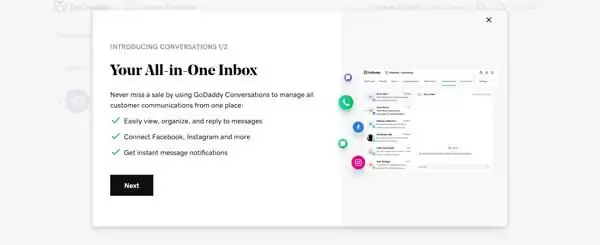
- To get this feature set up, click “Go to Conversations Inbox” within the right-side menu of the GoDaddy editor.
- From there, you will be taken to a separate page prompting you to set up this versatile inbox.
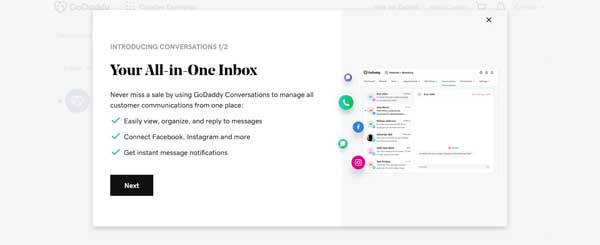
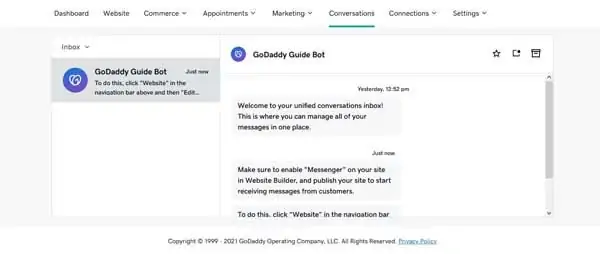
- Follow the instructions and click “Next” to arrive at your “Conversations Inbox” within your GoDaddy dashboard.
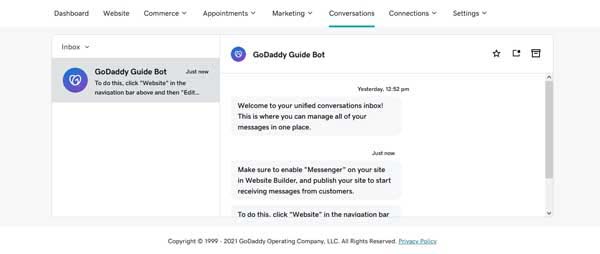
- From here you can manage your conversations, review bot chats, and more.
- Return to your GoDaddy site editor to complete the process of customizing this chat-box feature. Use the right-side menu to manage the greeting and confirmation messages, update the color, update chatbot settings, and more.
- Once you’ve finalized all your changes, click the “Done” button within the right-side menu to update.


You now have a homepage with three essential tools to really set it apart. However, a successful website needs more than just one page. Continue on to set up your Contact Us page and beyond.
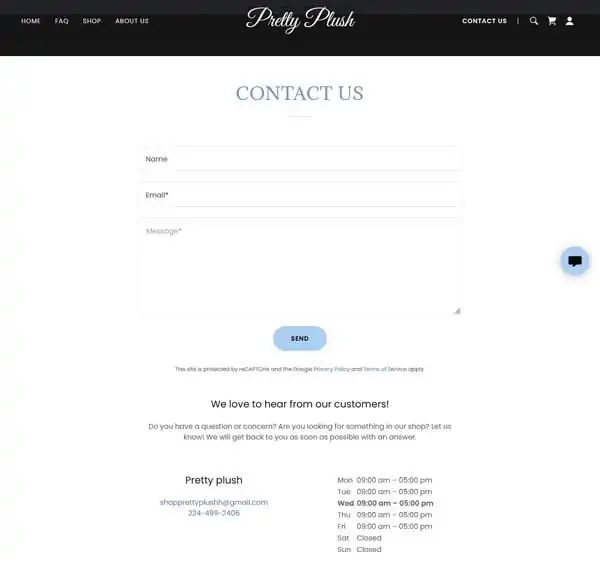
Contact Us Page
Your Contact Us page is where visitors should find several ways to get in touch with you and your business. We’ll walk you through how to create a Contact Us page and what necessary tools can help improve customer experience.
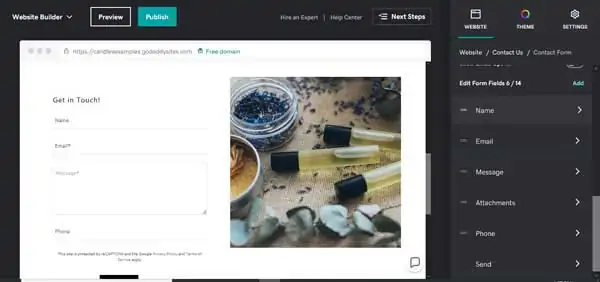
Below is an example of a successful Contact Us page built with GoDaddy for beauty sleepwear company Pretty Plush. For a deeper look at what makes this page successful, and how to make your Contact Us page the best it can be, read our How to Design a Successful Contact Us Page article.
How to create a Contact Us page with the GoDaddy website builder:
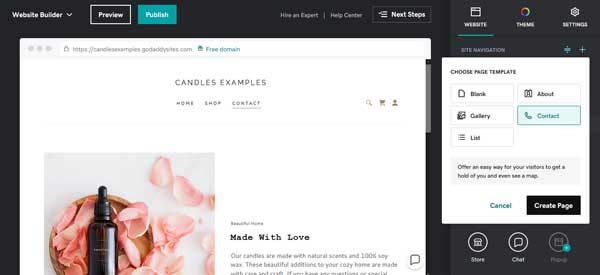
- GoDaddy should include a Contact Us page in its templates. Within the right-side menu of the GoDaddy site editor, click on “Contact” to be taken to your editable contact page.
- If you need to create a “Contact Us” page, click the blue “+” in the upper right corner of the GoDaddy editor. From the drop-down menu, select “New Page.”

- From the next menu, select “Contact Page” and then click the “Create Page” button to place this new “Contact” page within your GoDaddy site editor.
- Edit any of the sections within your “Contact” page by simply clicking them. To update any text, a helpful textbox editor will appear.
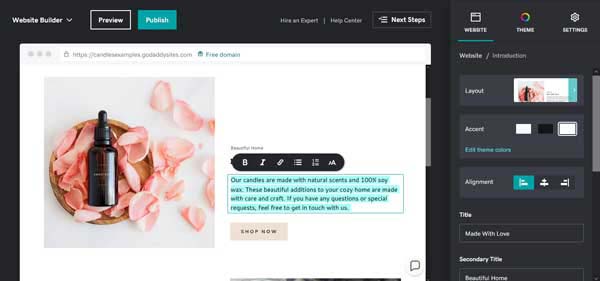
- You can also use the right-side menu to update text and media, edit your CTA button, and display your social media accounts.

Next, we’ll walk through adding a couple of essential tools to your Contact Us page. These will include setting up your contact form and adding a map widget.
Adding essential tools to your Contact Us page:
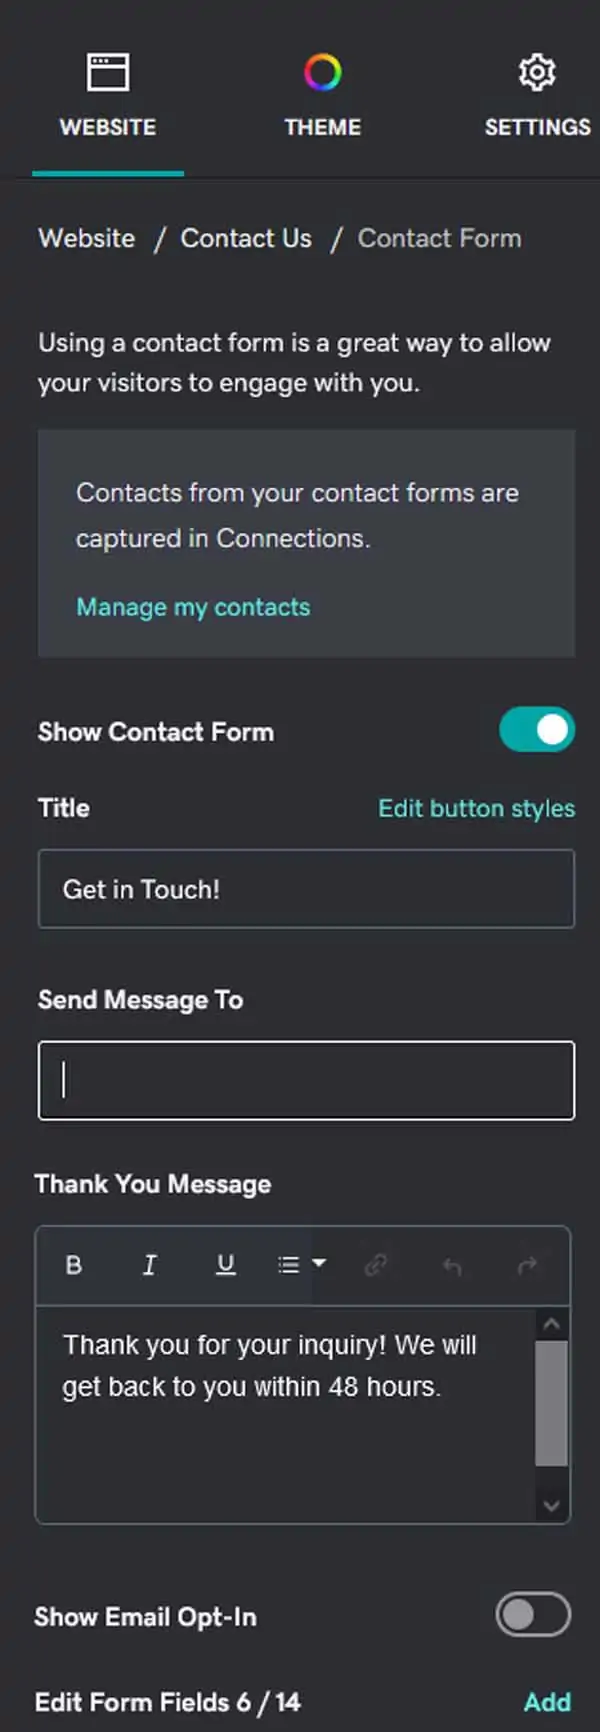
- GoDaddy will most likely include a contact form within any generic “Contact Us” page template. To begin editing this tool, click on “Contact Form” in the right-side menu, or click on the “Contact Form” section within the GoDaddy site editor.
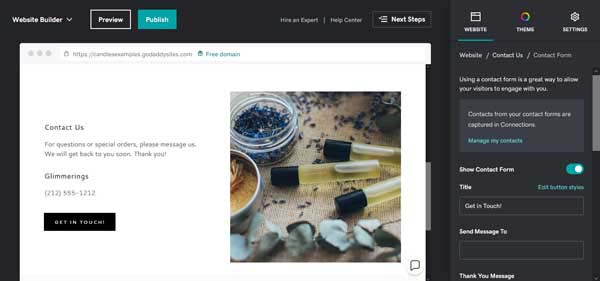
- From the “Contact Form” editor of the right-side menu, you can update the title of this form, connect it to your email account, update the “Thank You” message, and edit the form fields.
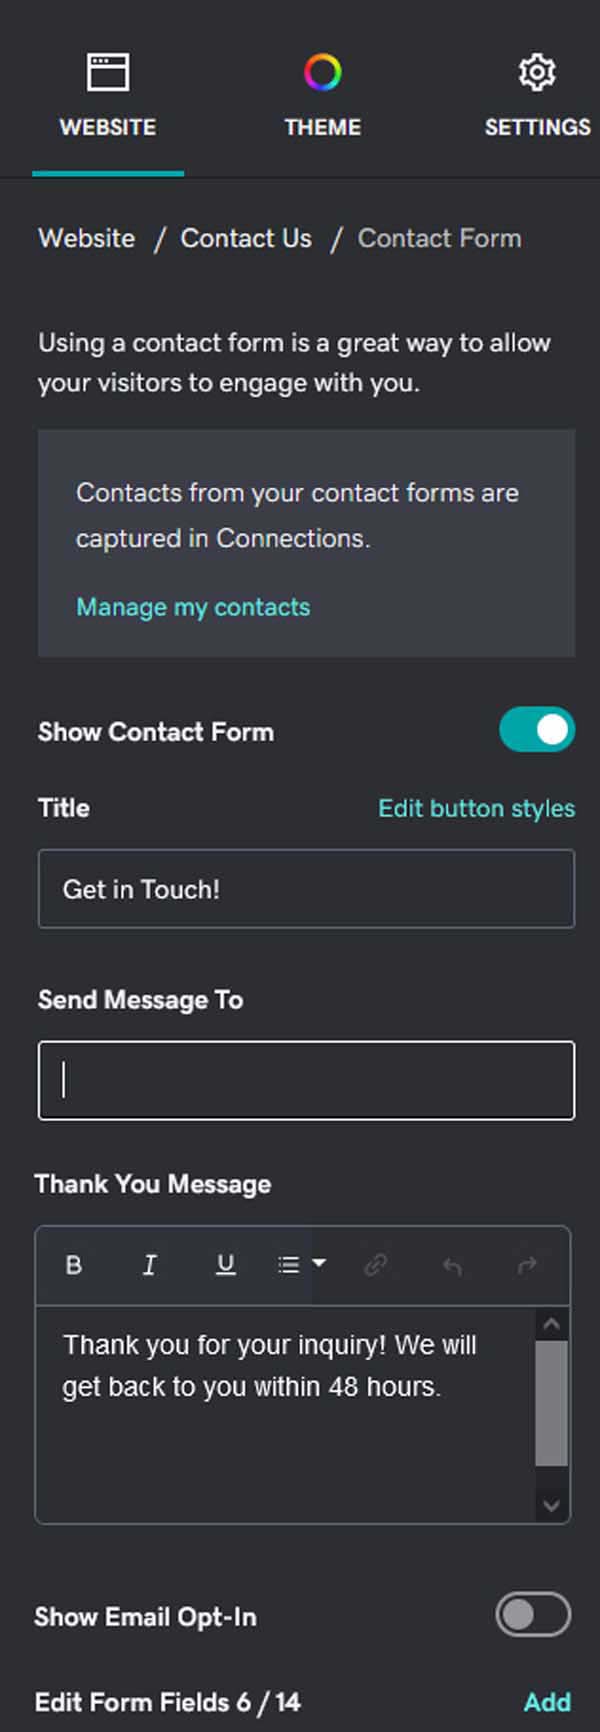
- Find the section you’d like to edit, and click the arrow to go to its corresponding menu. Conversely, you can click on any section within the GoDaddy site editor and alter it from there as well.

- From either location, you can update the field name, alter the input type, ensure it is a field that visitors must fill out, or even delete the selected field. Once you’ve finished making your updates, click the “Done” button.
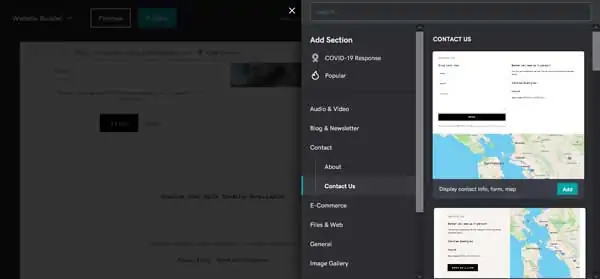
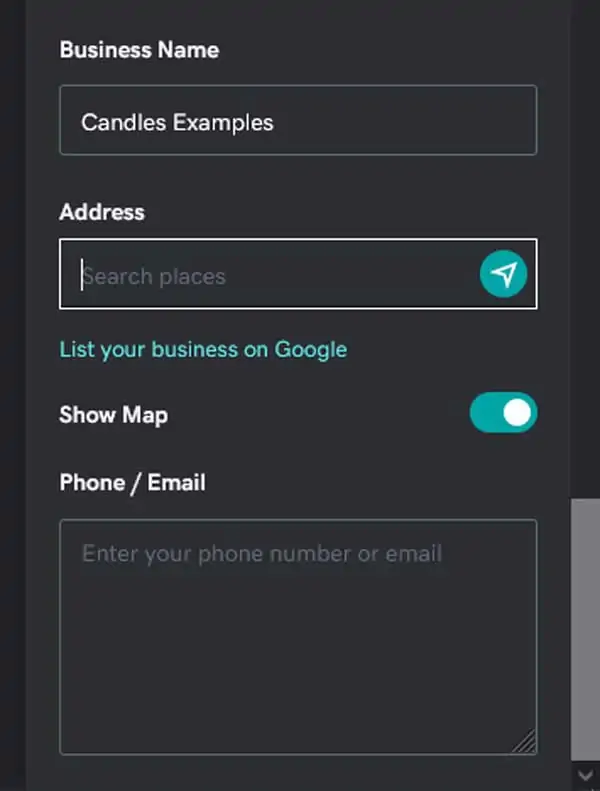
- Now that your contact form is ready to go, it’s time to add a map widget. These allow customers to find your location easily and improve their overall experience on your site. If your “Contact Us” page didn’t come with a map widget already placed, adding one is easy.
- To place a map widget, hover between two sections and click the “Add Section” button that appears. From the pop-up menu, select “Contact” and then “Contact Us.”

- On the right, a list of suggestions will open, scroll through to find an option with a map that best suits you. Click the “Add” button to instantly place this within your “Contact Us” page.
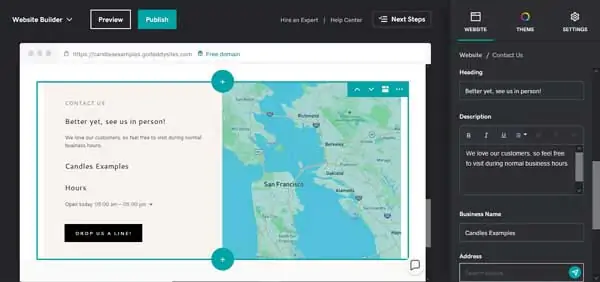
- Within your newly placed map section, click anywhere to open the corresponding right-side menu. From here you can update the title, heading, and description of this form.
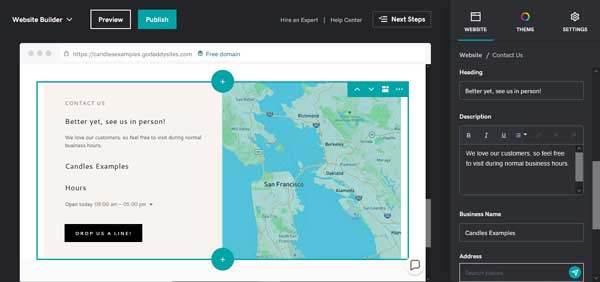
- Within the right-side menu, scroll down to enter your business name, address, and enter a phone number or email. Ensure the “Show Map” toggle is switched to the right.

- Once you’ve completed all the necessary changes, click the “Done” button to have them all saved within the GoDaddy site editor.
Now that you’re getting more familiar with the GoDaddy website builder, these next few pages will feel a bit easier and intuitive to set up. The next page to complete is the About Us page.
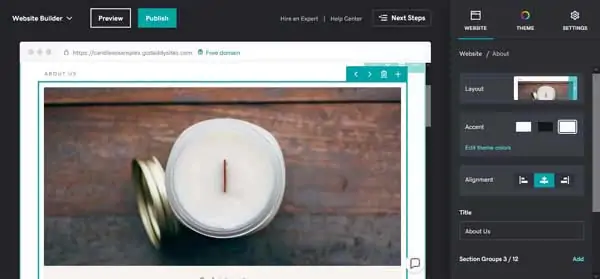
About Us Page
Your About Us page is where visitors can get to know you and any vendors or employees your local store might have. We’ll take you through how to create an About Us page and what useful tools can help encourage customers to interact with your business.
Below is an example of a successful About Us page built with GoDaddy for polymer clay jewelry company Little Miss Poly. For an in-depth look at what makes this page successful, and how to make your About Us page the best it can be, read our How to Design a Successful ‘About Us’ Page article.

How to create an About Us page with the GoDaddy website builder:
- Most GoDaddy templates need an “About Us” page to be added. To add an “About Us” page to your site, follow the same instructions as setting up a new “Contact Us” page, but instead choose “About” instead of “Contact.” Once your new page is placed, you can begin editing.
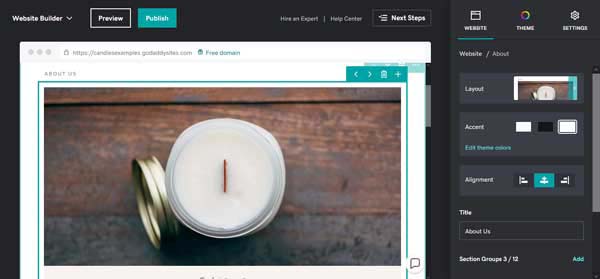
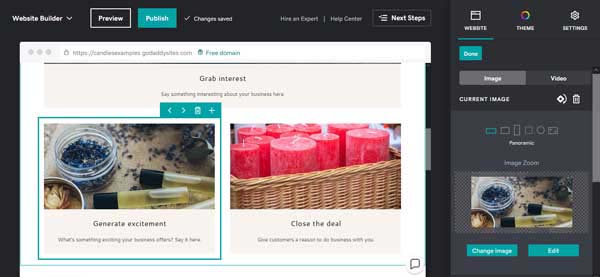
- You can edit this page by using the right-side menu or clicking on images or sections within the GoDaddy site editor.
- Click on any image you would like to update and an editing menu on the right side of the GoDaddy site editor will appear. Within this menu, you can alter the layout of the image, rotate, edit, or upload a new photo entirely.
- To remove any unwanted sections, click the section you’d like to delete, this will highlight it. Within the top right of the section, find the garbage can icon. Hovering your mouse over this icon will change the highlighted section from blue to red.

- Click the “Delete” garbage can icon. A pop-up window will ask if you’re sure you want to delete this content. Click the red “Delete” button to remove the section from your site.
Once you have a good feel for the layout and content of your About Us page, it’s time to add some essential tools. These include adding a “Reviews” section and an “Our Partners” section to highlight any vendors you’d like to showcase to make finding your products easier.
Adding essential tools to your About Us page:
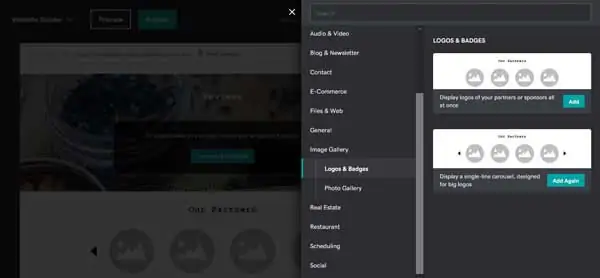
- For most business “About Us” templates, GoDaddy will include an “Our Partners” section. If your template doesn’t come with one already, this is simple to add.
- Hover over where you’d like to place this section in your GoDaddy site editor and click “Add Section.” From the “Add Section” menu, scroll down to “Image Gallery” and select “Logos and Badges.”
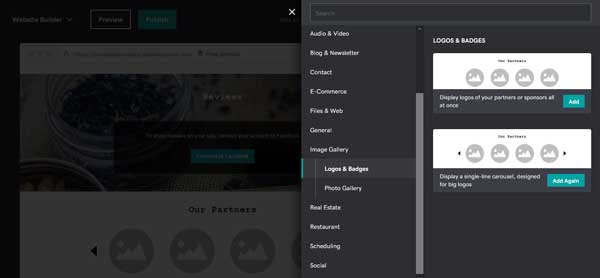
- You can choose either to display logos of your partners or opt for a single-line carousel. For this guide, we are using the single-line carousel section. Click “Add” to instantly place this in your GoDaddy site editor.
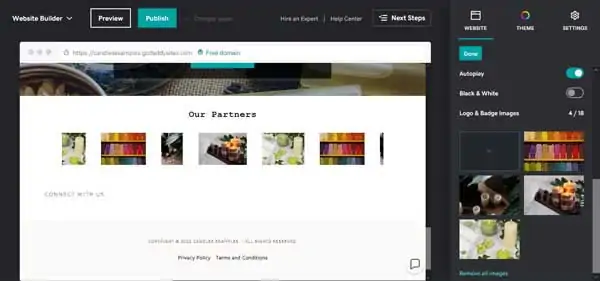
- Simply click inside this new section to begin editing. Using the right-side menu you can alter the title and begin adding images.
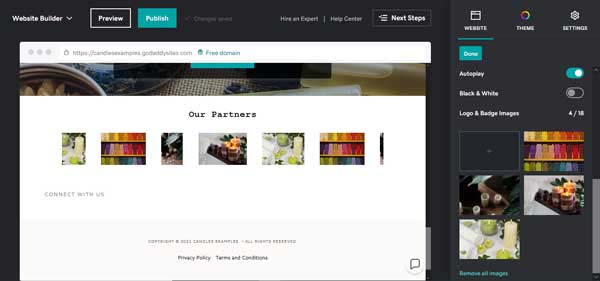
- To add images, click on the black square with a “+” in the middle. This will take you to a separate screen where you can choose from GoDaddy’s image library, or upload your own. Make sure all images you upload are professional and you have the right to post them on your website.
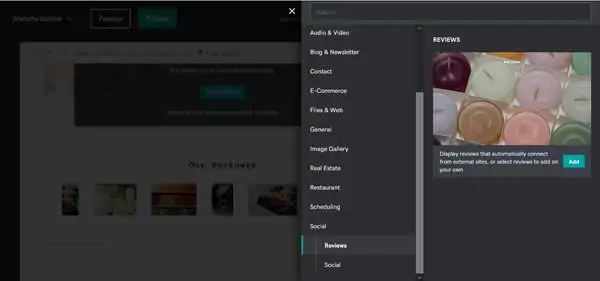
- Once you’ve gotten your photos uploaded, it’s time to set up your “Reviews” section. Some GoDaddy templates for “About Us” pages already come with this section included. However, if you need to add this to your page, the process is simple.
- Hover over between sections and click the “Add Section” button. From the “Add Section” menu, scroll down to “Social” and click to expand the drop-down menu. From here select “Reviews” and then push the “Add” button to place this reviews section into your GoDaddy site editor.

- If you’ve connected your Facebook account to GoDaddy, this section will already be set up for you to either add reviews from your Facebook business page, or you can manually enter them.
- If you haven’t linked your Facebook account to GoDaddy, click the “Connect to Facebook” button within your new section and follow the instructions. These steps will be very similar to the connecting Instagram steps.
Nicely done! You now have an About Us page with tools to make it shine. Next, it’s time to set up your Blog page. Having an engaging and intuitive Blog page is a great way to interact with your target audience. Knowing what features you need to make yours truly stand out is important.
Blog Page
Your Blog page is where visitors can read informative pieces on your process, what you offer, and your journey to becoming a local business owner. We’ll walk you through how to create a Blog page with the essential tools to invite readers to become customers.
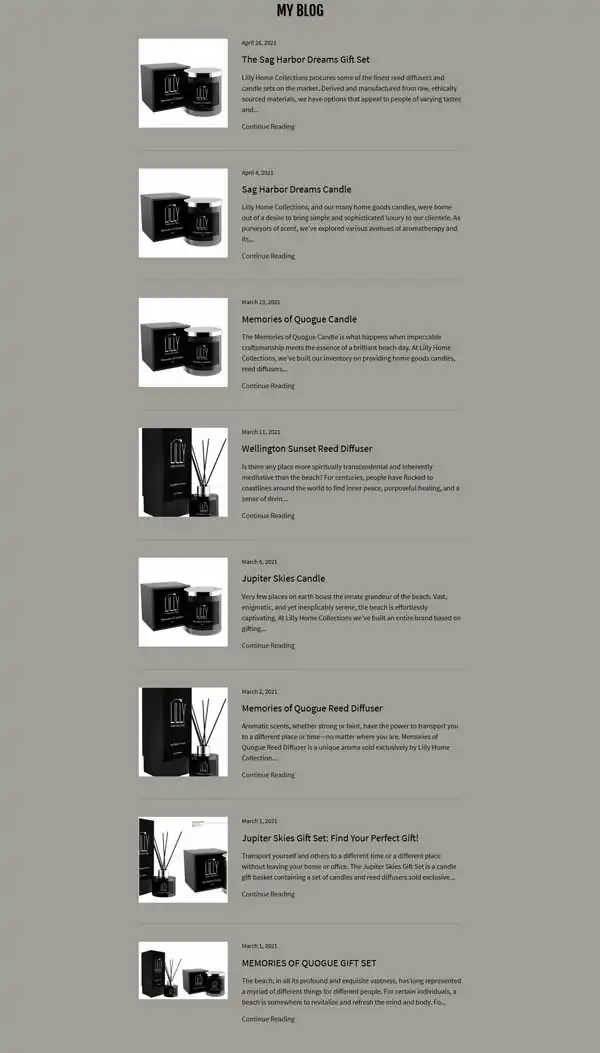
Below is an example of a successful Blog page built with GoDaddy for candle and gift company Lilly Home Collections. For a deeper look at what makes this page successful, and how to make your Blog page the best it can be, read our How to Design a Successful Blog Page article.
How to create a Blog page with the GoDaddy website builder:
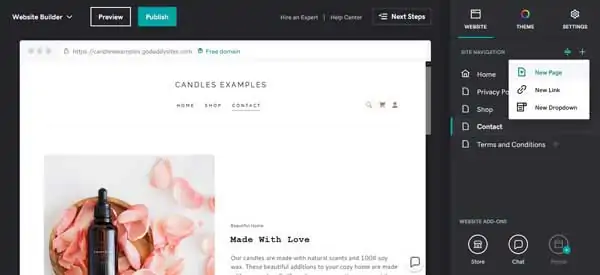
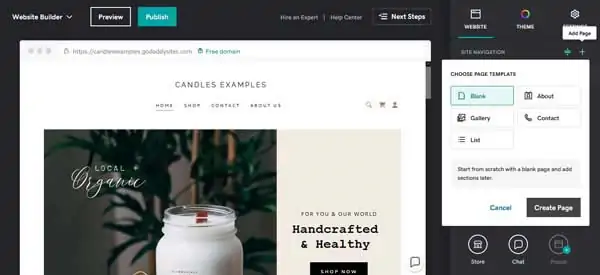
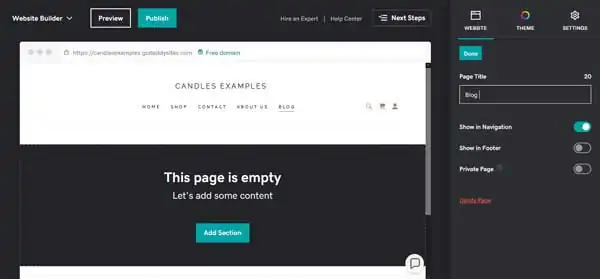
- It’s simple to add a Blog page to any GoDaddy template. In the right-side menu, click the blue “+” icon to add a new page.

- Choose “Blank Page” and click the “Create Page” button to place this page within the GoDaddy site editor.
- Within the right-side menu of the GoDaddy site editor, complete the process of setting up this page by updating the page title, and deciding if it should appear in the main navigation, the footer, or if it should be a private page.
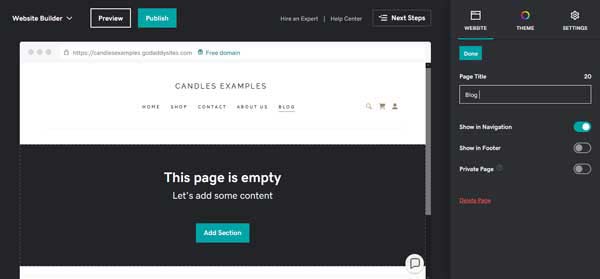
- Click “Done” when all your changes are complete. It’s now time to begin updating and editing this Blog page.
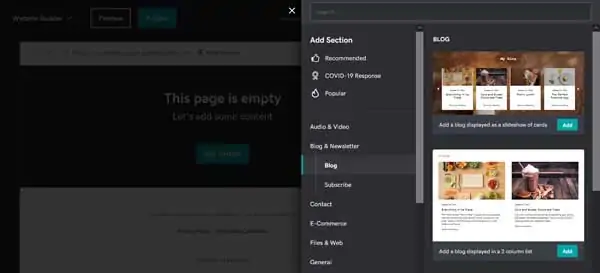
- Click the “Add Section” button to open the “Add Section” menu. From this menu, scroll down to and select “Blog & Newsletter” to open another drop-down menu.
- From this drop-down menu, select “Blog” and choose from the provided options. Click the “Add” button to place this new Blog section directly onto your page.

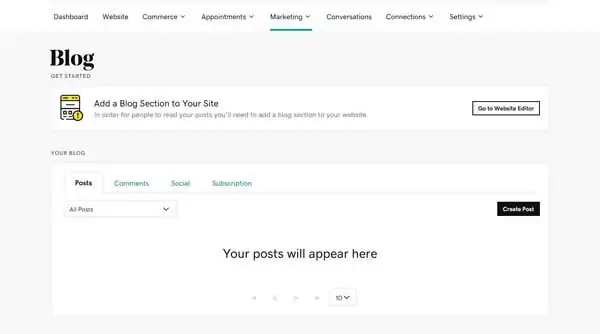
- To begin crafting your blog, click the “Start Writing” button to be taken to the “Blog” section of your GoDaddy Marketing dashboard.

- From here you can create posts, enable comments, allow for readers to share your posts on social media, and set up a way to email your posts to subscribers. More information on how to do this will be in the Adding Essential Tools section.
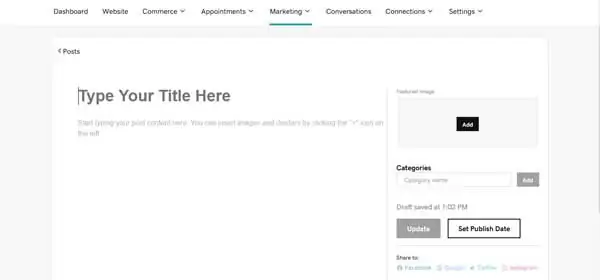
- To get started, click the “Create Post” button. You will be taken to a screen where you can give your post a title and body, upload an image, publish it immediately, or set up a date for it to go live. You can even connect your post to your social media.
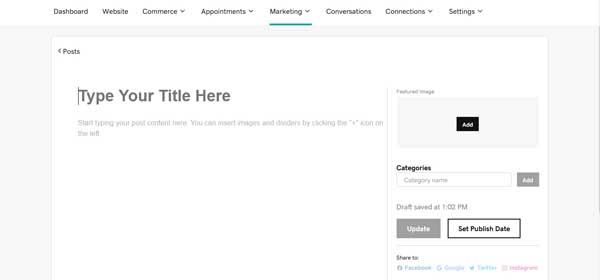
- To publish your blog posts, your GoDaddy site must be live. If you haven’t launched your GoDaddy site yet, simply schedule this post to be published on a date after you’ve completed your site.
Now that you’ve been given a brief overview of what a GoDaddy Blog page can do, it’s time to dig into how to connect these tools and services. This will include a discussion on how to set up a comments section, how to allow visitors to share your blog posts on social media, and how to email your blog posts to subscribers.
Adding essential tools to your Blog page:
- From the “Marketing” section of your GoDaddy dashboard, select “Blog” to arrive at the main dash for writing and publishing your blog.
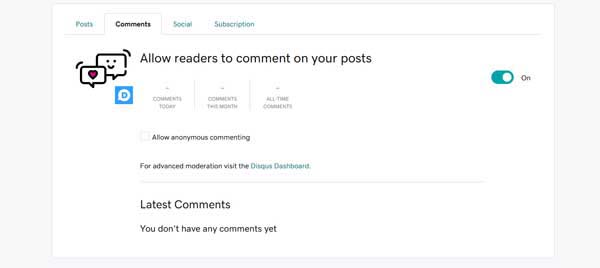
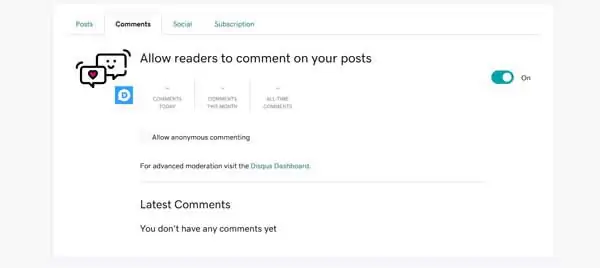
- To turn on comments, click on the “Comments” tab. To allow readers to comment on your posts, you must sign in or create a free account with Disqus.
- To do this, slide the “Activate Comments” toggle to the right. This will cause a pop-up window to appear, prompting you to sign-up for or sign in to your Disqus account.
- Enter in the necessary information and click the “Allow” button to sync your Disqus account with your GoDaddy Blog.
- You will then be returned to your “Comments” dashboard where you can monitor any future blog post discussions.
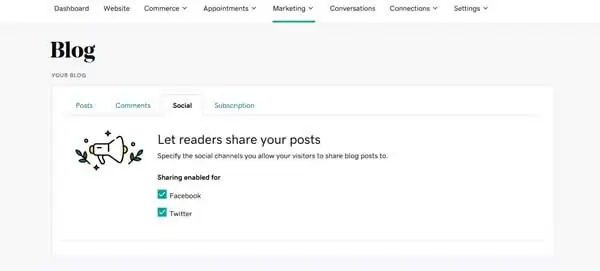
- To set up ways to share your blog on social media, simply click the “Social” tab of your GoDaddy Blog dashboard.

- Check the social media platforms you’d like your posts to be shared on. GoDaddy will automatically add a social icon for your Blog page readers to click next to each post. These make it so these posts can be shared on your readers’ social feeds.
- Click the “Subscribe” tab of your GoDaddy Blog dashboard to begin setting up ways to email your subscribers your blog posts.
- Click the toggle to turn on this useful feature.
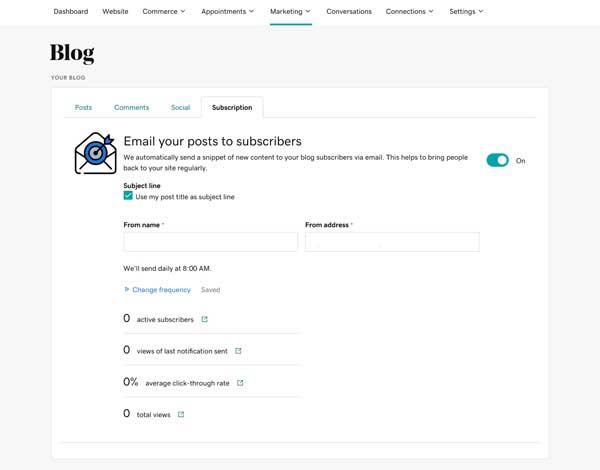
- From here you can change the frequency with which these posts are sent out, keep track of your subscribers and notifications, and view useful analytics like how often your email posts are viewed.

Congratulate yourself — you now have a four-page website for your local shop. Plus, these pages have added features and tools to help you succeed.
Other Pages a Local Business Website Might Need
Along with the pages already discussed, your website will probably need a few more to make it the best it can be. Read these useful guides to learn what these pages are and what they’ll need:
What Other Tools Does Your Website Need?
Now that you have the necessary pages for your site and features to make these pages shine, it’s time to discuss sitewide tools. These can be used to organize and track analytics and data, create and send out email campaigns, and other software to boost your business and customer experience. We’ll be going over three main areas: analytics, email campaigns, and customer relationship management (CRM) technology.
Using Analytics With the GoDaddy Website Builder
As confusing as the term “site analytics” might seem, these are actually incredibly easy to use and are a vital tool for measuring the success of your business and website. These can point out where your website is doing well, and what parts might need to be adjusted.
These tools help you track sitewide clicks, to better see what visitors are most drawn to. They also collect and organize information from surveys you’ve created, contact forms that have been filled out on your site, and other data customers may have entered while visiting your website.
One of the best options for sitewide analytics is Google Analytics. Read our article on How to Add Google Analytics to GoDaddy to help you better understand how to achieve the goals of your website.
Using Email Campaigns With the GoDaddy Website Builder
One of the strongest tools for a small business owner is launching an email campaign. This can be in the form of a newsletter sent to customers on a regular basis, pointing them back to your website and keeping them in the loop with what’s going on in your shop. Having an email collecting tool on your website can help you expand your reach, keep track of site visitors, and more.
GoDaddy is a platform that provides these tools and services for its users. With GoDaddy Email, you can collect email addresses, create newsletters, and send out sales announcements and coupons. Check out our article on How to Use GoDaddy Email to begin setting up and using this intuitive feature.
Using CRM Technology With the GoDaddy Website Builder
CRM can easily appear complicated, but it’s really just a regular feature to help small business owners better organize their analytics and data. There are several trustworthy platforms like HubSpot, Zoho, or Salesforce that can help you get started with this process.
These management systems help you stay on target with your goals, better understand convoluted analytics, and increase communication between you, your employees, and customers. For a deeper look at how to set up your GoDaddy site with everything it needs, read our How to Use GoDaddy article.
To learn more about CRM systems and what they can do for your business, refer to Startup Savant’s guide to What Is CRM?
Moving Forward
Nice work! Now that you have officially signed up for GoDaddy you can set up your professional business website with the essential pages needed to make it stand out.
Be sure to use our Related Articles further below to find more resources and begin building and running your successful business website.
Get Started With GoDaddy
We recommend GoDaddy for small business owners looking to make a professional website for their local store. TRUiC readers receive an extra discount on any GoDaddy plan of their choice by clicking the button below!