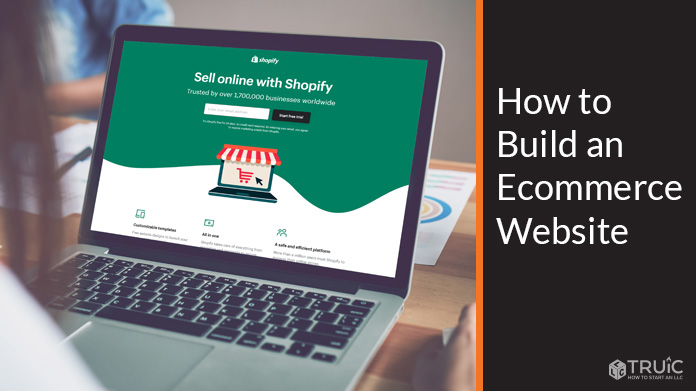
How to Build an Ecommerce Website: Step By Step Guide
As an ecommerce business owner providing goods for shoppers online, having a website is vital for reaching new customers. But creating a business website can prove challenging, especially when you factor in time, cost, and technical knowledge.
Knowing where to start, which website builder is best, and what tools to use can help you build your own ecommerce website, without needing any coding skills or hiring expensive designers.
This guide will take you through the process of signing up for the right ecommerce builder and publishing your own online store, in just a matter of a few steps.
Recommended: This guide uses Shopify to create a great online store. Follow along with a Shopify free trial to get started.
Summary of This Guide
This article will take you through the needed steps to properly get your ecommerce website off the ground. The main required steps are:
- Determine the goals of your ecommerce website.
- Select a website builder. Our recommended builder for this type of website is Shopify. Begin your free trial through this link.
- Identify the pages your website needs and begin building.
- Find any additional tools that will help you keep track of or expand your online store.
You may want to revisit this guide while making your way through these steps. Be sure to bookmark this page as you begin creating your website, for easy reference and useful reminders.
What Is the Goal of Your Website?
The first step of launching a successful ecommerce business is finding the goals to help your online store thrive. These goals will help guide what your business aims to do and how to best go about running a successful online store.
Having these intentions will assist you in the decision-making for and designing of your website, and will also aid in measuring your overall success.
For a deeper look into how to find the goals of your business and website, check out our What Makes a Good Website guide.
Identifying Your Business’s Goals
As an online retailer, your goals will most likely vary from those of a local services business or even a local store owner. For example, if your online store focuses on handmade jewelry, your goal might be to not only showcase what you have to offer but to also provide insight into your process and discuss where you source your materials. Incorporating a sense of transparency and growth is important to your goals and target audience.
Cultivating a secure base of returning customers is one of the more important goals to have. Satisfied shoppers are one of the best ways to organically spread the word about your online business and bring new curious customers to your site. Expanding your customer base will help your small business continue to shine and thrive.
Business goals for an online store can also include sustainable and environmental practices, offering a wider range of products, and finding ways to give back to your customers and community. These all tie right back into the main goal of securing a base of consumers who will keep your business growing.
Using Your Website to Accomplish Your Business Goals
As you identify your website and business goals, it will become easier to understand how to use your shop’s site to achieve them. As the majority of your business is performed online, having a website that accurately and effectively represents you and your business will make new customers feel informed, interested, and comfortable purchasing from you.
There’s a variety of ways to use your ecommerce website to accomplish your goals. This might involve providing customer reviews, including a well-developed blog to keep readers informed, or grouping select items into featured collections. All of these tools are great ways to encourage customers to interact with you and your business.
Having a professional ecommerce website to achieve your goals can sound like an overwhelming task. But, once you understand the relationship between your website and business goals, making a website to support this will come naturally.
Which Website Builder Is Best for Ecommerce?
| Best Website Builders | |
|---|---|
GoDaddy
4.7/5 |
Best Website Builder Overall
|
Web.com
4.5/5 |
|
Squarespace
4.4/5 |
|
|
Wix
4.4/5 |
|
Shopify 4.3/5 |
Best for Ecommerce
|
WordPress 4.1/5 |
|
There are lots of popular website builders nowadays, but none are as dedicated to ecommerce as Shopify. Shopify makes it easy to set up your online store, provides great analytics and tools to help your business grow, and so much more.
For complete coverage of this excellent ecommerce platform, check out our Shopify Review. Then, when you’re ready, get started with a Shopify free trial.
For more information on ecommerce builders:
Working With Shopify
For a small business owner running an online store, we recommend using Shopify to create your ideal website. The Shopify website builder is designed with ecommerce in mind. Shopify offers intuitive features that make adding products and keeping track of inventory an absolute breeze.
With Shopify you can have a functioning ecommerce business website in a matter of just a few steps. Adding specific content is easy, and included are ways to instantly connect your social media feeds to be able to sell on multiple platforms and keep customers informed.
How to Build an Ecommerce Website with Shopify
It’s simple to get started with Shopify. This next section will walk you through the process of signing up for a Shopify account and getting familiar with the basic controls of the builder.
For an in-depth look at how to get started with Shopify, check out our How to Make a Shopify Website guide.
Getting Started With Shopify
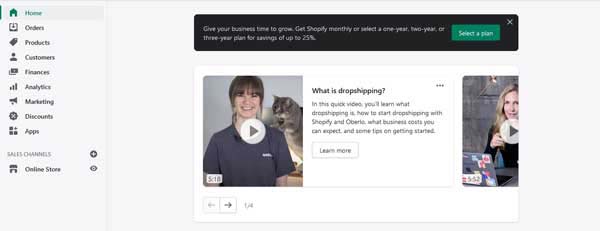
The first step to get started with Shopify is to complete the quick and easy sign-up process. We’ll walk you through this and help you get comfortable using the Shopify dashboard and main controls.
Having a domain name ready to go will help make this process easier. If you need help finding yours, use our domain name generator to begin choosing a successful domain for your business.
Signing up with Shopify
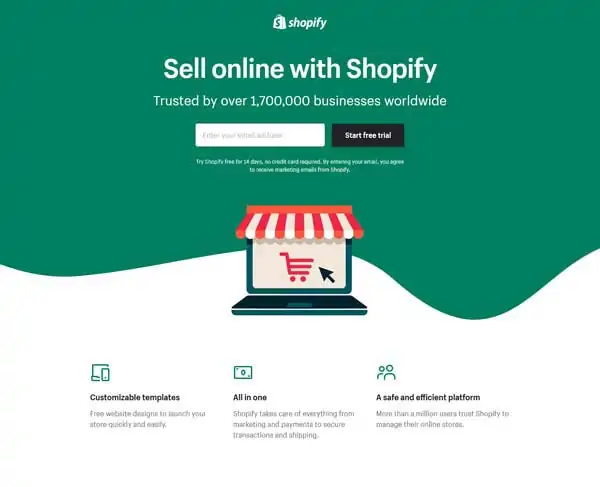
- Head to Shopify and click the “Start Free Trial” button.
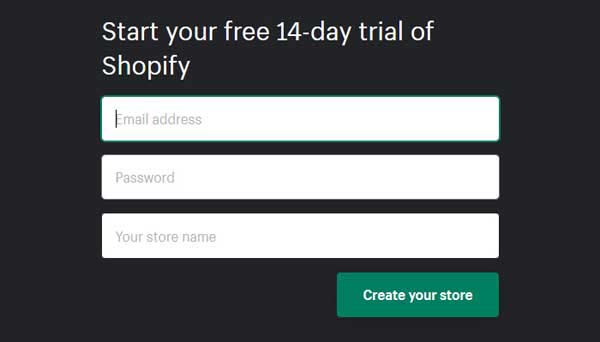
- From here you will be taken to a screen asking you to enter your email address, set up a password, and name your shop. Enter this information and click the “Create Your Store” button.
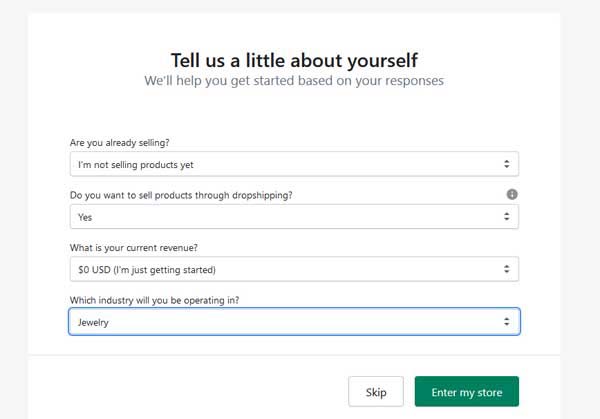
- The next screen will ask you a few questions to help you find the right template for your Shopify site. Fill this out to accurately reflect your needs. For the sake of this tutorial, we have selected that we are a jewelry store that’s just getting started.
- When you’ve finished entering your information click the “Enter My Store” button.
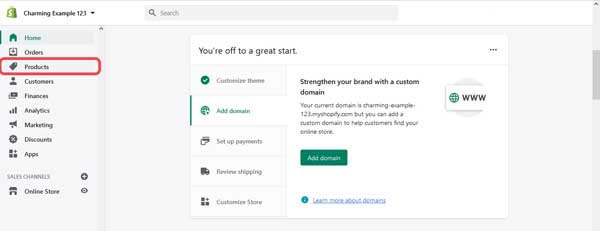
- You will then be taken to your main Shopify dashboard. From here you can learn more about the Shopify website builder and its features and begin editing your ecommerce website.


Next, we will show you how to get comfortable using the Shopify website dashboard and builder.
Using the Shopify Website Builder
Within the Shopify website builder it’s easy to update any content to match your online store and personal branding. This will be a general overview to get you started, for a more detailed guide on how to get the most out of the Shopify website builder, read our How to Use Shopify article.
Using the Shopify theme editor:
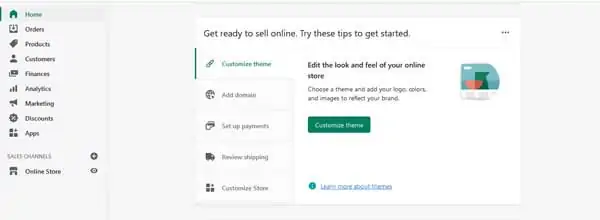
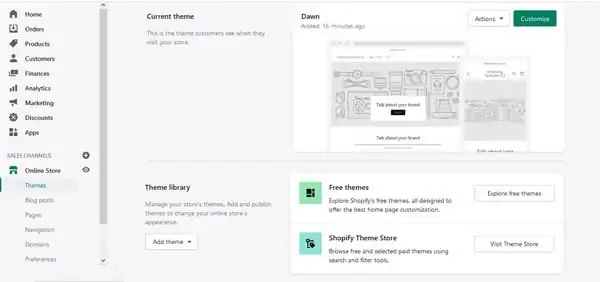
- To begin making your Shopify ecommerce website feel like your own, you must customize the theme. Scroll down within the “Home” section of your Shopify dashboard until you arrive at the screen below.
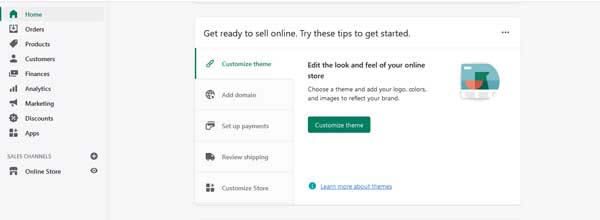
- Click the “Customize theme” button. This will take you to the “Themes” section of your Shopify dashboard. From here you can update your current theme, browse the Shopify Theme library, and more.
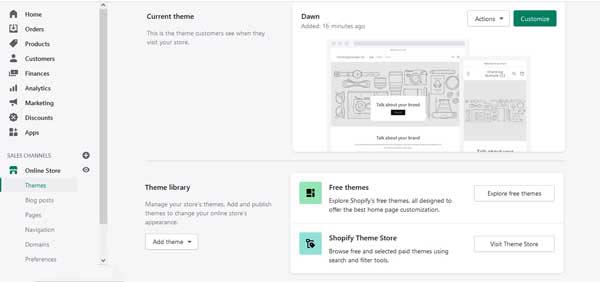
- Click the “Customize” button to begin editing your theme. This will take you to the Shopify theme editor. This is where you can add products, pages, and more to your ecommerce website.

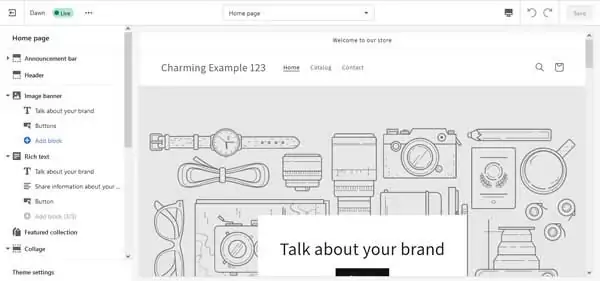
- To update your theme settings, click “Theme settings” at the bottom of the left-side column. This will open the “Theme settings” menu on the left side of the Shopify theme editor.
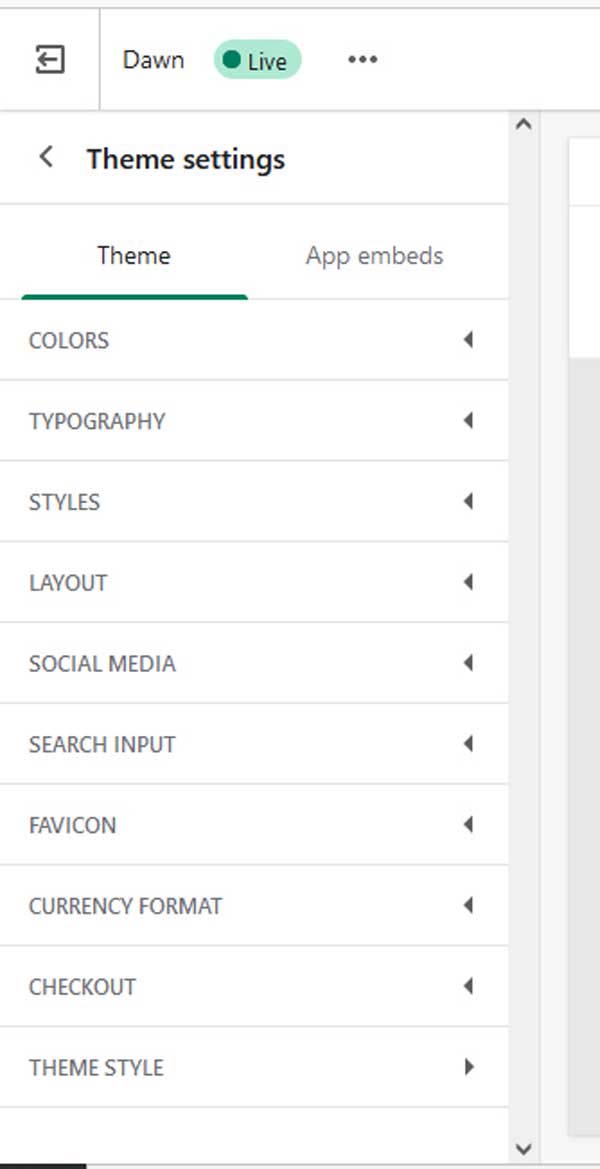
- From here you can edit the color, font, layout, and more. To further update any of these features, click on the arrow next to the feature you’d like to alter, and a menu within the left-side column of the Shopify editor will open.
- To update the colors of buttons, text, and other parts of your Shopify theme, click the arrow next to “Colors” to open the corresponding menu.
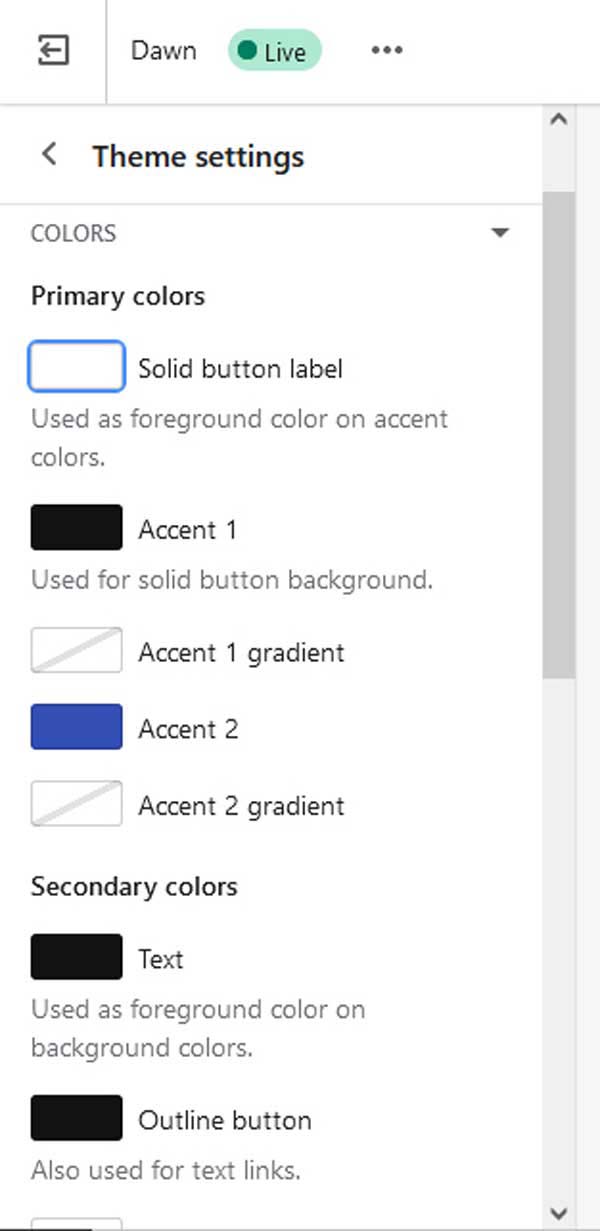
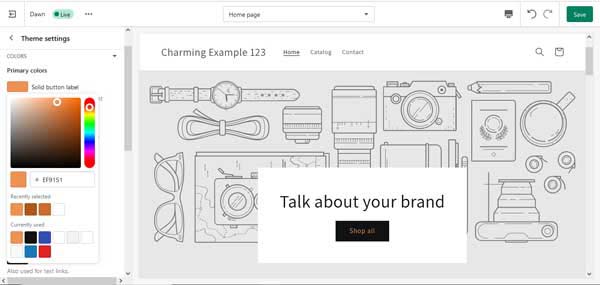
- To change the color of button text on your site, click the color swatch next to “Solid button label” to open a color picking tool. Select your color and your changes will be automatically placed.
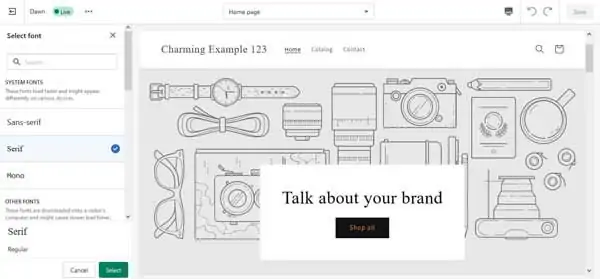
- Use the left-side column to adjust the font and typography of your theme, styles, layout, and more.
- For example, to change the font, use the left-side menu to select “Typography.” Click the “Change” button to open the “Select font” menu.
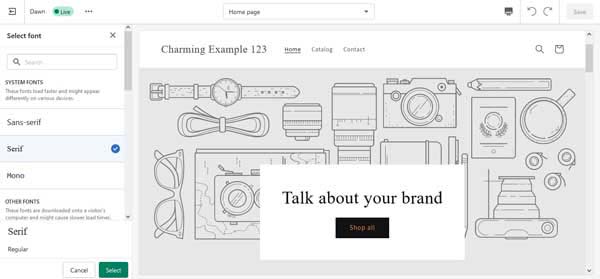
- You can choose from the suggested fonts available, or scroll down further to sort through Shopify’s large font library. Make your selection and click the “Select” button within the left-side menu. Repeat this process to update the “Body” font and more.
- Continue to use the left-side menu to further update your Shopify theme. We will discuss more of these features further on in this guide, but feel free to get comfortable in the meantime.


Now that you’re more familiar with some of the basics of the Shopify website builder, we’ll walk you through how to add four necessary pages with essential tools to your new ecommerce website.
For a deeper look at how to use the Shopify website builder, read our How to Use Shopify article.
What Pages Does an Ecommerce Business Website Need?
Almost any website for an online store will need a Homepage, Product page, About Us page, and a Blog page to get started. This section will cover setting up these necessary pages, as well as how to find useful tools to really make them shine.
Homepage
Your Homepage sets the first impression for your online store and business, it’s important to ensure it’s effective and has almost everything it needs. We’ll walk you through how to create a Homepage and connect the tools required to make it shine.
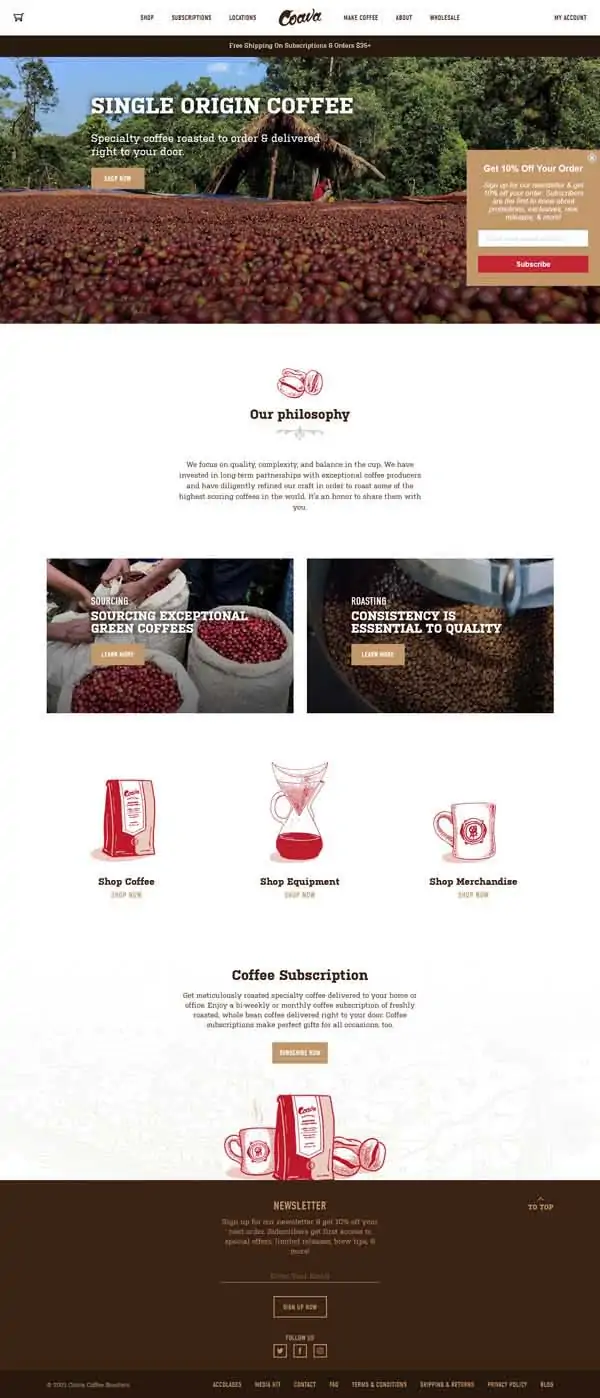
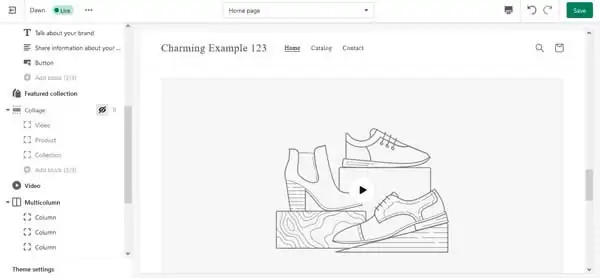
Below is an example of a successful Homepage built with Shopify for the specialty coffee roaster, Coava. For a deeper look at what makes this Homepage successful, and how to make yours the best it can be, read our How to Design a Successful Homepage article.
How to create a Homepage with the Shopify website builder:
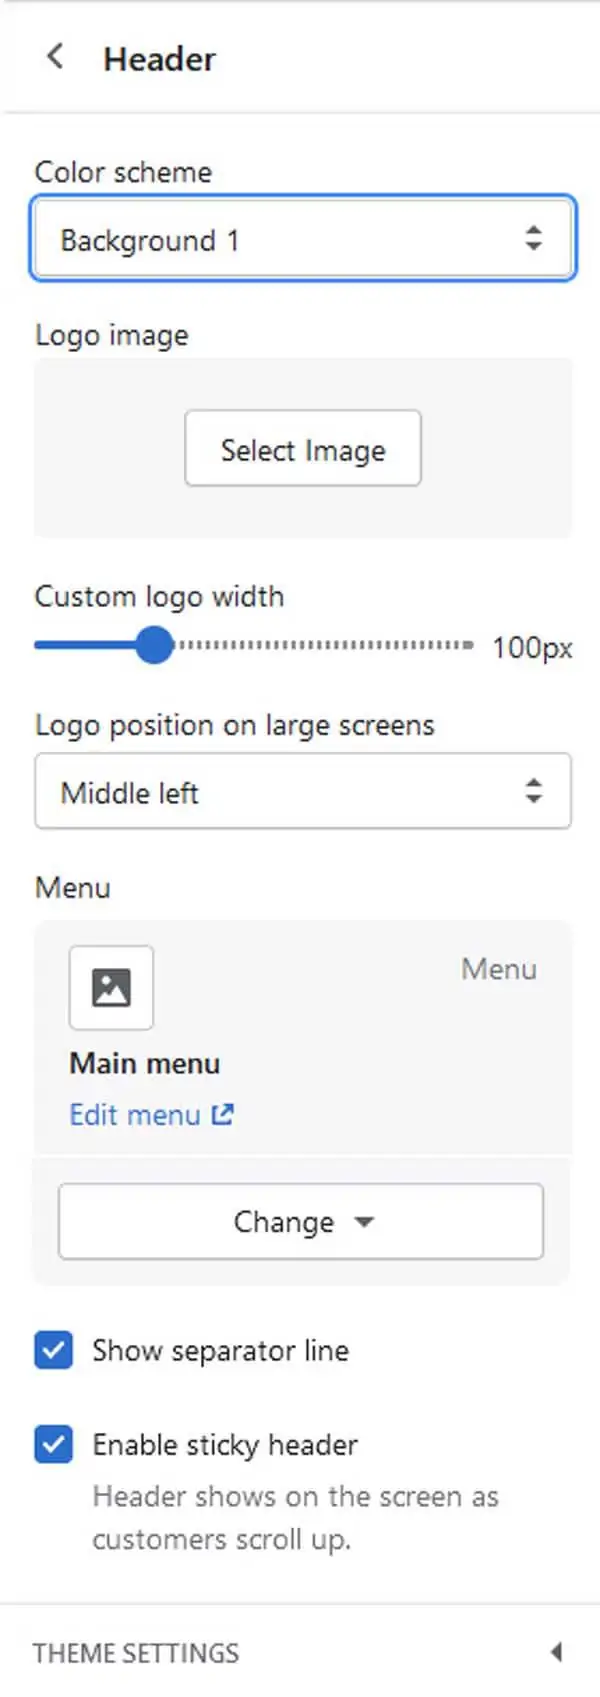
- To update Homepage elements, use the left-side column of the Shopify theme editor. From this, select “Header” to begin editing your Homepage header.
- From the “Header” menu you can update the color scheme, add your logo, and more.

- To add a logo, click the “Select Image” button to upload your own photo or select from Shopify’s free image library.
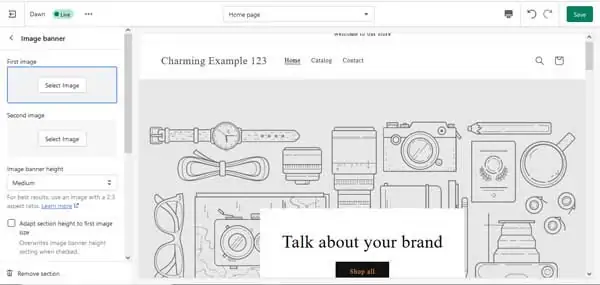
- Within the left-side menu of the Shopify theme editor, select “Image banner” to be taken to the “Image banner” menu.

- From here you can upload your “First” and/or “Second” images by clicking “Select Image” and uploading your own image, or choosing from the free stock photos available through Shopify.
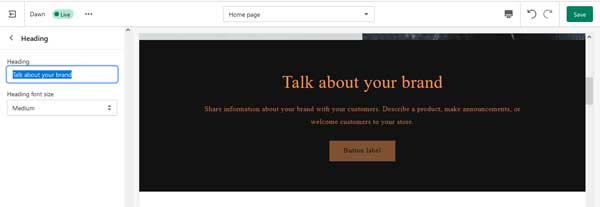
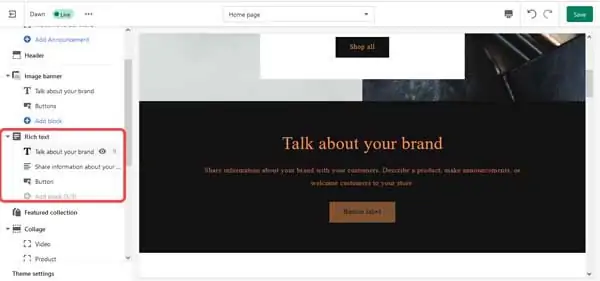
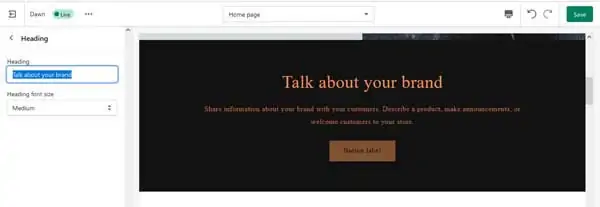
- Return to the “Homepage” section of the Shopify theme editor to update the text of this page. Within the left-side column, beneath the “Rich Text” section you’ll find the text you can edit.

- Click on the text you want to edit to be taken to a menu where you can update it. Update the text for the heading, body text, and button of this section.
- Not all the sections on your Homepage are necessary — hiding a section is simple. Within the left-side column of the Shopify theme editor, find the section you’d like to remove. Hover over it until the eyeball icon appears.
- Click the eyeball icon so that it has a strikethrough. This will hide the section for being displayed on your Homepage.
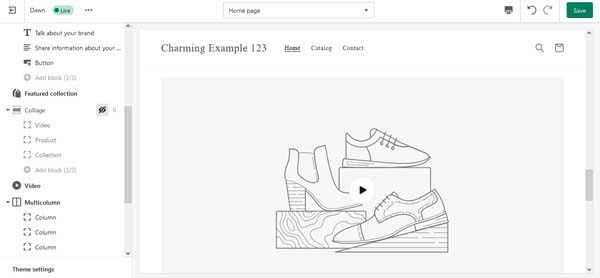
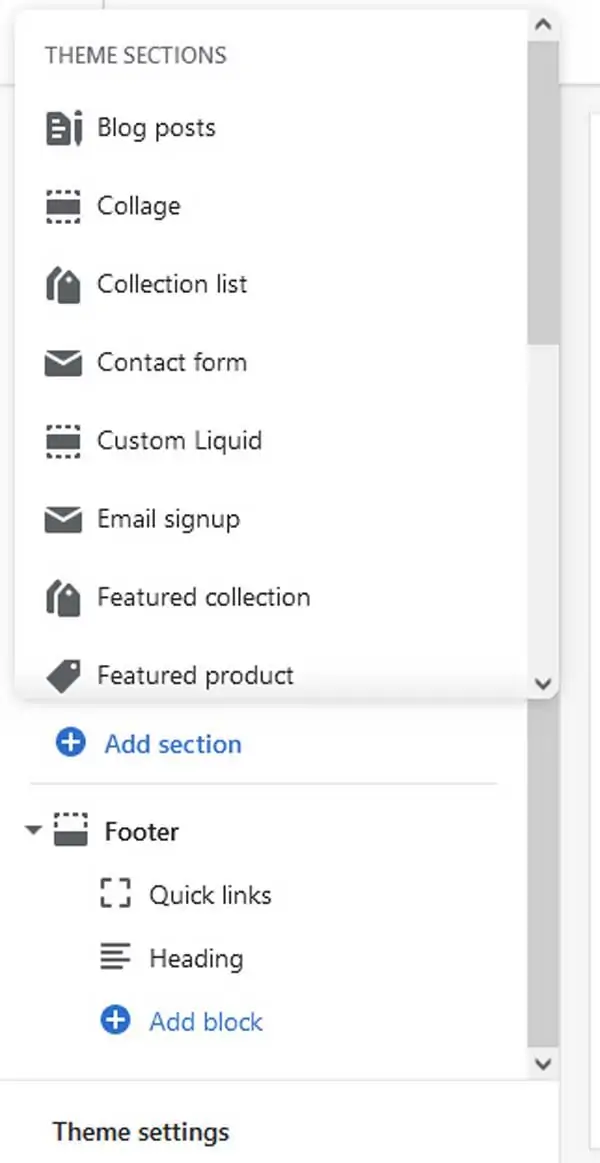
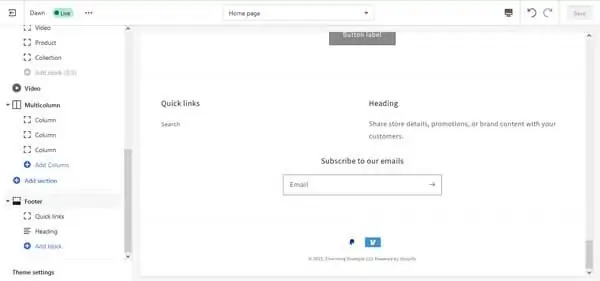
- To add a section, scroll down the bottom of the left-side column. Just above “Footer,” you’ll find an “Add section” button. Click this button to open a drop-down menu of sections you can choose from to add to your site.

- Make your selection to have it be instantly placed within your Shopify theme editor.
Now that you’ve been introduced to the basics, we’ll walk you through adding a few essential tools to your Homepage. These will include adding a way to collect emails and including your social media icons within the footer of your online store Homepage.
Adding essential tools to your Homepage:
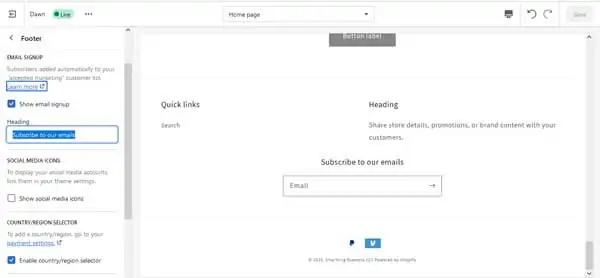
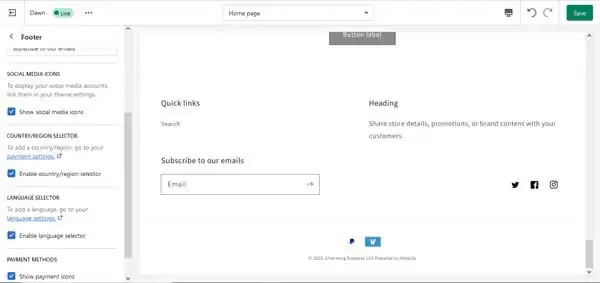
- Collecting emails is a great way to send out sales notices, keep in touch with customers, and collect useful data. With the Shopify theme editor, adding this feature to the footer of your online store is simple.
- To add a way to collect emails, scroll down in the left-side column until you arrive at “Footer.”
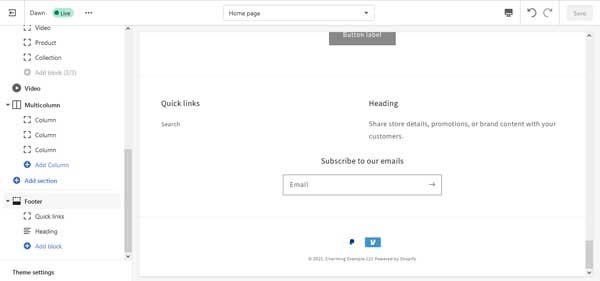
- Click “Footer” to open the “Footer” menu within the left-side column of the Shopify editor.
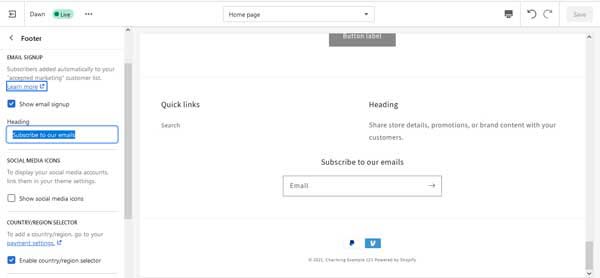
- Make sure “Show email signup” is checked, and alter the heading text of this subscription form to match your branding. For more information on how to manage this feature, click the “Learn More” link.
- Adding your social media icons to the footer of your ecommerce website is a great way to provide easy access for customers to follow you as well as shop for your products on other platforms.
- To add your social media icons to your Shopify site, exit out of the “Footer” menu and return to the Shopify theme editor.
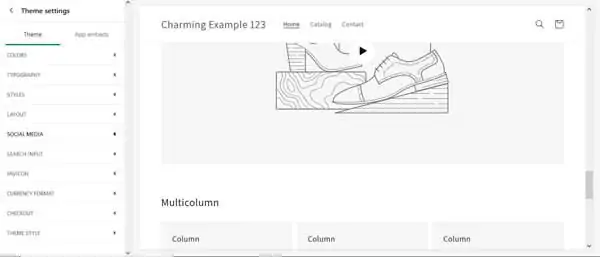
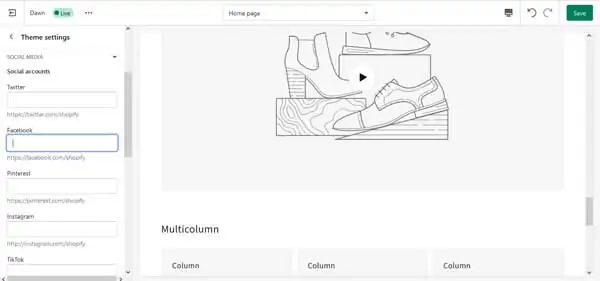
- Click “Theme settings” at the bottom of the left-side column. This will open the “Theme settings” menu within the left-side of the Shopify theme editor.
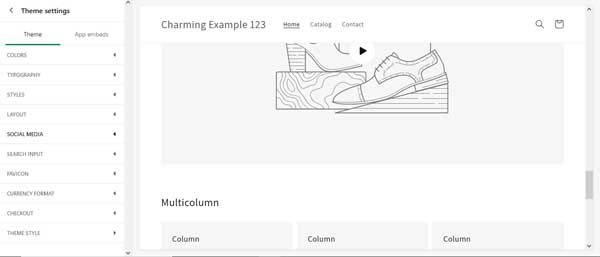
- Click on “Social Media” to open the corresponding drop-down menu.
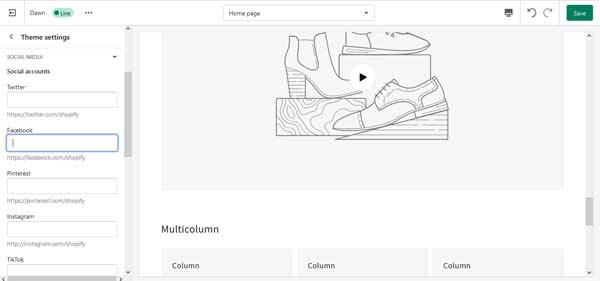
- From here, enter in all the social media accounts you’d like to connect as social icons to your Shopify site. Click the green “Save” button in the upper right corner of the screen once you’ve completed this.
- Return to the “Footer” menu and check the box beside “Show social media icons.” This will automatically display icons for all the social media accounts you’ve connected to.
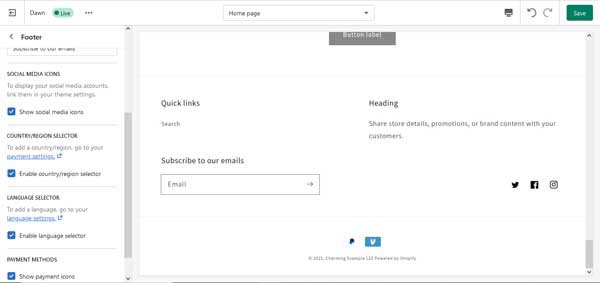
- Click the green “Save” button once you’ve finished this.
Congratulations! You now have a Homepage with some essential tools to help set it apart. Next, we will dive into setting up your products and other features a strong Product page will need.
Product Page
Your Product page is where shoppers should find an organized showcase of available items from your online store. Depending on what you have to offer, this can be as in-depth or pared-down as you need it to be.
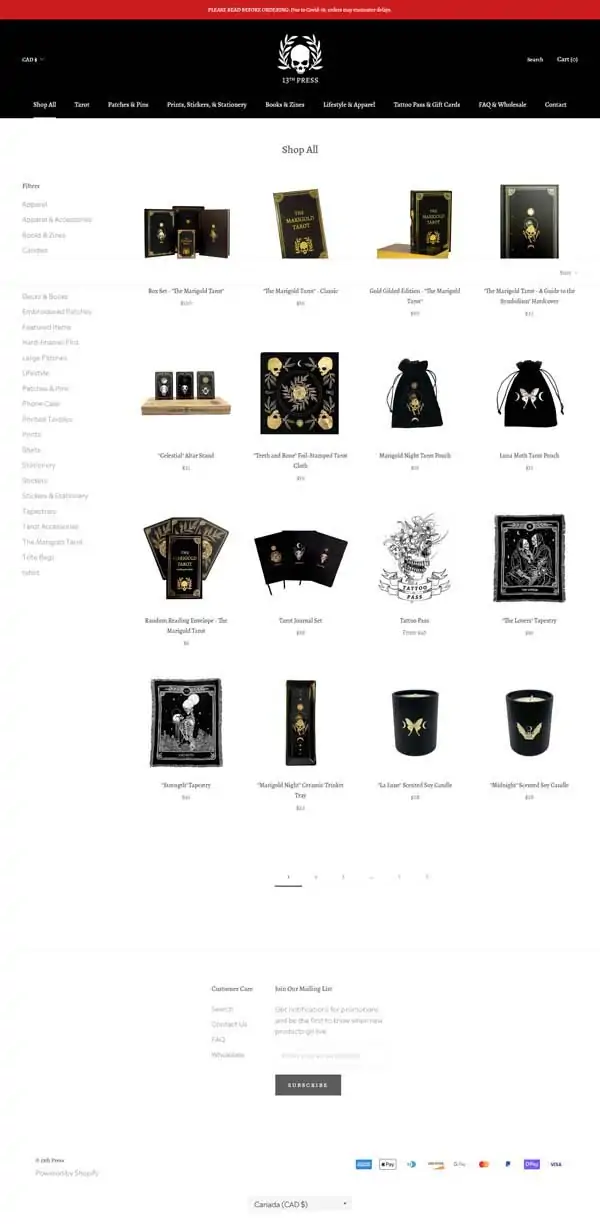
Below is an example of a successful Product page built with Shopify for mystical trinkets and accessories company 13th Press. For a deeper look at what makes this page successful, and how to make your Product page the best it can be, read our How to Design a Website article.
How to create a Product page with the Shopify website builder:
- To begin building your Product page, you first need to add products to your Shopify account. In the main dashboard of the Shopify website builder, use the left-side menu and select “Products.”
- This will open a drop-down menu on the left and will open the “Products” menu on the main screen.
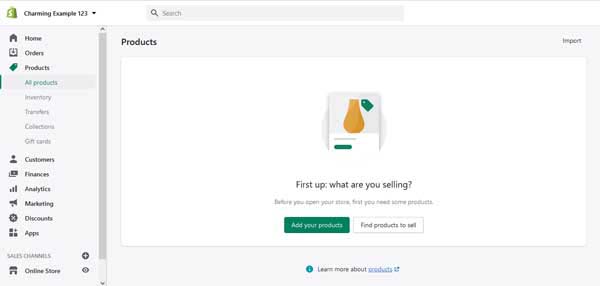
- Click the “Add your products” button, to get started adding and setting up your offerings.

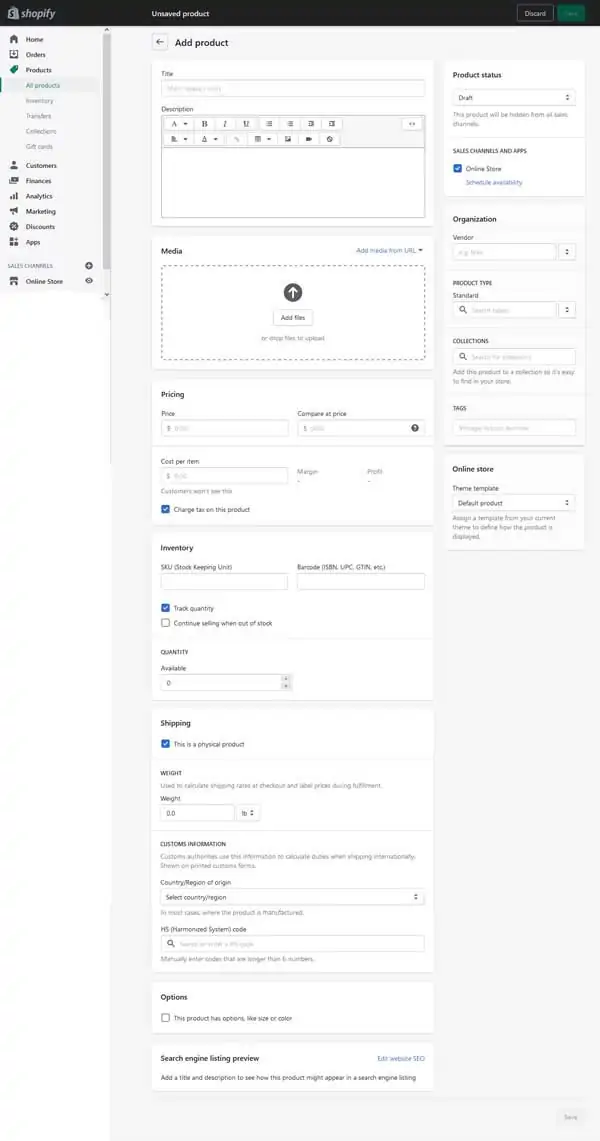
- From here you can add a title and description, upload an image of the product, set the price and inventory amounts, as well as set up shipping. Click the “Save” button when you’ve completed all changes. Repeat this process for each of your products.
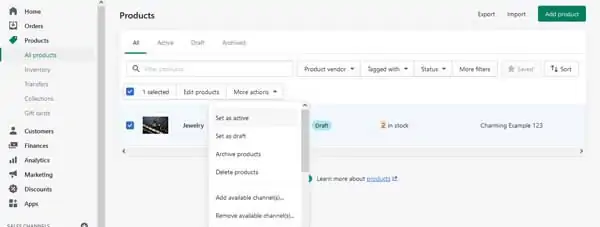
- Return to the “Products” menu within the left-side column of the main Shopify dashboard to find your products. If they are marked as “Drafts” be sure to activate them. To do this, select the items you’d like to make active, and then click the “More actions” button to open the corresponding drop-down menu.

- Select “Set as active.” This will open a pop-up window asking you to confirm you’d like to make this product available. Click the “Set as active” button to confirm this.
- Return to the “Customize Theme” menu of your Shopify dashboard and select “Customize” to return to the Shopify theme editor.
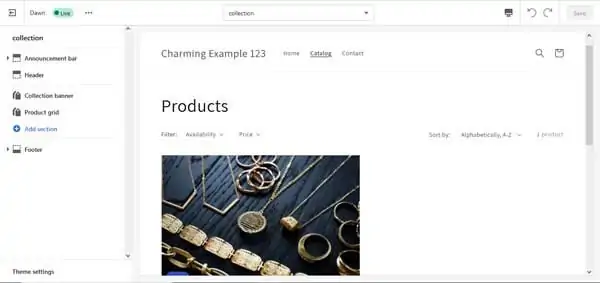
- Most Shopify themes will come with a Product page setup and ready to be edited. For this current theme, the page is titled “Catalog.” Click this to arrive at your Product page.
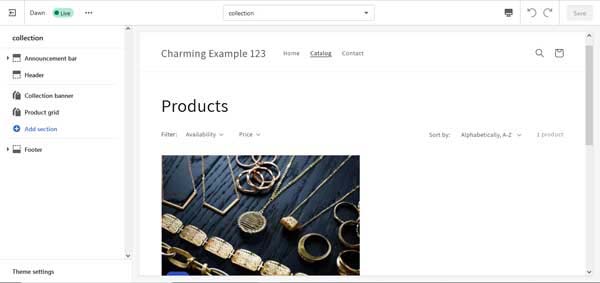
- Use the left-side column to alter how this product or collection of products is displayed. Add more sections, or remove unnecessary sections from view.

Once you have a good feel for the layout and content of your Product page, it’s time to add two essential tools. First, we will be adding a “Reviews” section, then we will discuss creating “Featured Collections.”
Adding essential tools to your Product page:
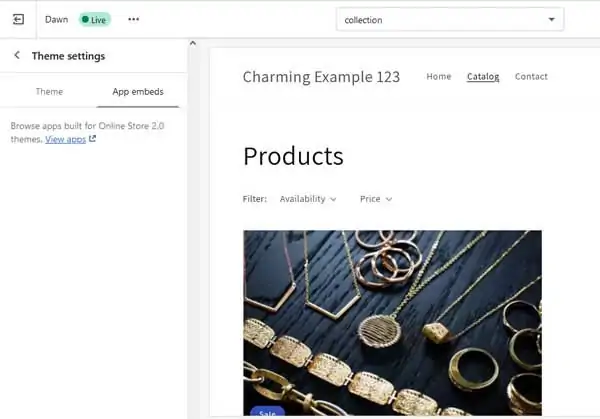
- At the bottom of the left-side column within your Shopify theme editor, select “Theme settings” to open the “Theme settings” menu. From this menu select the “App embeds” tab.
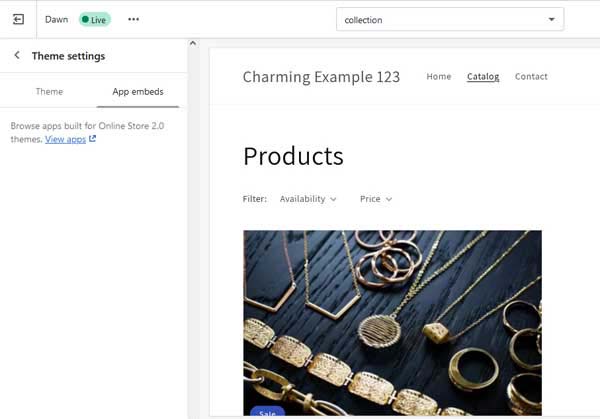
- Click the “View apps” link to open the “Shopify App Store” in a separate window.
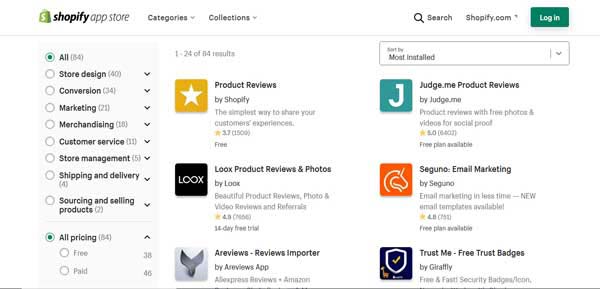
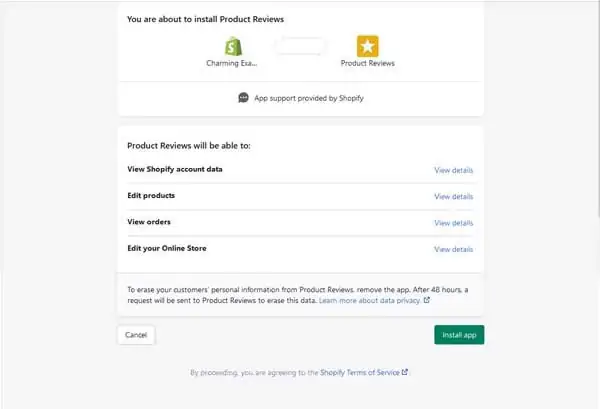
- One of the first apps listed should be “Product Reviews.” Select this app and then click the “Add App” button. You might be prompted to log into your account again. Select your account and your store to connect this feature.
- You will be taken to a screen discussing the app and what it will do once you connect it to your store. Click the “Install app” button to continue.
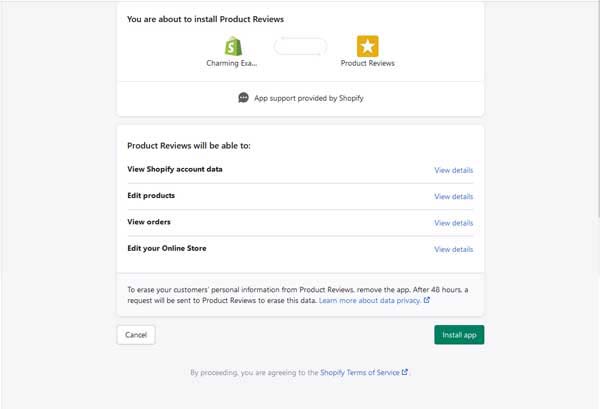
- You will then be taken to a page discussing installation instructions. Read through these instructions and click the “Verify and Continue” button at the bottom.

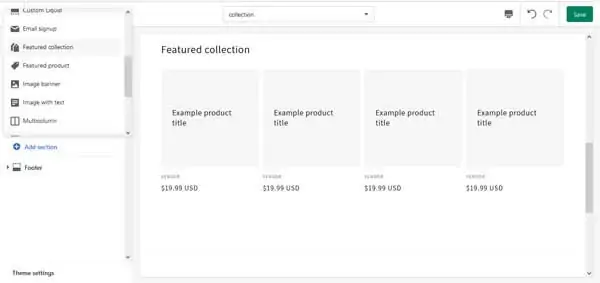
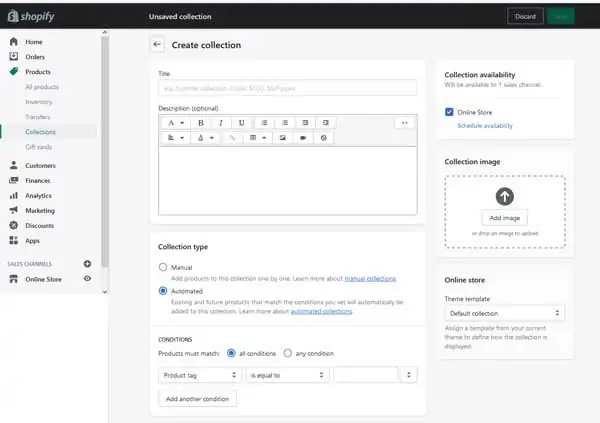
- Now that you have reviews ready to go on your site, it’s time to create A “Featured Collection.” These sections are ways for you to organize and display specialty or similar items within your Product page.
- Return to your “Catalog” page within the Shopify theme editor. Using the left-side column, select “Add section” to open a drop-down menu of section options.
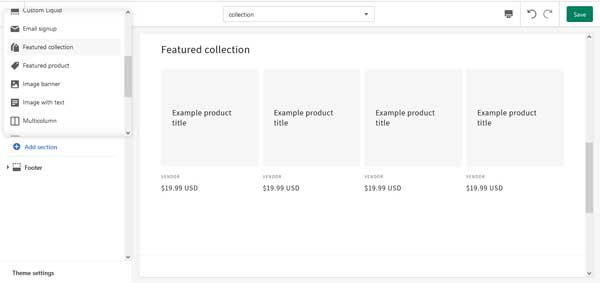
- Scroll down and select “Featured Collection” to place this new section within your Shopify theme editor. Select this section to open the “Featured Collection” menu within the left-side of the Shopify theme editor.
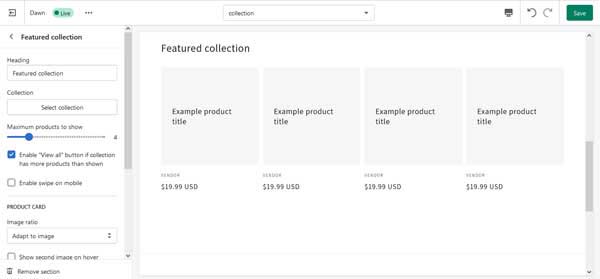
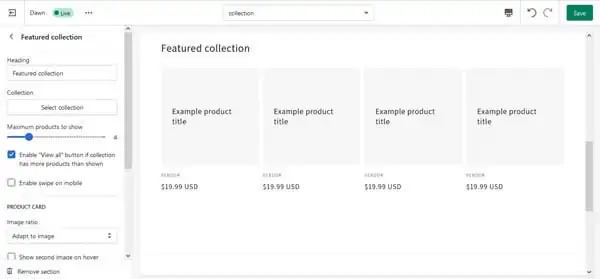
- From the left-side menu, you can update the heading, adjust how many products are shown, enable a “View All” button, and more. Press the “Select Collection” button to continue.
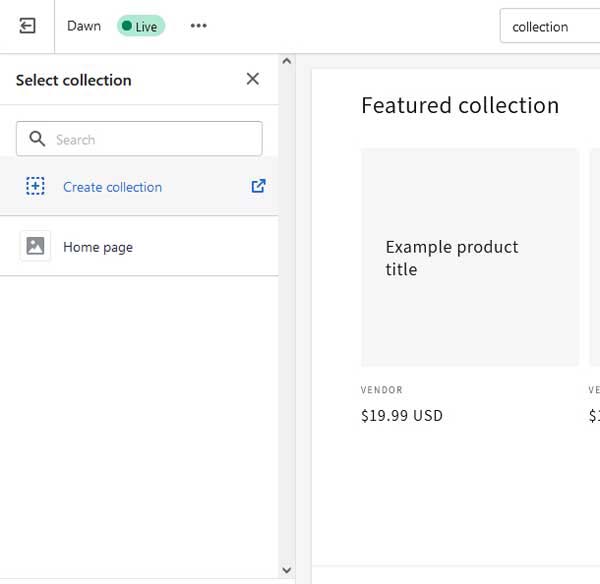
- Click the “Create collection” link to have a new window open. From this new window, you can name your collection, add a description, and upload a “Collection image.”

- You can also determine if the collection will be manual or automated. If you opt for automated, there are ways to adjust how a product is selected to be part of the collection.
- Click the “Save” button when you’ve updated your new collection and this will automatically appear on your Product page.


Now that you’re getting more familiar with the Shopify website builder, these next few pages will feel a bit easier and intuitive to set up. The next page to complete is the About Us page.
About Us Page
Your About Us page is where visitors can get to know you and any vendors or employees your online store might have. We’ll take you through how to create an About Us page and what useful tools can help encourage customers to interact with your business.
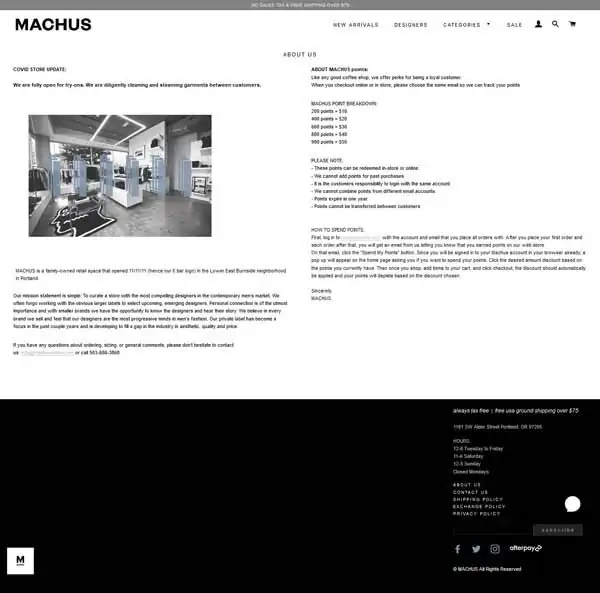
Below is an example of a successful About Us page built with Shopify for high-end clothing retailer and brand, MACHUS. For an in-depth look at what makes this page successful, and how to make your About Us page the best it can be, read our How to Design a Successful About Us Page article.
How to create an About Us page with the Shopify website builder:
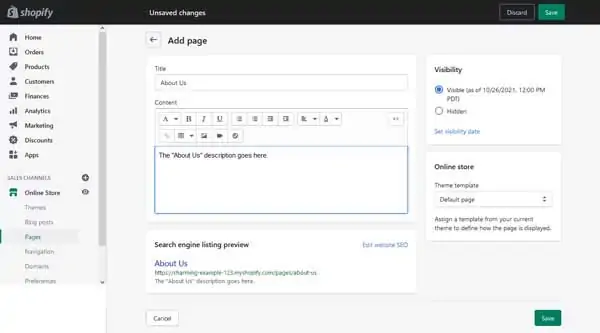
- Not all Shopify themes and templates will come with an About Us page ready to go. It is simple to add this page to the Shopify website builder. From your main Shopify dashboard, use the left-side column and select “Pages” from underneath the “Online Store” section.
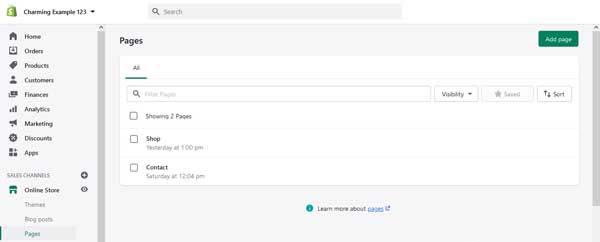
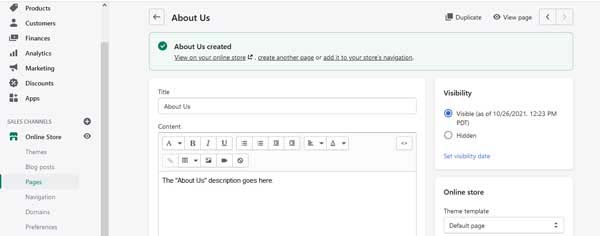
- This will open the “Pages” menu. Click the “Add Page” button from the top-right of this menu page. This will open an “Add Page” menu on your screen.
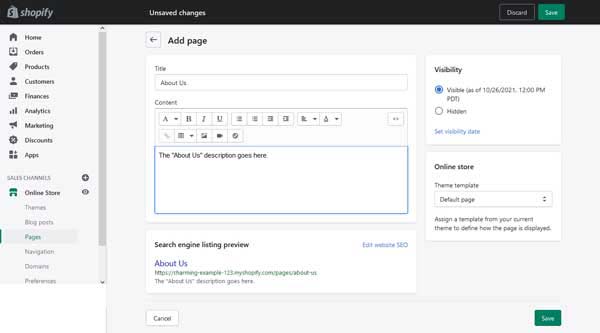
- From here you can enter a title, description, and update the “Visibility” of this page. Click the “Set visibility date” link to select when this page should be published. Click the “Save” button when all these changes have been made.
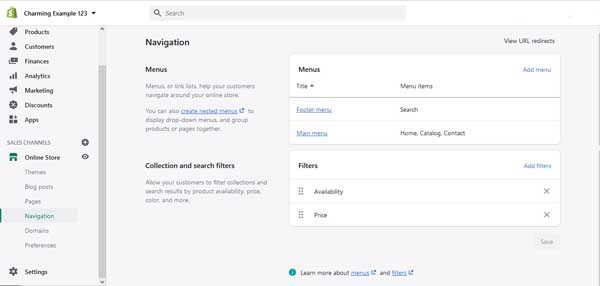
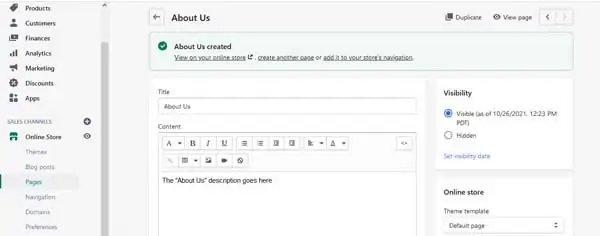
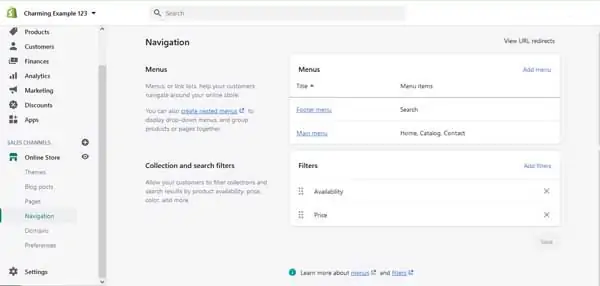
- To ensure this new page appears in your site navigation menu, click the “Add it to your store’s navigation” link. This will open the “Navigation” menu of your main Shopify dashboard.
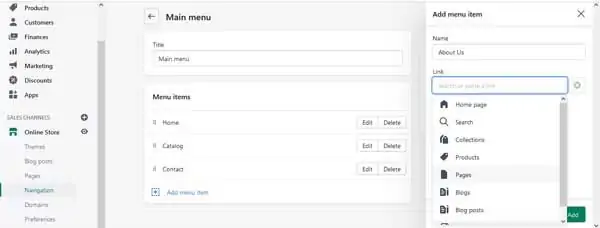
- Click the “Main menu” link to open the “Main menu” editing page. From this page, click “Add menu item” to open the corresponding menu on the right side of the screen. Type in the name as you’d like it to appear within the navigation, and within the “Link” search bar, scroll down and select “Pages.”
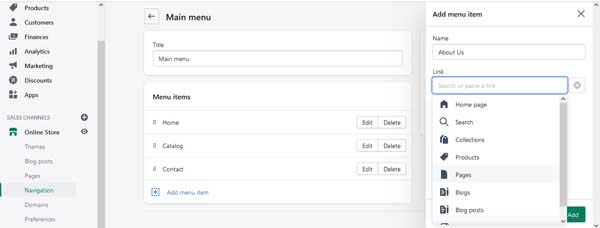
- From the list of pages, select “About Us” and then click the “Add” button to include the “About Us” page in your site’s navigation menu.
Now that you have your About Us page placed within your site navigation, it’s time to add some essential tools that will really help set it apart. These will include an image and text section as well as a contact form.
Adding essential tools to your About Us page:
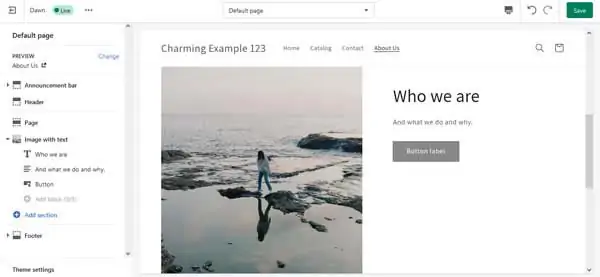
- Return to the Shopify theme editor and select “About Us” to begin editing and adding sections to this page. Within the left-side column, click on “Add section” and choose “Image with text” from the list of options.

- Use the left-side menu to update the photo, change the headline text, the filler text, and edit or remove the button. Use this section to tell your personal story, your brand’s story, and more.

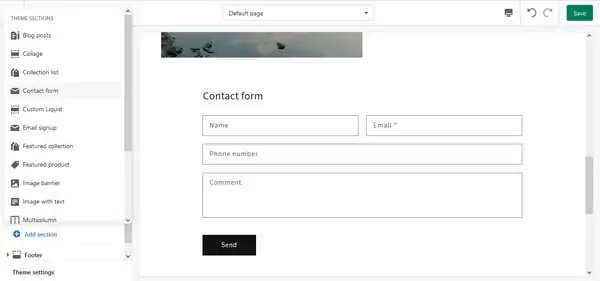
- To add a contact form is just as simple. From the left-side column, select “Add section” to open the drop-down menu of available options. Select “Contact form” to instantly place this section.
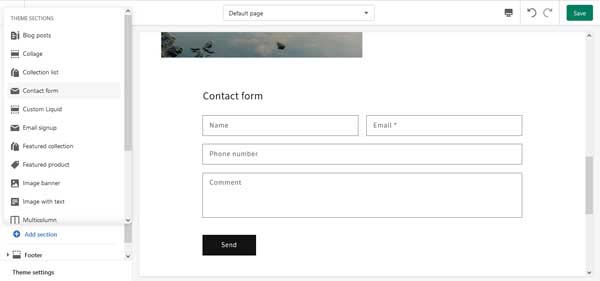
- Once placed, that’s all you have to do. Shopify is set up so that all messages submitted through this form will be sent to the email address you used when setting up your Shopify account.
- Use the left-side column to update the title of this contact form and click the “Save” button to ensure all your edits are kept.

You now have an About Us page with useful tools to make it shine. Next, it’s time to set up your Blog page. Having an engaging Blog page is a great way to interact with your target audience. Knowing what features you need to make yours truly stand out is important.
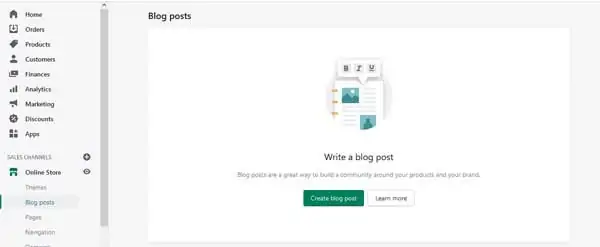
Blog Page
Your Blog page is where visitors can read up on your process, what you offer and why, and your journey to becoming a business owner. We’ll walk you through how to create a Blog page with the essential tools to encourage readers to become customers.
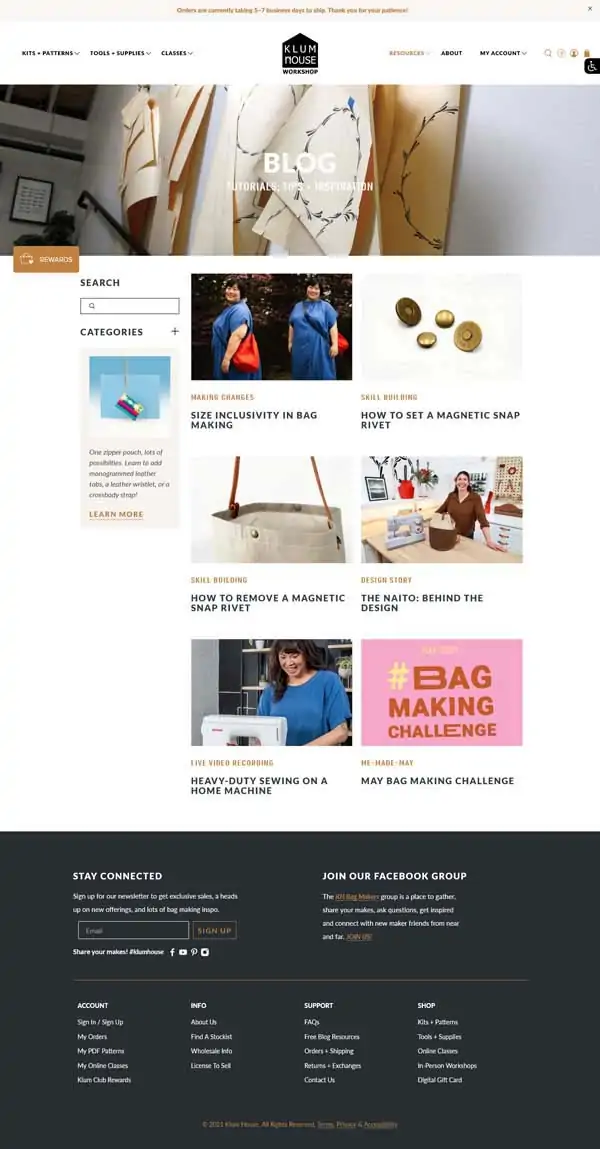
Below is an example of a successful Blog page built with Shopify for sewing kit company Klum House. For a deeper look at what makes this page successful, and how to make your Blog page the best it can be, read our How to Design a Successful Blog Page article.
How to create a Blog page with the Shopify website builder:
- Following the same instructions for creating a new page as discussed in the “How to Create an About Us” section, create a Blog page and place it within your main navigation menu.
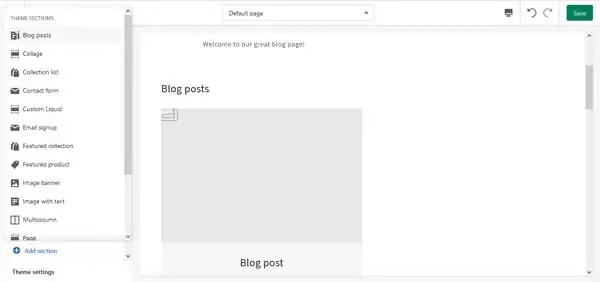
- Then return to the Shopify theme editor and select your new “Blog” page to begin editing it. Within the left-side menu, select “Add section” and select “Blog post” from the list of available options.
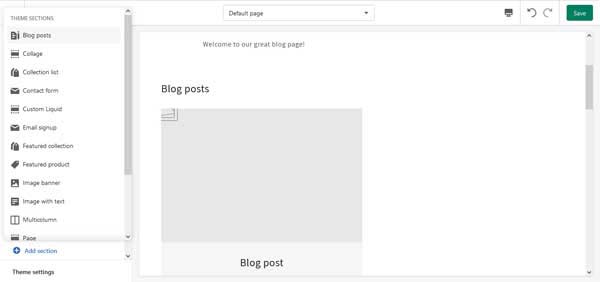
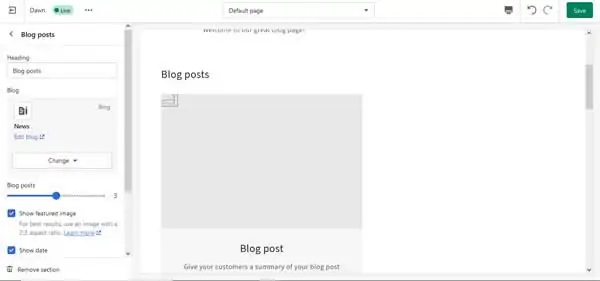
- Click your new “Blog posts” section within the left-side column to open its own menu. From here you can edit your blog posts, adjust how many posts are displayed, and more.
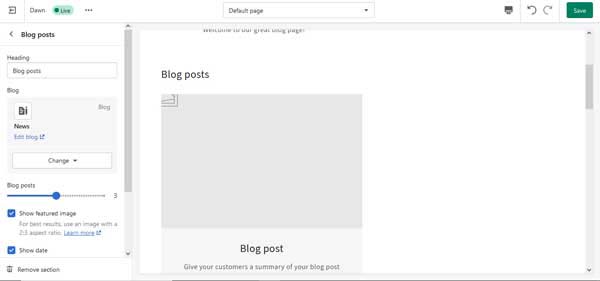
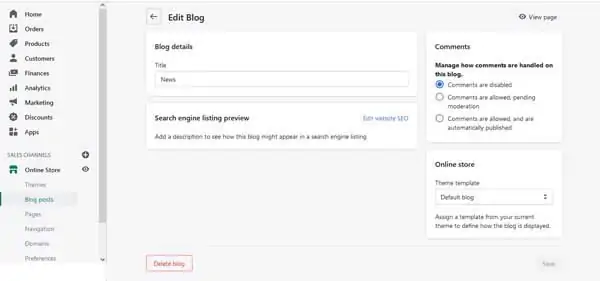
- To begin editing your blog, click the “Edit blog” link to open a new screen.
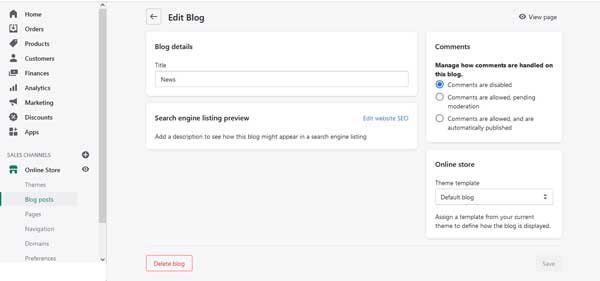
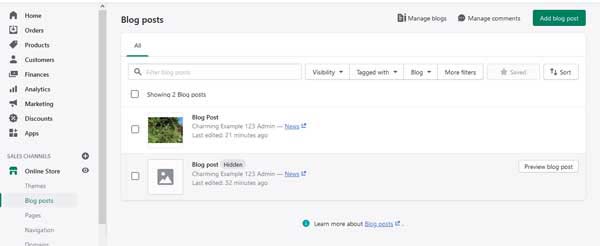
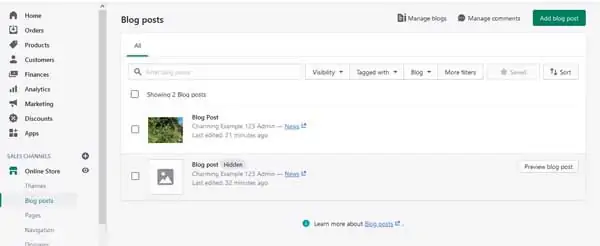
- From this screen, you can update the title of the blog post, manage comments, and more. Click the “Save” button to update any changes and then click the “Blog posts” section beneath the “Online Store” portion of the left-side column to open the “Blog posts” menu.
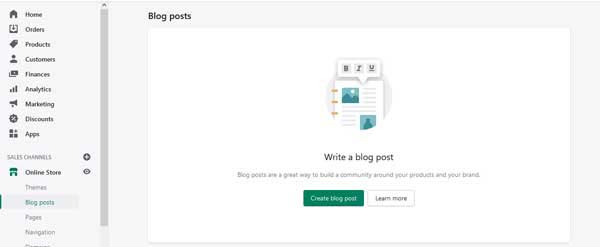
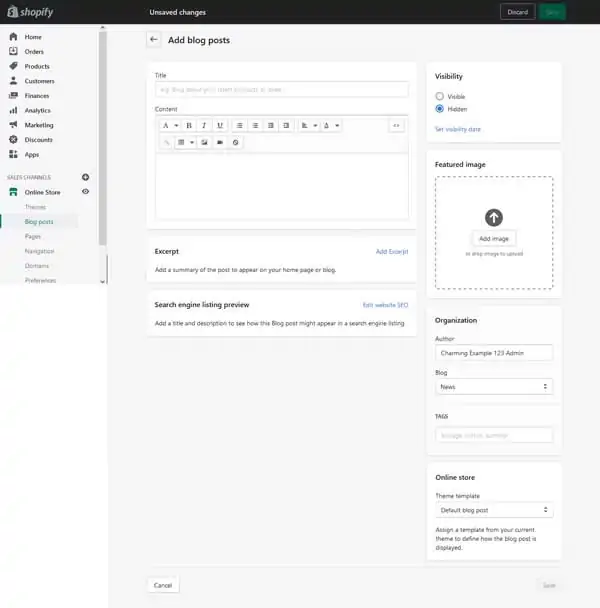
- From here, click the “Create blog post” button to be taken to the below “Add blog posts” screen. From here you can write your post, set a date for it to become visible, upload an image, and more.
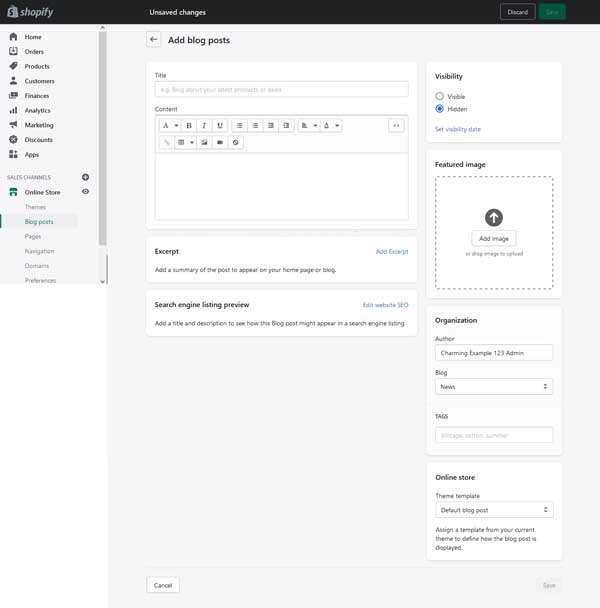
- Ensure “Visible” is selected beneath the right-hand side “Visibility” section, this will make sure your blog post is instantly placed within your website. Click the “Save” button to update.
You now have a functioning Blog page and a general understanding of the controllers to organize and create more posts. It’s now time to discuss how to allow visitors to subscribe to the Really Simple Syndication (RSS) feed for your blog so they never miss a post.
Adding essential tools to your Blog page:
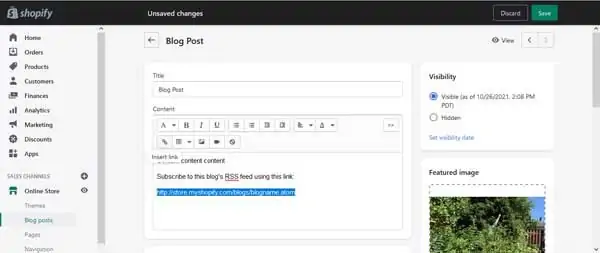
- Shopify allows you to manually include a way for readers to subscribe to the RSS feed of your blog. This way, customers receive a notification every time you make a post.
- From your Shopify main dashboard, go to “Blog posts” underneath the “Online Store” section of the left-side column.
- At the end of your blog post/content, insert a .atom link with your feed name. For example: Subscribe to this blog’s RSS feed using http://store.myshopify.com/blogs/blogname.atom.

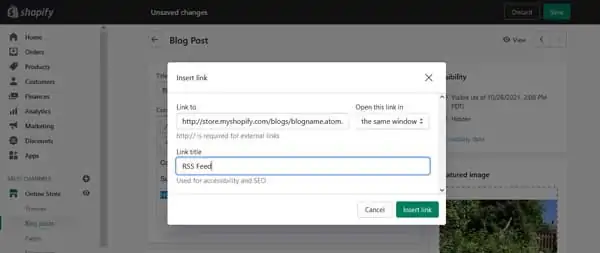
- You can turn this long link into a short title with a hyperlink by highlighting it and clicking the “Insert link” icon. This will open a pop-up window where you can complete this process.
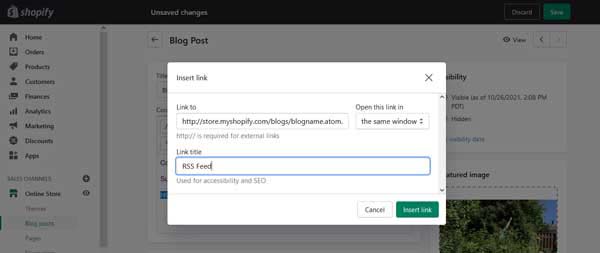
- Click the “Insert link” button to return to your “Blog post” menu and click the “Save” button. Your blog post will now have an embedded RSS feed allowing customers to click to follow along.
- You can always connect an app from the Shopify App Store that can perform this function for you, or even include social sharing icons for your blog posts. Keep in mind that these apps typically cost money and some require coding skills. To add an app that performs this same general feature, follow the steps discussed for adding an app in the “Adding Essential Tools to Your Product Page” section and choose an app for linking and sharing Shopify Blog posts.
Congratulate yourself — you now have a four-page website for your local shop. Plus, these pages have added features and tools to help you and your business succeed.
Other Pages an Ecommerce Website Might Need
Along with the above pages, your ecommerce website will also require a few more to be the best it can be. Read these helpful articles to learn what these pages are and what they’ll need.
What Other Tools Does Your Website Need?
Now that you have the necessary pages for your site and features to make these pages successful, it’s time to touch on sitewide tools. These can be used to organize and track site analytics and data, create and send out email campaigns, and other software to boost your business and customer experience. This section will briefly cover three main areas: analytics, email campaigns, and customer relationship management (CRM) technology.
Using Analytics With the Shopify Website Builder
The term “site analytics” might seem confusing at first, but these tools are surprisingly easy to use and are vital for measuring the success of your ecommerce business and website. These can help point out where your website is doing well, and what parts might need some attention.
Site analytics can help you track sitewide clicks, to better see what visitors are most drawn to. They also collect and organize information from surveys or contact forms that have been filled out on your site, and other data customers may have entered while visiting your website.
One of the best options for sitewide analytics is Google Analytics. Read our article on How to Add Google Analytics to Shopify to help you better understand how to achieve the goals of your website.
Using Email Campaigns With the Shopify Website Builder
One of the strongest tools for a small business owner is launching an email campaign. This can be in the form of a recurring newsletter sent to customers, pointing them back to your website, and keeping them in the loop with what’s going on in your shop. Having an email collecting tool on your website is a great way to help expand your reach, keep track of site visitors, and more.
It can be overwhelming to search for the right fit for your online store, we recommend ActiveCampaign. ActiveCampaign has specific marketing tools geared towards ecommerce, plus it’s already set up to work with Shopify, allowing for easy syncing and connecting.
Using CRM Technology With the Shopify Website Builder
CRM can also appear complicated at first, but it’s a really useful feature to help small business owners better organize analytics and data. There are several trustworthy platforms like HubSpot, Zoho, or Salesforce that can help you get started with this process.
These management systems help you stay on track with your goals, better understand your site analytics, and increase communication between you, your manufacturers, and customers.
For a deeper look at how to set up your Shopify site with everything it needs, read our How to Use Shopify article.
Moving Forward
Congratulations! You have officially signed up for Shopify and now have a professional and functioning ecommerce website with essential pages and tools to make it stand out.
Be sure to check out our Related Articles further below to find more resources to help you grow your ecommerce business.
Get Started With Shopify
Shopify has everything you need to get your online store up and running. Click the button below to get started with a free trial.