How To Make a Jimdo Website: A Step-by-Step Guide
With all the website builders out there, it’s hard to know which will work efficiently for you. That’s where Jimdo comes in.
Jimdo is a website-building platform that uses artificial intelligence (AI) to make creating a fully functional business website a quick and intuitive process. Here, we will go over the eight simple steps needed to create a business website using Jimdo.
Still looking for the right website builder for you? Check out our Best Website Builder of 2026 review.

Before You Begin
This step-by-step guide will walk you through the process of creating a simple, yet professional Jimdo business website in just a few hours. By the end, you’ll have a four-page website that’ll suit nearly any freelancer, entrepreneur, or small, local business.
While diving right in can seem exciting, it’s a best practice to take some time to create a clear plan for your website first.
For help with this planning, check out our other useful articles:
8 Steps to Make a Jimdo Website
As we stated at the top, Jimdo uses AI to better help you craft a professional website for your business. Here, we will go over the eight easy steps for building and publishing your business site with Jimdo.
Skip Ahead
- Sign Up for Jimdo
- Set Up Jimdo Page Structure
- Upload Your Business Logo
- Update the Homepage Header Area
- Update Your Jimdo Homepage
- Update Other Pages in Jimdo
- Test Your Website
- Publish Your Jimdo Website
Step 1: Sign Up for Jimdo
The first step in building a new website for your small business involves creating a Jimdo account. It’s free to sign up and build your website. While Jimdo offers a free Play plan with plenty of features to get you started, we recommend upgrading to a paid plan so you can use all Jimdo has to offer.
It’s also important to note there are two different Jimdo website editors within the Jimdo website-building software: Jimdo Dolphin and Jimdo Creator. The more basic Jimdo Dolphin editor doesn’t require the use of any code while the more advanced Jimdo Creator editor allows users to leverage their coding skills to customize their websites. This guide will focus on using the Jimdo Dolphin editor.

To sign up, visit the Jimdo website and click on the “Let’s get started. Free.” button.
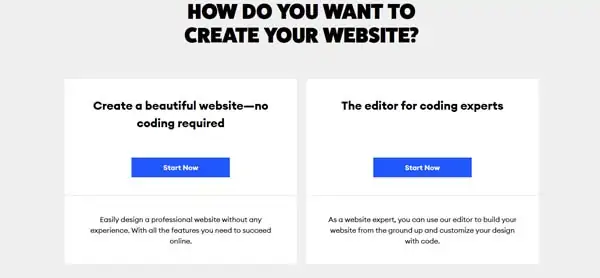
Jimdo will then ask you a series of questions, starting with “How do you want to create your website?” Your answer will determine whether you sign up for the Jimdo Dolphin editor or the Jimdo Creator editor. Again, this tutorial focuses on the Jimdo Dolphin editor so select the “no coding required” option.
Jimdo will then ask you several more questions. These include for whom do you want to create the website, what’s your website’s purpose, and the name of your business or project. If you don’t know the name of your business yet, use our Business Name Generator to select one. Once you enter the name of your new website, Jimdo will ask you to connect your business’s Facebook page.
But, the Jimdo quiz isn’t over yet. Jimdo also will ask you for the goal of your website, what your website is about, as well as your preferred style. Choosing your style will help Jimdo find color palettes to suit your interests.

Once you choose your style and color palette, Jimdo will ask what pages your website will need. At this point, you can choose up to three pages. But, don’t worry, we’ll walk through how to add more later.
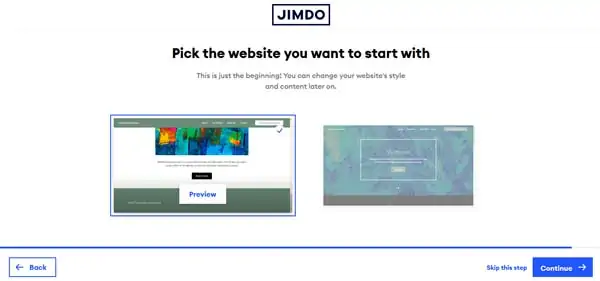
The final part of the sign-up process involves choosing your basic Jimdo website. That’s all it takes to create a generic website in Jimdo! But, you still need to customize the content to match your specific business.
Make sure you have a cohesive color scheme for your business and branding. Read our How to Choose a Great Website Color Palette guide to learn more.
Upgrade Your Jimdo Site
At this point, you may want to consider upgrading so you can access the premium features Jimdo provides as you create your website.
For most businesses, we recommend the Jimdo Grow plan. It provides everything most service-based businesses need, including the social marketing tools vital to reaching new customers and faster replies from Jimdo’s support team to any questions you may have.
If your business needs a website capable of supporting an online store or any type of ecommerce, we recommend the Jimdo Business plan. It comes with almost everything you’ll need to get your shop up and running.
Select a plan and complete your purchase.
Change Jimdo Theme
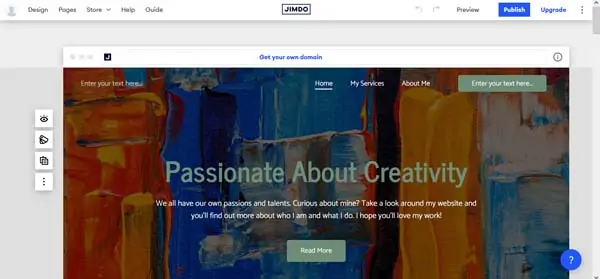
The Jimdo website builder automatically creates a site for you based on your answers to several questions posed during the sign-up process. If you prefer a different look and feel, you can easily change your site’s theme.
You’ll edit your website from the Jimdo Dolphin editor’s dashboard.
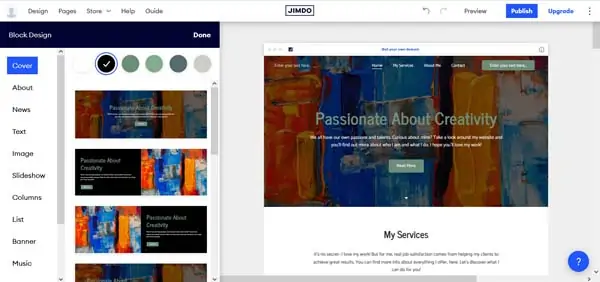
Your site includes multiple sections that Jimdo refers to as “Blocks.” You can edit these blocks to adjust your site’s theme. Simply hover over a block and select the “Block Design” icon from the left-hand toolbar.

Scroll through the available layouts and color options, and then click on the “Done” link at the top of the “Block Design” menu when you find one you like.
To further customize your theme, you can select different colored circles or even alter the block to a different type of section by reviewing the block design options. Read our How To Use the Jimdo Website Builder guide for more detailed instructions.
Step 2: Set Up Jimdo Page Structure
In the Jimdo Dolphin editor, you can choose up to three pages to include in your website during the sign-up process. The next step in building a professional website involves creating a page structure that serves your business needs. Most entrepreneurs and small businesses need these four pages for their websites:
- Homepage: As the first page people see when they visit your site, this should provide an overview of your business.
- About: This page offers more information about you, your business, and/or your team.
- Services: This page describes what services your business offers.
- Contact: This page features your business’s contact information, such as a phone number, email address, physical address, hours of operation, and a contact form.
In the menu at the top of the Jimdo Dolphin editor, select the “Pages” option. Your site’s existing page structure will then appear in the “All Pages” menu.
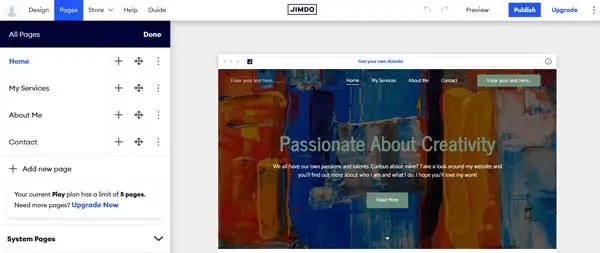
For the purposes of this tutorial, we want our example Jimdo website to include the following pages: “Home,” “About,” “Services,” and “Contact.” Luckily, most Jimdo templates come with these pages already built in. But, it’s still helpful to know how to add, delete, reorder, and rename pages if you ever need to do so.
Looking for a more in-depth discussion about how to set up your website’s structure? Check out our How To Structure a Website article.
To add a page:
- In the menu at the top of the Jimdo Dolphin editor, select the “Pages” option to open the “All Pages” menu.
- Click on the “+ Add a new page” link to enter in the name of your new page.
- Click on the “Done” link at the top of the “All Pages” menu to return to the Jimdo Dolphin editor where you can start building and editing your new page.
To delete a page:
- In the menu at the top of the Jimdo Dolphin editor, select the “Pages” option to open the “All Pages” menu.
- Click on the “More” (“⋮”) icon to the far right of the page you want to delete.

- A drop-down menu with the option to delete the page at the very bottom will then appear. Select the “Delete” option to permanently remove this page.

To reorder the pages:
- In the menu at the top of the Jimdo Dolphin editor, select the “Pages” option to open the “All Pages” menu.
- Click on the “Navigation” icon (the one with four arrows) next to the page you want to move.
- Drag that page up or down in the “All Pages” menu and drop it in your preferred location.
- Click on the “Done” link at the top of the “All Pages” menu and your pages will appear in their new order in your site’s navigation menu.
To rename the pages:
- In the menu at the top of the Jimdo Dolphin editor, select the “Pages” option to open the “All Pages” menu.
- Click on the page you want to rename.
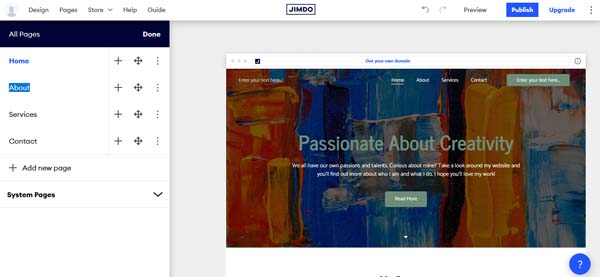
- Type in the new name and the Jimdo Dolphin editor will automatically update that page’s name.

Step 3: Upload Your Business Logo
After creating a Jimdo account, updating your site’s theme, and adding or altering the pages you’ll need, it’s time to customize your website to match your business. Let’s start with your logo.
With the Jimdo Dolphin editor, you can display your business logo in your site’s navigation bar and/or footer.
Don’t have a logo yet? Use our Free Logo Generator to create one.
To add your business logo to the navigation bar:
- Hover your mouse over the navigation bar, and then click on the “Show Elements” icon in the left-hand toolbar of the Jimdo Dolphin editor. This’ll open the “Show Elements” drop-down menu.
- In the “Show Elements” drop-down menu, select “Logo” to make a blue “Checkmark” appear on the right.
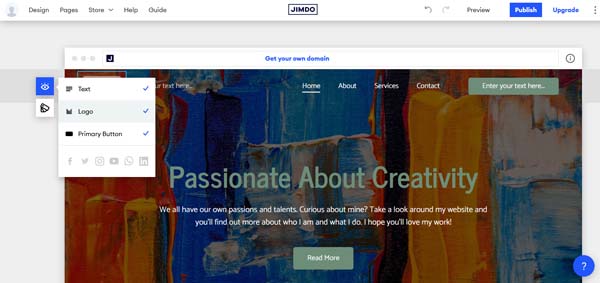
- This’ll automatically add your logo to the navigation bar. If you haven’t uploaded a logo yet, a logo placeholder will appear in your navigation bar.
- Click on the logo placeholder and a horizontal, pop-up, “Editing” menu will then appear.
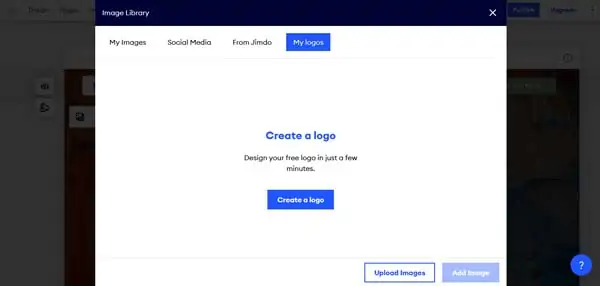
- Click on the “Choose Image” icon in that menu to open the “Image Library” window.
- From the “Image Library” window, you can upload your own logo file from your computer or a social media platform. Alternatively, you can create a logo with Jimdo.
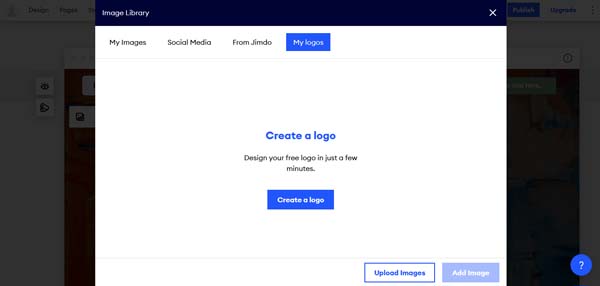
- Select your logo and click on the “Add Image” button to return to the Jimdo Dolphin editor with your new logo displayed.

To add your business logo to the footer:
- Scroll down to the bottom of the Jimdo Dolphin editor and hover your mouse over the footer.
- Click on the “Show Elements” icon in the left-hand toolbar to open the “Show Elements” drop-down menu.
- In the “Show Elements” drop-down menu, select “Logo” to make a blue “Checkmark” appear on the right.
- This’ll automatically add your logo to your footer.
- If you need to update or add a logo, follow the steps above for how to update the logo for the navigation bar.
Step 4: Update the Homepage Header Area
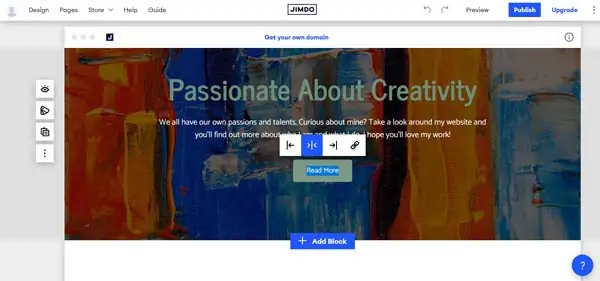
The homepage header area represents the most important part of your website because it’s what potential customers see first when they visit your site. That makes it essential for this area to feature attention-grabbing content.
The main elements of the homepage header area include:
- A large image that covers the top of the homepage
- A headline (and subhead if your theme allows)
- A call-to-action (CTA) button
Read on to learn how to tailor each of these elements to your business.
Change the Homepage Header Image
Because this header image appears at the top of your website’s homepage, it’s the most important image on your site. It should give readers a clear understanding of your business’s purpose and offerings.
Good ideas for homepage header images include:
- An external view of your business
- A picture of your business in action
- Happy people using your product(s) or service(s)
- A picture of your product(s) or service(s)
Pick an Image
Hopefully, you have some high-quality photos of your business you can use for your header image. If not, don’t worry. Many business owners don’t have such images when they first start out.
If you don’t have a personal photo to use, Jimdo offers free images within its Image Library or you can search a website like Unsplash.com and download a royalty-free image. Just make sure the image has a horizontal orientation.
Replace the Existing Image
Once you choose your preferred header image, it’s time to replace the image currently in that area.
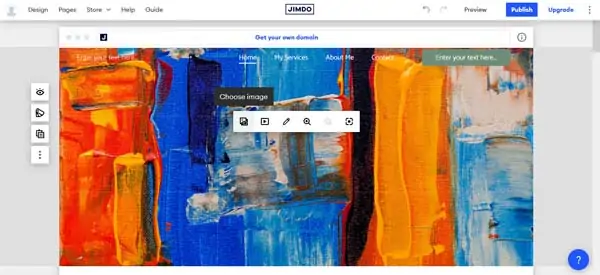
To replace the existing homepage header image:
- Click on the current image, and then click on the “Choose Image” icon in the horizontal, pop-up, “Editing” menu that’ll then appear. This opens the “Image Library” window.

- From the “Image Library” window, you can upload your own photos, choose from the Jimdo library of images, or connect your social media feeds to choose an image you previously uploaded to Facebook or Instagram®.
- Click on the “Add Image” button after you make your final choice. You’ll then return to the Jimdo Dolphin editor with your changes in place.
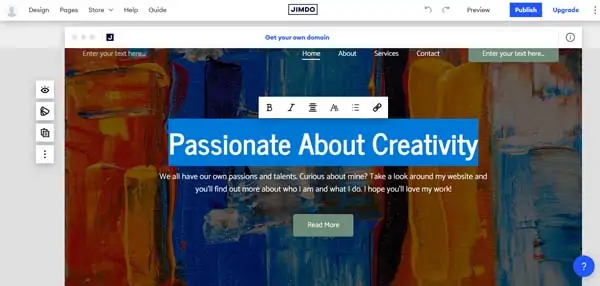
Change the Homepage Header Headline
Your homepage headline should clearly convey what your business offers. Make it descriptive, but avoid anything that sounds too cute.
To change the headline, hover over it to highlight the current text. Click on that text to open the “Text” editor, and then type in your new headline.
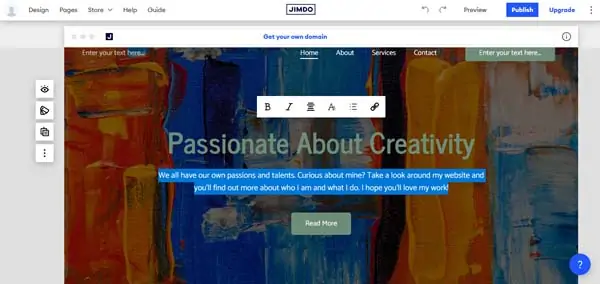
Change the Subhead
Changing the subhead follows the same process as changing the headline. Just hover over it to highlight the current text, click on that text to open the “Text” editor, and then enter your new subhead.
Update the CTA Button
The CTA button that appears in the homepage header area of your website should take visitors one step closer to becoming customers.
Some ideas for effective CTA buttons include:
- Call ###-###-####
- Contact Us
- Schedule Now
- Buy Now
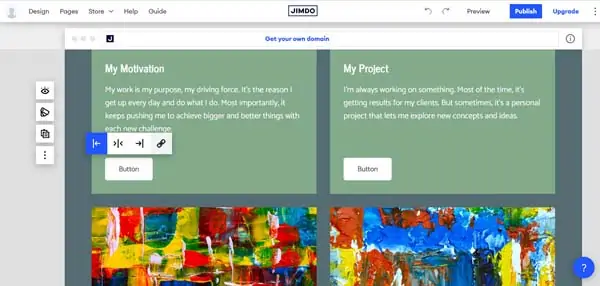
To change the CTA button:
- Hover over the existing “Button,” and then click on it to edit the text.

- To update the alignment of the button, choose the “Align Left,” “Align Center,” or “Align Right” option from the horizontal, pop-up, “Editing” menu.
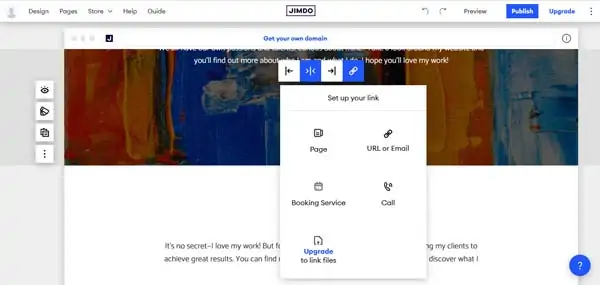
- To update where the button will take visitors, click on the “Link” icon in that “Editing” menu to open the “Set up your link” submenu.
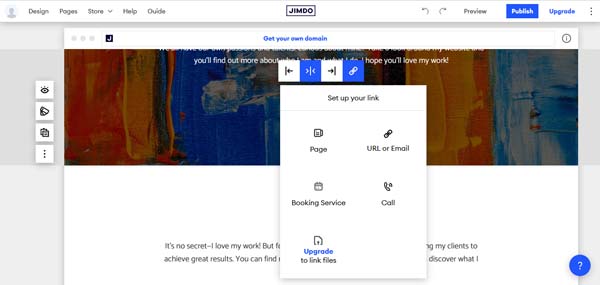
- Choose your preferred option from this menu. Your button can take visitors to a page within your website, an external website or email address, a booking service, a way to call you, and more.
Step 5: Update Your Jimdo Homepage
The other sections that appear on your website’s homepage will differ based on the template Jimdo gave you.
To get your website up and running quickly, we recommend you leave the block sections Jimdo provided and simply update the text and images to match your business.
Change the Text
To change the existing text on your site’s homepage, click on that block of text.
You can edit this text directly on your website, and then use the “Text” editor to alter its style and alignment.
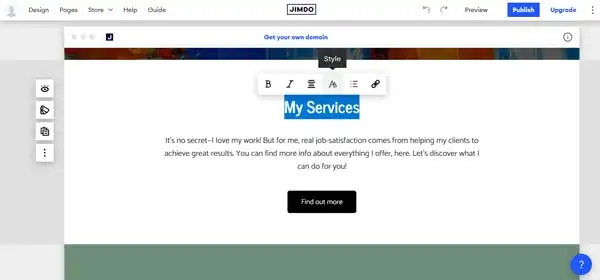
When you finish making edits, the Jimdo Dolphin editor will automatically update your changes.
Make sure your font matches your branding. Use our Best Fonts For Websites guide to learn more.
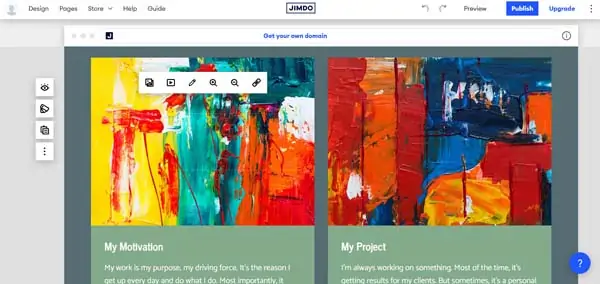
Replace the Images
The images on your website should highlight how your business helps customers and give visitors a better idea of what you offer.
To replace an existing image:
- Click on the image you want to change to open the horizontal, pop-up, “Editing” menu.

- Click on the “Choose Image” icon in that menu to open the “Image Library” window.
- Upload or select your chosen image and click on the “Add Image” button to automatically update the image.
Link to Customer Reviews
The Jimdo website builder doesn’t provide its own tool for ratings or reviews. But, you can choose to link a button to your external Yelp® or other reviews page. You also can add reviews and testimonials manually.
To connect external reviews to your site:
- Click on your chosen button to open a horizontal, pop-up, “Editing” menu.

- Click on the “Link” icon in the “Editing” menu, and then select the “URL or Email” option from the drop-down menu that’ll then appear.
- Enter the link to which you want to connect, and then click on the blue “Checkmark” icon to automatically connect your link.
To add reviews manually:
- Hover over any current block until the “+ Add Block” button appears. Click on the “+ Add Block” button to open the “Add Blocks” menu.
- Scroll down and select the “Slideshow” option, and then choose a block layout that includes text as part of the slideshow.
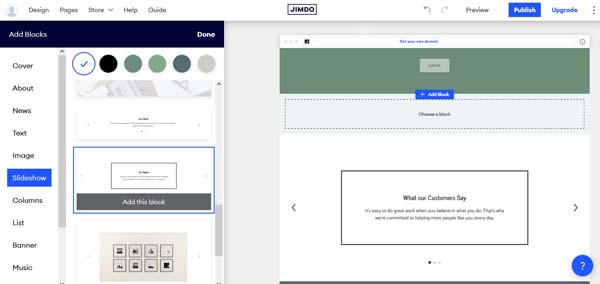
- Once your block is all set, click on the existing text in that new slideshow to manually enter your customer reviews.

For more detailed instructions, check out our How To Use the Jimdo Website Builder guide.
Set up the “Contact” Block
Contact forms provide a vital opportunity to connect with your site visitors. Typically found on a website’s “Contact” page, these forms also can appear on any page you’d like.
To set up the “Contact” block:
- Hover over any current block until the “+ Add Block” button appears. Click on the “+ Add Block” button to open the “Add Blocks” menu.
- Scroll all the way down the “Add Blocks” menu to find and select “Contact.” From the “Contact” submenu, scroll to choose your preferred contact form layout.
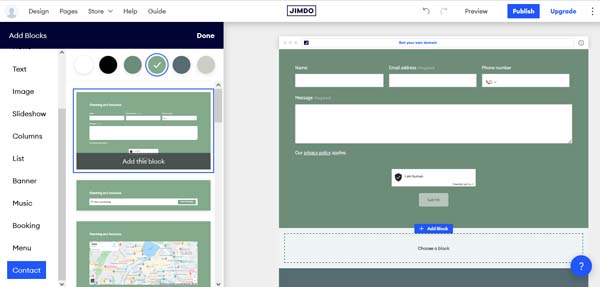
- Once you click on your preferred layout, the Jimdo Dolphin editor will automatically load it into your web page.
- Click on the “Submit” button in your new contact form to edit the email address that’ll receive your online inquiries.

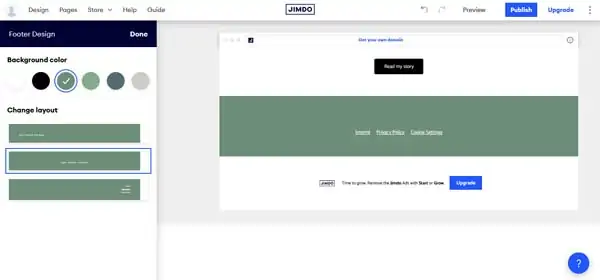
Update the Footer
The footer is one of the most important, yet often overlooked parts of a website. Your site visitors expect to find certain information in the footer, including:
- A copyright date
- Links to your “Privacy Policy” and “Terms of Service” pages
- Your business’s contact information
- Social media icons linked to your business’s social media accounts
The Jimdo Dolphin editor automatically includes “Cookie Settings,” a “Privacy Policy,” and “Imprint” as links embedded within the footer of all of its site templates.
To update the footer:
- Scroll all the way down in the Jimdo Dolphin editor to reach the “Footer” area of your website.
- Click on the “Block Design” icon in the left-hand toolbar to open the “Footer Design” menu.

- Use the “Footer Design” menu to alter the color and layout of your footer.
- Click on the “Done” link to exit the “Footer Design” menu.
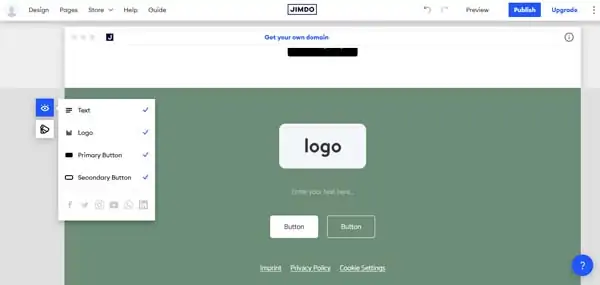
- Next, click on the “Show Elements” icon in the left-hand toolbar to open the “Show Elements” drop-down menu.
- Select the “Text” option to add a text box to your footer.
- Select the “Logo” option to add a logo box to your footer.
- Select the “Primary Button” and/or “Secondary Button” options to add these features to your footer.

- To edit any of these Jimdo features, simply click on them.
Step 6: Update Other Pages in Jimdo
Now that you have a completed homepage, it’s time to finish your site’s “About,” “Services,” and “Contact” pages.
Follow the same steps you’ve already learned for editing text and replacing pictures to update the existing content on these three pages to match your business.
To edit a page, click on the specific page in the navigation menu of your Jimdo Dolphin editor. This’ll open that page for editing.
For detailed directions on using Jimdo, check out our How To Use the Jimdo Website Builder guide.
Step 7: Test Your Website
When you finish updating your new Jimdo website to reflect information relevant to your business, it’s time to publish and test the site.
Normally, we recommend testing your website with your assigned subdomain to ensure everything appears and functions as expected. But, the Jimdo website builder doesn’t allow you to use and manage subdomains. You’ll instead need to look at a preview of your site in order to test it before going live.
Switching to Preview Mode
In preview mode, you’ll see how your website will appear to online visitors. This enables you to test and confirm the links and buttons on your site’s pages work the way they should.
To enter preview mode, click on the “Preview” button in the menu at the top of the Jimdo Dolphin editor.
Test Your Website
In preview mode, you can review your Jimdo website in both desktop and mobile views.
Click on every button to ensure they work and go where you want. Ask a friend to read through and test every page on your website as well as look for any typos or broken links.
If something doesn’t work as planned, click on the “Edit Website” button in the upper-left corner to return to the Jimdo Dolphin editor. Make the necessary changes, and then check your site once again.
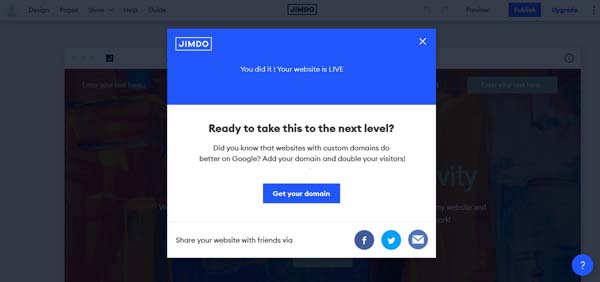
Step 8: Publish Your Jimdo Website
Pat yourself on the back! You just finished creating a website for your business using the Jimdo Dolphin editor. Now you need to publish your website to your permanent domain.
It’s easiest to use a domain from Jimdo, but you also can connect to a domain from another domain host.
If you already purchased a domain from Jimdo, it’ll automatically connect when you click on the “Publish” button.
If you need help choosing a domain for your business, check out our helpful Domain Name Generator.
Purchase a Domain From Jimdo
If you haven’t purchased a domain yet, Jimdo makes this process simple.
To purchase a domain from Jimdo:
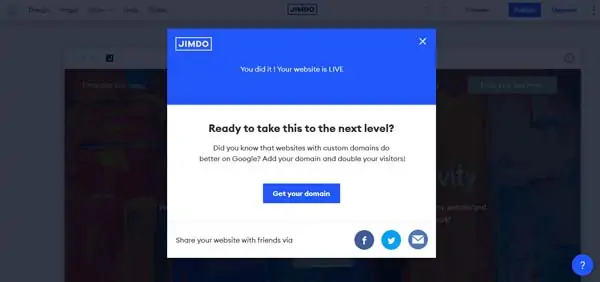
- In the Jimdo Dolphin editor, click on the “Publish” button.
- In the pop-up window that then appears, click on the “Get your domain” button.
- You’ll then see a list of recommended options for your personal domain. Choose the one that best suits your business, and then click on the “Continue” button.
- If you haven’t already purchased a Jimdo plan, you’ll encounter a prompt to do so here.
- If you already purchased a Jimdo plan, the Jimdo Dolphin editor will now publish your website at your chosen domain.
Connect to a Domain Purchased Elsewhere
If you purchased your domain outside of the Jimdo website builder, you’ll need to manually connect your new website to that domain.
To connect to a domain purchased elsewhere:
- Ask your current domain host to release the domain for transfer. This process will differ, depending on the domain host you currently use.
- Specifically ask for the “AuthCode,” which your current domain host will send to the admin email address listed for your domain.
- Back up and secure any important data from your domain email account (i.e., @yourdomain.com). Why? You can’t transfer any information stored in email accounts associated with your current domain host when you transfer your domain to your new Jimdo website.
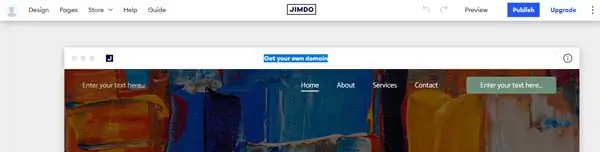
- Next, click on the “Get your own domain” link near the top of the Jimdo Dolphin editor.

- Scroll all the way down the screen that then appears, select “Browse more options,” and then click on the “Continue” button.

- Enter your own domain in the search bar and click on the “Yes, this is mine” button.
- Read and click the “Checkboxes,” to confirm you’ve read and followed the steps provided for a domain transfer and then enter your “AuthCode.”
- Double check the domain ownership data, and then click on the “Start transfer” link. Please note that this transfer can take anywhere from one to five days.

Final Thoughts
Now that you successfully built and launched your Jimdo website, you’re ready to focus on growing your small business.
Check out our in-depth guide to How To Use the Jimdo Website Builder and learn how to take your website to the next level.
Use these other helpful articles to determine if the Jimdo website builder is the right tool for you and your business: