How To Make a Simvoly Website: A Step-by-Step Guide
Every business needs a website, without an online presence your business will most likely miss out on countless potential sales. But, most small business owners don’t have the time or training to create a website from scratch.
That’s where the Simvoly website builder come in. Simvoly is a drag-and-drop builder that makes it easy to create a professional website — even for beginners. This guide will walk you through the seven simple steps required to create a business website using Simvoly.
Still looking for the right website builder for you? Check out our Best Website Builder of 2026 review.

Before You Begin
Before you start building a website for your business, take a little time to answer a few foundational questions. First, what do you want to achieve with the site? Do you want to attract new customers, sell products online, increase awareness of your brand, or all of the above?
Next, consider how you want your website to appear. What websites do you think look particularly attractive? How should your site reflect your business’s brand? What pages will your customers or clients find most important?
Spending a few minutes answering these questions will help you create a plan for precisely the website your business needs to meet your goals.
Use these helpful articles to aid you in better preparing to build your business website:
7 Steps to Make a Simvoly Website
As we stated at the top, the Simvoly website builder is incredibly easy to use, especially for beginners. Here, we will take you through the seven simple steps to build your website with Simvoly.
Skip Ahead
- Sign up for Simvoly
- Choose a Template
- Update the Homepage Header Area
- Update the Rest of the Homepage
- Add Necessary Sections
- Preview Your Website
- Attach Your Domain
Step 1: Sign up for Simvoly
To get started, go to Simolvy.com and click on the “Get Started” button in the upper-right corner.

On the next screen, create your Simvoly account by entering your name, email address, and a password. Check the boxes next to “I’m not a robot” and “I agree with the Terms and Conditions and the Privacy Policy.” Then, click on the “Get Started” button at the bottom.

Step 2: Choose a Template
After you create your Simvoly account, you’ll reach a page with a selection of Simvoly website templates.
Simvoly divides its templates into four categories: “Website,” “Online Store,” “Landing Page,” and “Funnels.” Within each of these categories, you’ll find subcategories grouped by industry or purpose.
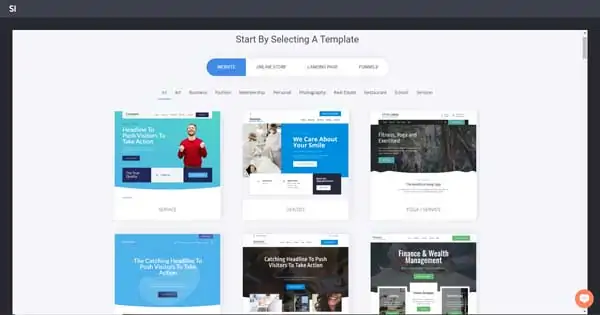
To take a closer look at a template, hover over it and click on the “View” button that then appears. This’ll open a preview of that template.
Browse through the templates to find one that’ll work best for your business. When you decide on a template, open the preview and click on the “Start With This Theme” button at the top of the screen.
Simvoly will then prompt you to provide a name for your new website. It’s for your use only and invisible to visitors.
Simvoly will then present a five-minute, tutorial video that offers some guidance on how to start building your website. Once you finish watching the video, close it’s window and you’ll then see the Simvoly content management system (CMS) — also known as the “Builder” dashboard.
From this dashboard, you can adjust and customize your website to fit your specific business needs.
Step 3: Update the Homepage Header Area
The header area is the top section of your website’s homepage. It usually contains a logo and a navigation bar. Sometimes it may include call-to-action (CTA) buttons, social media icons, or additional information.
Because your site’s homepage header is the first thing visitors will see, it makes sense to adjust it first.
Don’t have a logo yet? Use our free Logo Maker to create one instantly.
Change the Logo
A logo is the text or image that represents your company visually.
To change the header logo:
- Hover your cursor over the logo, and then click on the “Gear” icon that appears above the logo. This’ll open the “Edit Settings” menu on the right side of the “Builder” dashboard.
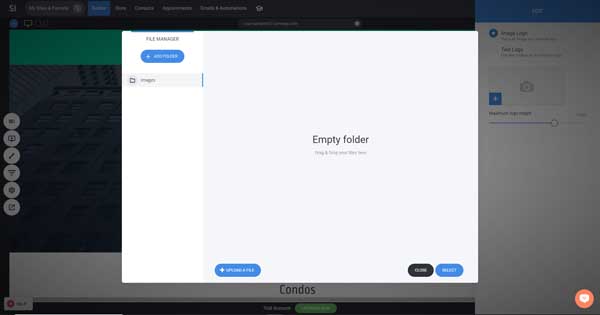
- To add a photo as your logo, click on the box next to “Image Logo.”
- Click on the plus sign (“+”) icon.
- Click on the “+ Upload a File” button, and then select the photo file you want to use as your logo.
- To instead create a text logo, click on the box next to “Text Logo.”
- Enter the text you want to use as your logo in the box under the “Edit Your Text Logo” section.

Change the Background Color
The Simvoly website builder also makes it easy to customize the background of your homepage header.
Learn why it’s important to have a cohesive color scheme for your business website and branding with our Website Color Palette guide.
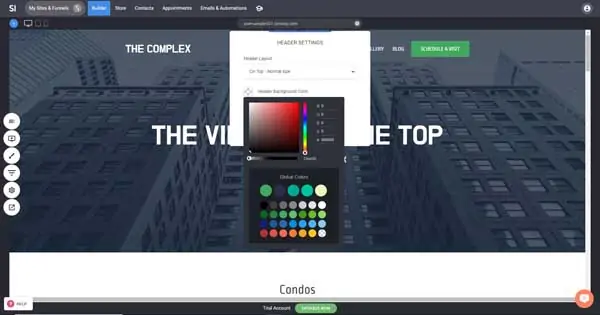
To change the header background color:
- Hover the cursor over the homepage header.
- Click on the “Gear” icon that appears on the left side of the header. This’ll open the “Header Settings” menu.
- Click the icon next to “Header Background Color” to open a color palette window.
- Choose the color you want to use from within that color palette.
Change the Headline
Headlines are brief lines of text that stand out and separate sections of your website.
To change the header headline:
- Click on the headline to open the toolbar above it, and then click on the “Edit” button in that toolbar
- Delete the existing text, and then enter the text you want to use as your headline.
- You also can adjust the font, style, color, and size of the lettering in your header headline from this “Edit” toolbar.
Add a Subhead
A subhead is similar to a headline, only smaller. It often follows a headline to clarify it or provide more information.
To add a subhead to the header:
- Click on the “Add Widget” button near the top of the dashboard’s left-hand toolbar. It looks like a computer monitor with a plus sign (“+”) on the screen.
- Click on the “Heading” box in the “Add Widget” menu, drag it over to your site, and drop it into your header.

- Type in the text you want to appear in your subhead.
- A toolbar will automatically appear above the new subhead when you drop it on your page. Use that toolbar to adjust the font, style, color, and size of the lettering in your subhead.

Update the CTA Button
CTA buttons invite site visitors to take specific actions, such as “Learn More,” “Make an Appointment,” or “Subscribe.”
To update the header’s CTA button:
- Hover your cursor over the existing CTA button. A toolbar will automatically appear above that button.
- To change the button’s text, add a second line of text, or add an icon, click on the “Gear” icon. This’ll open the “Edit Settings” menu.
- To change the CTA button text color, text font family, font size, letter spacing, and font style, click on the “Text Styles” tab within the “Edit Settings” menu.
- To change the CTA button or border color, text style, shadow, padding size, border radius, border size, hover effect, or to add a gradient, click on the “Paintbrush” icon to open the “Edit Styling” menu.
- To delete the CTA button, click on the “Trash Can” icon.
Step 4: Update the Rest of the Homepage
The next step involves updating the rest of your website’s homepage so all of its text, images, and links accurately represent your business.
Ensure your homepage is successful by reading our How to Design a Homepage guide.
Change the Text
Most business websites include blocks of text that provide information and introduce visitors to the brand. Make sure your font matches your overall branding by reading our Best Website Fonts guide.
To change the homepage text:
- Click on the text box you want to update. A toolbar will then appear above the text box.
- Click on the “Edit” button in that toolbar.
- Delete the existing placeholder text and enter the wording you want to use.
- Use this same toolbar to make any desired changes to the lettering’s style, font, size, and color.
Replace the Images
Images add visual appeal to a website and help engage your online visitors.
To replace the homepage images:
- Click on the image you want to replace. A toolbar will then appear above the image.
- Click on the “Edit” button in that toolbar to open the “Image Settings” menu.
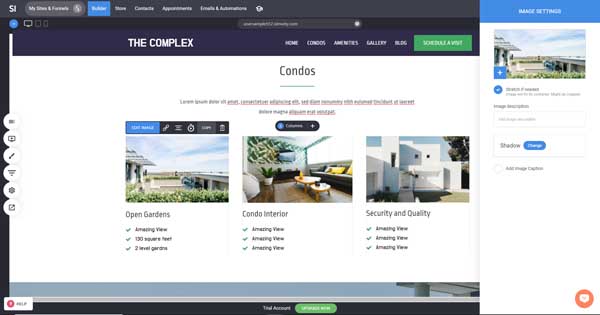
- Click the plus sign (“+”) icon in the lower-left corner of the image that appears at the top of the “Image Settings” menu.
- Drag and drop an image from your computer into the box that then opens or click on the “+ Upload a File” button at the bottom to find a file.

Add Customer Reviews
Most business websites include customer reviews — also called testimonials — to highlight the value of their products or services.
If you want to learn more about creating a Reviews page for your business site, be sure to read our How to Make a Reviews Page guide.
To add customer reviews to your homepage:
- Hover your cursor over the border between the two sections where you want to place your customer reviews section.
- Click on the “+ Add Block” button that then appears. This’ll open a window of premade sections.
- In the “Categories” listing on the left side of this window, click on the “Team & Testimonials” item.

- Find and click on the customer reviews layout you want to use.
- To update the images and text in the customer testimonial blocks, click on them and choose the “Edit” option from the toolbar that then appears.

Set up the “Subscribe” Section
Many business websites enable their visitors to subscribe to email newsletters, coupons, event notifications, and other services.
To set up a “Subscribe” section:
- Hover your cursor over the border between the two sections where you want to place the “Subscribe” section.
- Click on the “+ Add Block” button that then appears. This’ll open a window of premade sections.
- In the “Categories” listing on the left side of this window, click on the “Call To Action” item.
- Find and click on the CTA layout you want to use.
- To update the images and text in the CTA block, click on them and choose the “Edit” option from the toolbar that then appears.
Update the Footer
The footer is the section at the very bottom of every page on your website. It typically includes your business’s copyright information, physical address, and social media icons.
To update the footer:
- Click on the text box in the footer of your website template. A toolbar will then appear above the text box.
- Click on the “Edit” button.
- Delete the existing placeholder text and enter the wording you want to use.
- You also can change the lettering’s style, font, size, and color from this toolbar.
- Next, click on the social media icons box. A toolbar will then appear above the social media icons box.
- Click on the “Edit” button to open the “Social Media” menu.
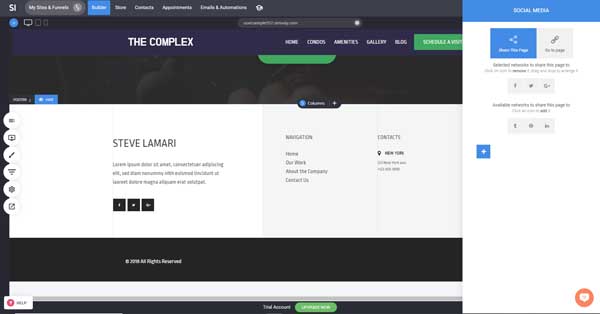
- Click on the icons you want to appear in your footer, drag them over to your footer, and then drop them into your desired order.
- Click on the “Go to Page” box in the “Social Media” menu.
- Enter the URL for each of your chosen social media icons.

Step 5: Add Necessary Sections
Most business websites also include a “Services” section that explains what the company offers as well as a “Contact” section that tells visitors how to reach the company via phone, email, or other means.
To add these sections:
- Hover your cursor over the border between the two sections where you want to place the “Services” section.
- Click on the “+ Add Block” button that then appears. This’ll open a window of premade sections.
- In the “Categories” listing on the left side of this window, click on the “Services” item.
- Find and click on the “Services” section layout you want to use.
- To update the images and text in the “Services” block, click on them and choose the “Edit” option from the toolbar that then appears.
- Repeat the process, clicking on the “Contact” item in “Categories” listing this time.
Step 6: Preview Your Website
Once you finish making all the changes listed above, you should preview your site prior to launch to see precisely how it’ll appear to online visitors.
To preview your site:
- Click on the “Website Preview” button at the bottom of the dashboard’s left-hand toolbar.
- The preview will open in “Desktop View,” which shows you how your website will appear on a desktop computer.
- Scroll through your site and carefully review each page and section.
- Scroll back to the top of the homepage.
- Click on the “Tablet View” button located at the top of the preview pane near the center. This view shows how your website will appear on a tablet computer.
- Scroll through your website again, reviewing each page and section carefully, and then scroll back to the top of the homepage.
- Click on the “Phone View” button located at the top of the preview pane to the right of the “Tablet View” button.
- Scroll through your website yet again, reviewing each page and section carefully, and then scroll back to the top of the homepage.

- Close the preview pane by clicking on the “X” in the upper-right corner.
- Use the dashboard to make any necessary changes to your site based on what you found during the preview.

Step 7: Attach Your Domain
A domain is the unique web address attached to a website. The Simvoly website builder automatically generates a domain for your site when you begin the building process.
If you already purchased a custom domain, you can attach it to your Simvoly website.
To attach a custom domain:
- Click on the “Website Settings” button near the bottom of the dashboard’s left-hand toolbar. A Website Settings” menu will then appear.
- Click on the “Domains” option in that menu.
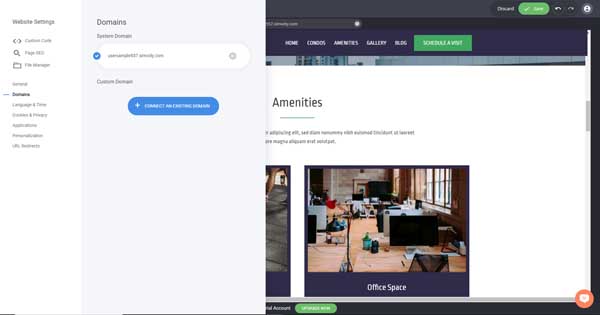
- Click on the “+ Connect an Existing Domain” button.
- Enter your domain.
- Click on the “Connect Domain” link.

Final Thoughts
Congratulations! You now have a functioning small business website. That means you can focus on running your business and reaping the rewards of your new online presence.
For more guidance on how to leverage your new website for maximum business impact, check out our in-depth guide on How to Use Simvoly.
Looking for additional articles on Simvoly? Use these to find what you need: