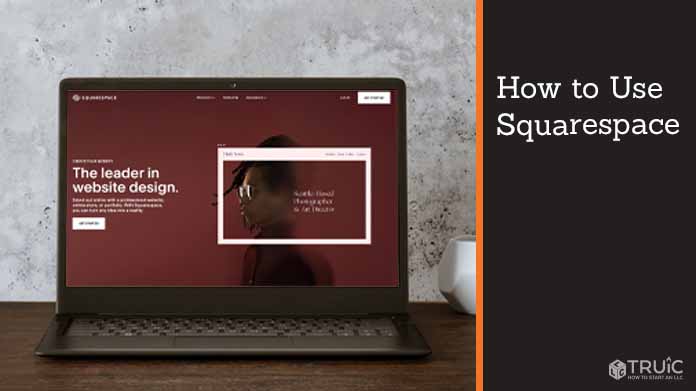
How to Use Squarespace to Build a Website For Your Business
Squarespace is a website builder that enables you to create a website for your small business in just a few hours. A process that often can take weeks — and cost a small fortune — if you instead hire a professional website designer.
This Squarespace tutorial provides an in-depth look at the Squarespace editor to walk you through how to use Squarespace to better create your professional website. We’ll cover key features while keeping things simple enough so beginners can easily learn how to use Squarespace software and tools.
Ready to start your website? Visit Squarespace.
Creating Your Squarespace Account
The first step in building a new website for your small business using Squarespace involves creating a Squarespace account. It’s free to sign up and you’ll get a free trial to be able to begin building your website. However, we strongly recommend upgrading so you can use all of Squarespace’s features and publish your website right away.
Head to Squarespace and click on the “Get Started” button to sign up.

Before creating your account, Squarespace will ask you to select a template for your website. The Squarespace website builder conveniently groups its templates by type and topic so you can easily find one to meet the needs of your small business.
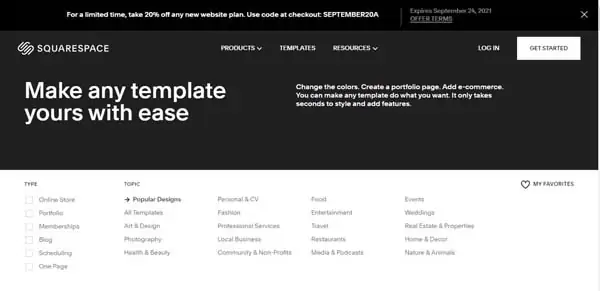
We’ll choose the “Community & Nonprofit” template for the purposes of this guide, but you should select one that most closely matches your business. Before confirming your template selection, you’ll have the opportunity to preview whichever option(s) you’re considering.
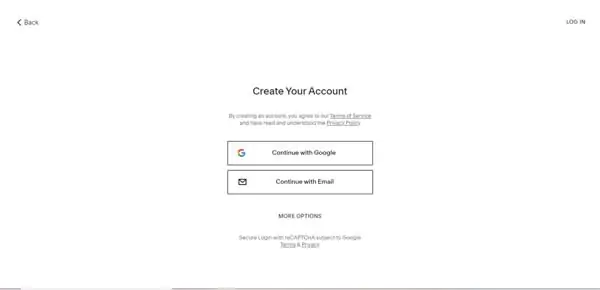
After you choose your template, you’ll have two options for creating your account. The first is an easy sign-up process using Google while the second involves creating your account with an email address. The second option will require you to enter your name and email address, and then choose a password.
Once you enter this information, you’ll enter the Squarespace website editor where a pop-up window will ask you to choose a name for your new website. While recommended, this isn’t required just yet.
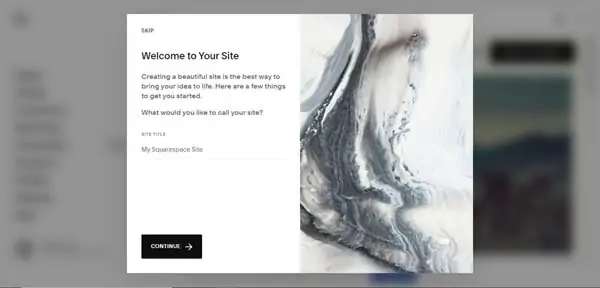
If you haven’t decided on a name for your business yet, use our Business Name Generator to help you select one.
That’s all it takes to create a website with Squarespace. But, you still need to customize the content to match your business’s branding using this the Squarespace editor.
Upgrading Your Website
It’s best to upgrade your website right away so you can access the premium features Squarespace provides as you create and customize your website. To do this, simply click on the “Subscribe” button at the bottom of the screen to choose from the following plans:
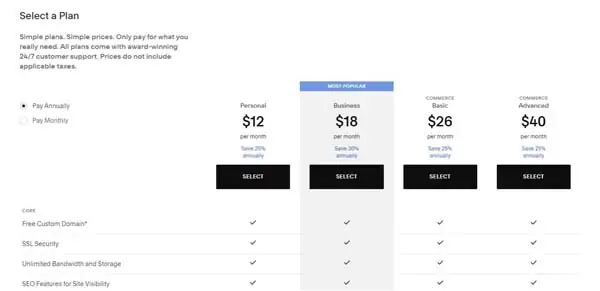
We recommend the “Business” Squarespace plan for most small business owners given the range of ecommerce features it includes at an affordable price, including the ability to sell an unlimited number of products. Once you decide on a plan, click on the “Select” button below your chosen plan and enter your payment information to proceed.
Creating Pages in Squarespace
In the Squarespace website builder, each website template comes with its own set of pages. Before you begin building and customizing your site, it’s important to ensure your template has all of the pages your business will need.
If you need to add pages, you can choose from several pre-made layouts sorted by category. Common pages almost every website needs include a homepage, an “About” page, a “Contact” page, and a “Products” or ”Services” page.
Click on the “Pages” tab in the editor’s left-hand menu to see your website’s existing page structure.
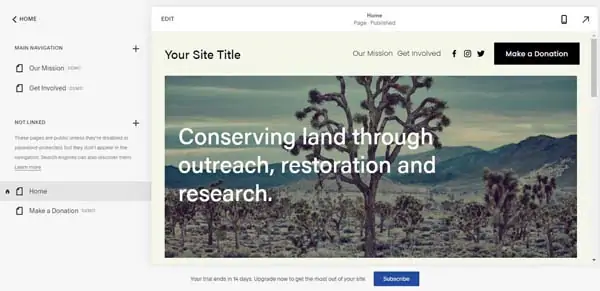
The default pages included in your Squarespace template likely won’t exactly match your specific needs. To start adjusting your website structure to suit your business, delete the pages you don’t need.
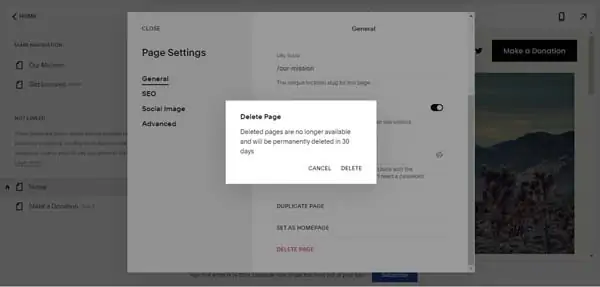
To delete a page:
- Hover over the page you want to delete under the “Main Navigation” section of the left-hand menu, and then click on the “Gear” icon. A drop-down menu of options will then appear.
- Scroll through the drop-down menu until you see the “Delete Page” option, and then click on that.
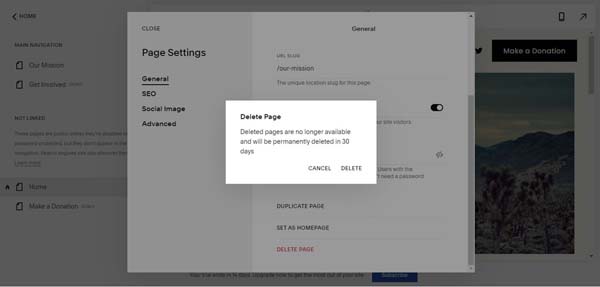
- Confirm you really want to delete this page by clicking on the “Delete” button in the pop-up window that then opens.
- Do this for every page you don’t want on your website.
To create a new page:
- To add a page to your site’s main navigation, click on the plus sign (“+”) icon at the top of the left-hand menu next to the “Main Navigation” section.
- You’ll then have the option of creating a blank page or choosing from premade layouts. For the purposes of this guide, we’ll select “Page Layouts.”
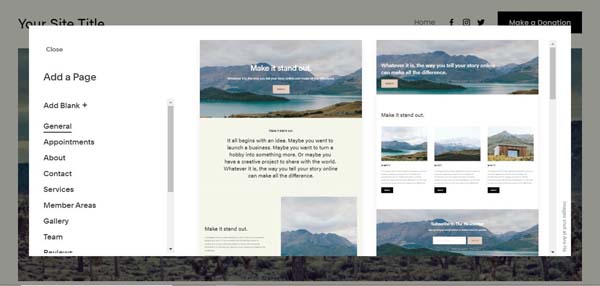
- You can then choose from Squarespace’s collection of premade page layouts. Your website will come with a homepage by default, so consider adding “About,” “Contact,” and “Services” pages.
- Choose a name for your page, which will appear in your site’s main navigation.

To reorder the pages:
- Click on the page you want to move and drag it to wherever you’d like it to appear in your site’s main navigation. For example, your homepage should appear at the top of the “Main Navigation” section in the left-hand menu.
- If you don’t want your page to appear in your site’s main navigation, simply click on and drag it to the “Not Linked” section of the left-hand menu.
Looking for a more in-depth discussion about how to set up your website structure? Check out our How To Structure a Website article.
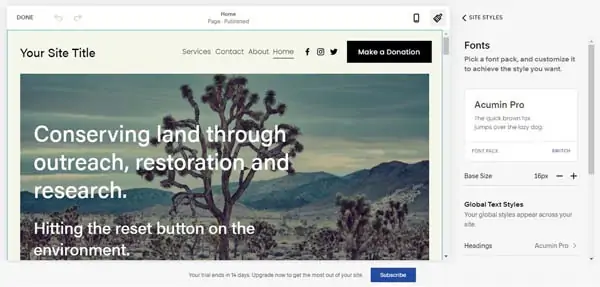
Editing Styles in Squarespace
One of the ways you can modify your website’s template so it consistently presents your business branding involves editing the site’s styles. This allows you to change various design elements, such as the fonts and colors that appear on your website, to give it a more customized appearance.
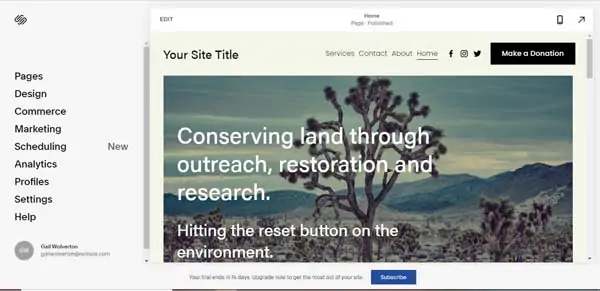
To get started, click on the “Edit” button on your website’s dashboard to enter the Squarespace editor.
Adjusting Fonts
Choosing the right font can help elevate your website’s overall appearance, make its text more legible, and create a more intuitive user experience. Make sure you’ve chosen the best font for your website.
To edit your website’s fonts:
- Click on the “Paintbrush” icon in the upper-right corner of your website’s editor. A menu will then appear on the right side of the screen.
- Click on the “Fonts” tab.
- You’ll then see a box that displays the name of your font along with a sample of the font underneath.
- Click on the “Switch” button to open a list of available fonts sorted by serif.
- Choose from the dozens of options by double-clicking on the one that meets your needs, and then click on the “Back” button.
- Adjust your chosen font’s base size, as needed.
- You also may adjust your site’s fonts according to the type of text. For example, you may want to use one font for headings and another for buttons.
Modifying Colors
Changing your website’s color scheme can not only help create a more visually appealing experience for visitors, but also clearly communicate your brand’s personality.
To learn more about the importance of color in your branding and web design, be sure to read our article on How to Choose a Great Website Color Palette.
To edit your site’s color palette:
- Click on the “Paintbrush” icon in the upper-right corner of your website’s editor. A menu will then appear on the right side of the screen.
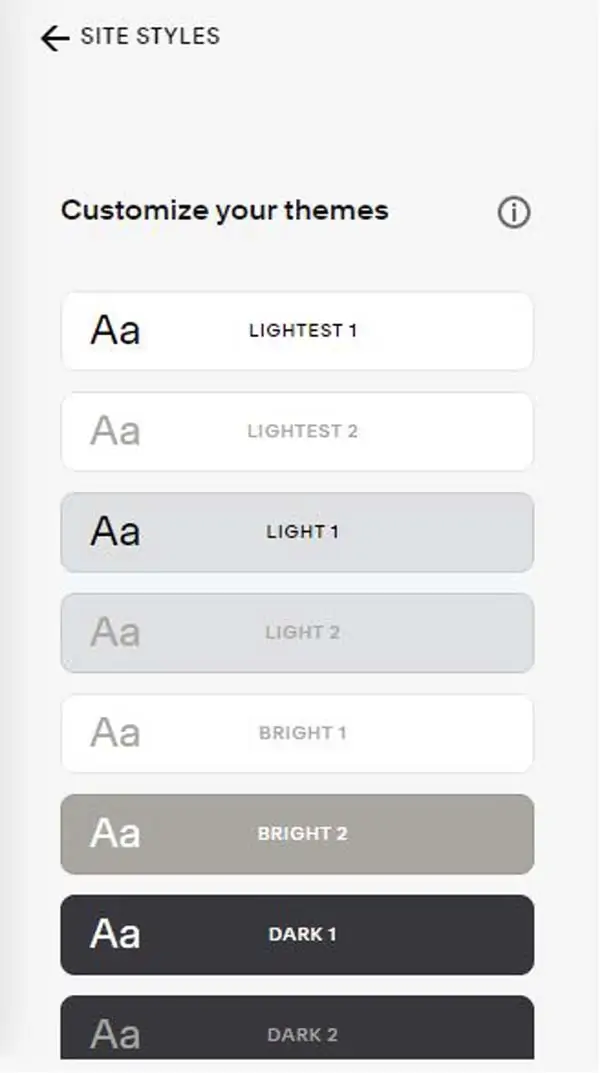
- Click on the “Colors” tab. The Squarespace website builder groups available color palettes by themes, ranging from lightest to bright to darkest.
- To change the color theme to which an element of your website belongs, click on the theme and check or uncheck that element.
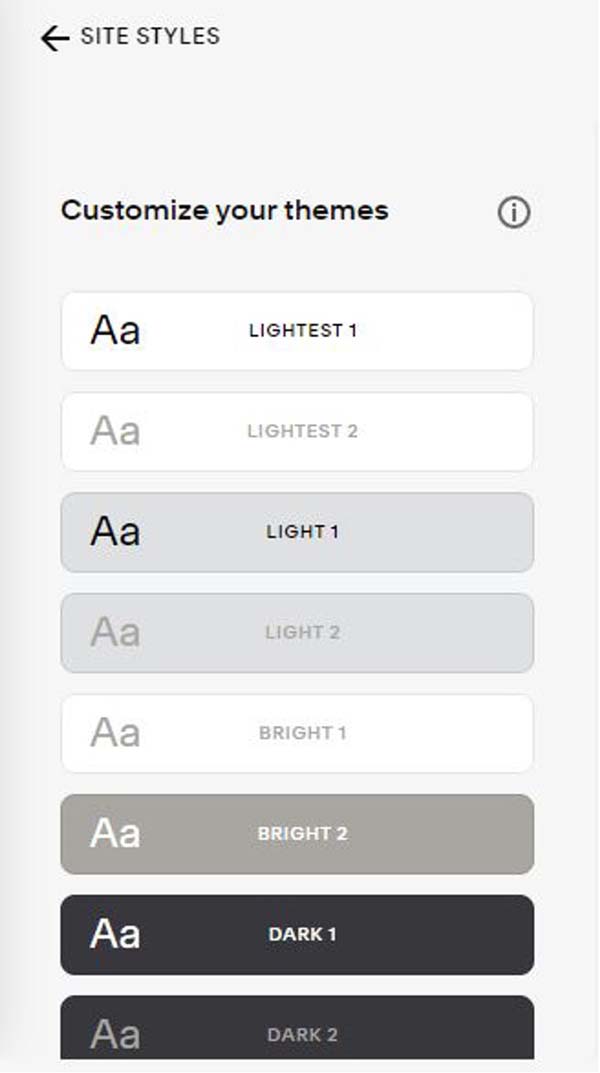
- For example, buttons appear in the darkest colors by default. To change their theme to “Bright,” simply click on a “Bright” theme and then check the “Background” option under the “Buttons” section.
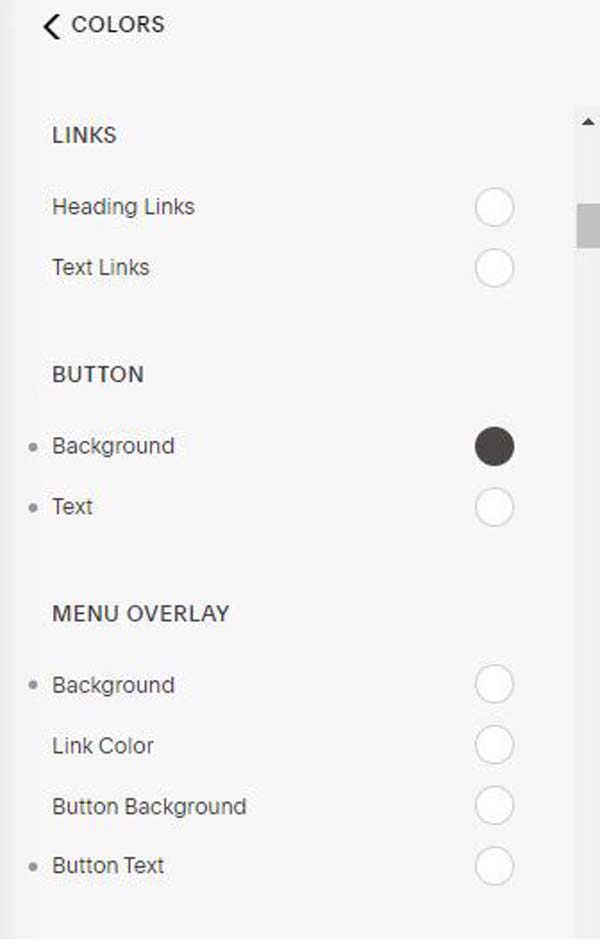
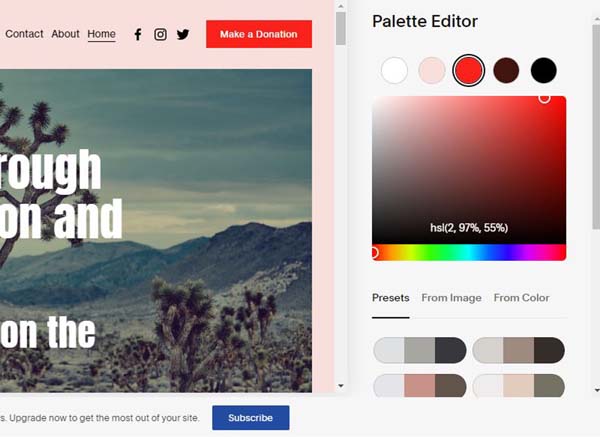
- Once you decide which elements you want to belong to which themes, you can change these by clicking on the “Edit Palette” button.
- When editing your site’s color palette, you can choose from preset palettes or edit each theme individually.

Once you’ve gotten your color palette set just right, it’s time to update your buttons.
Changing Your Button Style
Your website’s call-to-action (CTA) buttons will help you convert visitors into customers. That means you should ensure they attract enough attention to accomplish this.
To edit your button style:
- Click on the “Paintbrush” icon in the upper-right corner of your website’s editor. A menu will then appear on the right side of the screen.
- Click on the “Buttons” tab.
- Choose if you want your buttons to appear with a solid background color or transparent with an outline.
- Choose your preferred button shape (e.g., square, rounded, or pill-shaped).
- Choose the padding level for your buttons, which refers to the amount of space (in pixels) between the button’s text and borders.
Adding a Logo in Squarespace
After creating a Squarespace account, choosing a template, and adding the pages you’ll need, it’s time to customize your site to match your business. Let’s start with your logo.
If you don’t have a logo yet, use our Free Logo Generator to create one. The process takes seconds and the results help get the ball rolling for your professional website.
Your website’s navigation bar can either display your business name or your logo. Our chosen template places our business name in the upper-left corner of our example website.
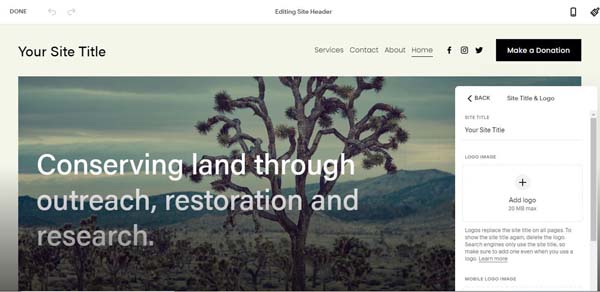
To add your business logo:
- Hover over your site’s header and click on the “Edit Site Header” button. A global editing menu will then appear on the right side of your screen.
- Click on the “Site Title & Logo” tab.
- Choose “Add Logo” and upload a file from your device.
- You also may choose “Add Mobile Logo” to add a logo specifically designed for mobile device screens.

Adding a logo here will replace your business name in the header section of every page of your site. For the sake of your search engine optimization (SEO) efforts, make sure to include your business name elsewhere on your website because search engines use this information to help determine the contents of their results pages.
Make sure your logo is large enough to viewed in the navigation bar. If yours is too small to be visible, simply use a text version of your business name instead.
Modifying Your Squarespace Header
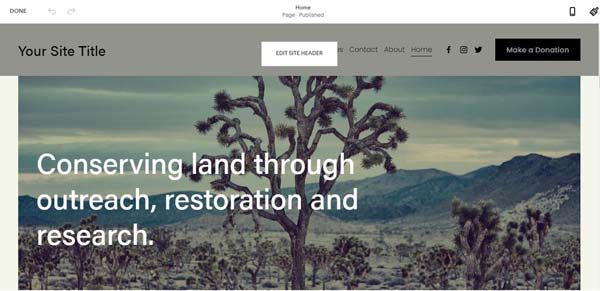
The homepage header area represents the most important part of your website. Site visitors will make a quick judgment about your business based on what they see when they first arrive on your website. This judgment happens before visitors start to scroll down your homepage, so they’ll leave your site if they don’t like what they see.
The main elements of the homepage header include:
- A large image that covers the top of the homepage
- A headline (and subhead if your template allows for this)
- A CTA button
Read on to learn how to tailor each of these elements to your business.
Learn everything you need to have a successful homepage. Check out our How to Design a Homepage guide.
Changing the Header Image
The header image that appears at the top of your homepage is the most important image on your website. It should give readers a clear picture of your business’s purpose and offerings.
Good ideas for header images include:
- An external view of your business
- A picture of your business in action
- Happy people using your product(s) or service(s)
- A picture of your product(s) or service(s)
Picking a Header Image
Ideally, you’ll use one of your own high-quality photos of your business for your homepage header image. Always ensure you have the legal right to use whatever images you display on your website. Don’t just search for images via Google and use them. Make sure you have permission to use an image on a website.
Replacing the Existing Header Image
Once you choose your preferred homepage header image, it’s time to replace the image currently occupying that space with the new one.
To replace the existing header image:
- Double-click on the existing image, and then click on the “Background” tab at the top of the menu that appears on the right side of your screen.
- Click on the “Replace” link to replace the image.

- Select and upload your chosen image from your device.
- Choose if you want the image’s background width to be “Inset” or “Full Bleed.” Essentially, this means whether or not you want the Squarespace website builder to automatically scale the image to fit the section’s dimensions.
- You also may edit the section’s dimensions by clicking on the “Format” tab at the top of this menu, and then choosing the section’s height, content width, and content alignment.

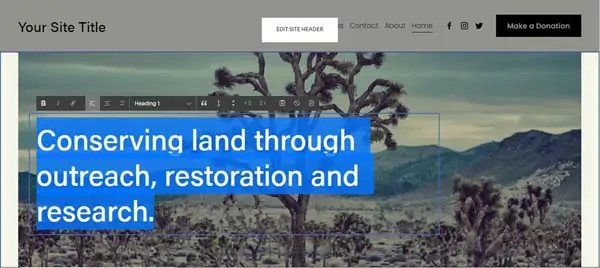
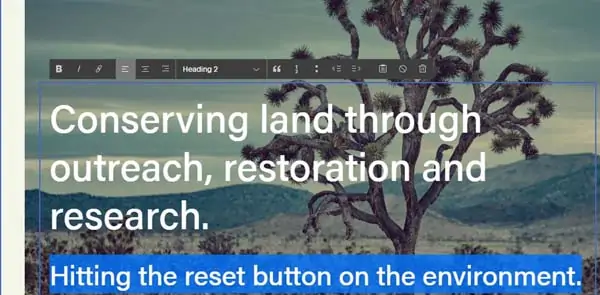
Changing the Headline
You want the headline to clearly convey what your business has to offer visitors. While it’s important to be descriptive, short and sweet is key here.
To change the headline in your homepage header, triple-click on the headline to highlight it and then type in your new headline. A menu bar will appear that’ll also allow you to edit the text’s style (e.g., if it’s bolded or italicized) and alignment as well as add a hyperlink and quotation marks. To delete the text, simply click on the “Trash Can” icon.
Adding a Subhead
To add a subhead, double-click on the text box you want to edit. Press “Enter” at the end of your header text to start a new paragraph. Highlight the text to open an editing toolbar above that text. Click on the heading options drop-down menu within this toolbar and choose “Heading 2.” You may then edit the text using the same options as you used to edit your main header text.
Updating the CTA Buttons
The CTA button that appears in the homepage header area of your website should take your visitors one step closer to becoming customers.
Some ideas for effective CTA buttons include:
- Call ###-###-####
- Contact Us
- Schedule Now
- Buy Now
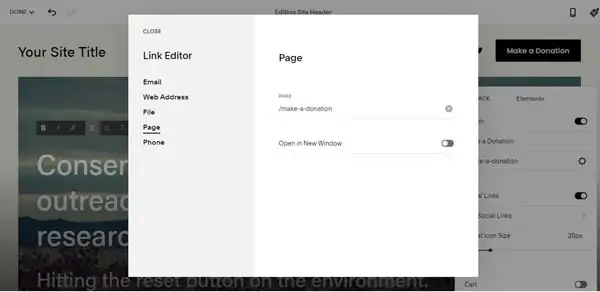
To change the CTA button:
- Hover over your site’s homepage header and click on the “Edit Site Header” button.
- Click on the “Elements” tab in the menu that then appears on the right side of your screen.
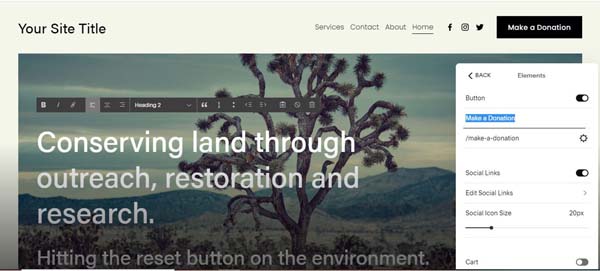
- Highlight the current text for your CTA button and modify it according to your needs.
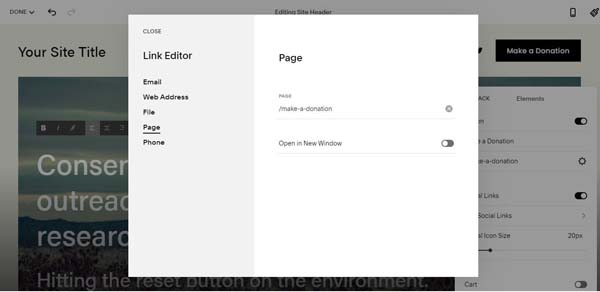
- Beneath the button’s text, click on the “Gear” icon to choose the button’s action. Your options include linking to a page on your website or to an external web address, opening a file, calling a phone number, or opening a new email message.
- Click on the “Save” button after you choose your preferred action.
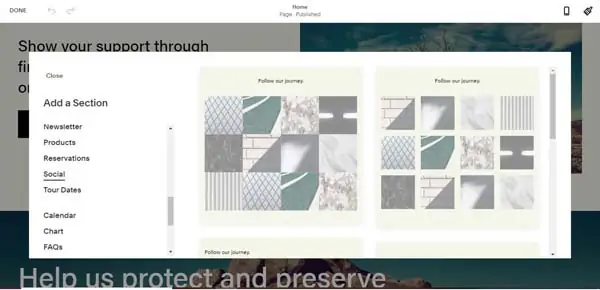
Adding Section Layouts
Adding additional content and integrations to your website can help add a personal touch as well as make your site more consistent with your brand personality. In addition to useful information, your homepage should contain an area where visitors can get in touch to learn more about your business.
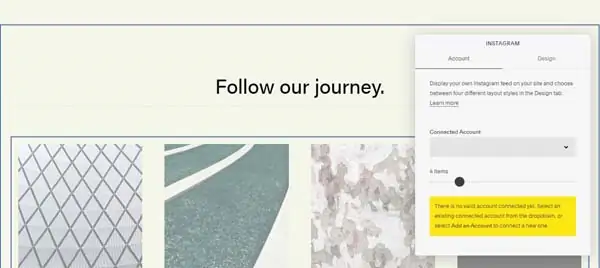
Embedding an Instagram Feed
Squarespace offers a convenient integration with Instagram that allows you to embed this social media feed on your site to offer visitors easy access to more content from your business.
To embed an Instagram feed:
- Hover below whichever section in which you’d like to embed your social media feed, and then click on the “Add Section” button.
- Select whichever layout you prefer from the available options that appear when you click on the “Social” tab.

- Once you make your selection, a menu will open on the right side of the screen. Click on the drop-down menu in the field below the “Connected Account” section and select “Add an account.”
- You’ll then need to sign into your Instagram account. Do this to continue.
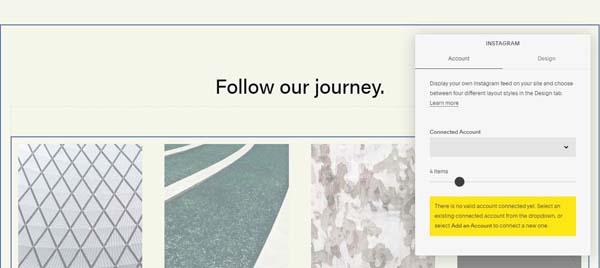
- Under the “Design” tab in this same menu, you may edit the way your Instagram posts display on your site. Options include “Slideshow,” “Carousel,” “Grid,” and “Stacked.” Choose whichever you prefer for your website.
- You also may edit the aspect ratio and the number of thumbnail images that’ll appear per row.
Adding a Form
Adding a form to your homepage will enable your site visitors to connect with you more easily. This is one of the most valuable methods of boosting conversion rates, allowing you to turn engagement into business.
To add a form:
- Hover below the section in which you want to add your form — typically just above your site’s footer — and then click on the “Add Section” button.
- Select whichever layout you prefer from the available options that appear when you click on the “Form” tab.
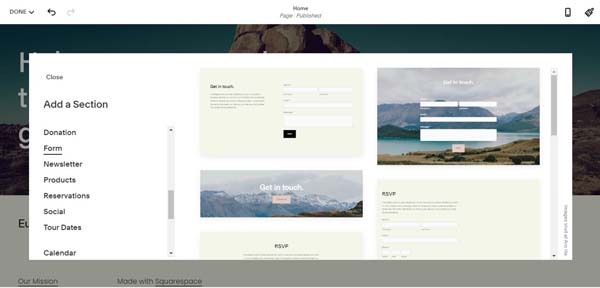
- Populate the form layout with information specific to your business. Use the above steps for modifying its text, buttons, and images.

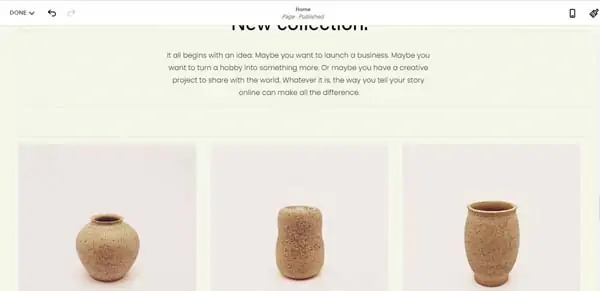
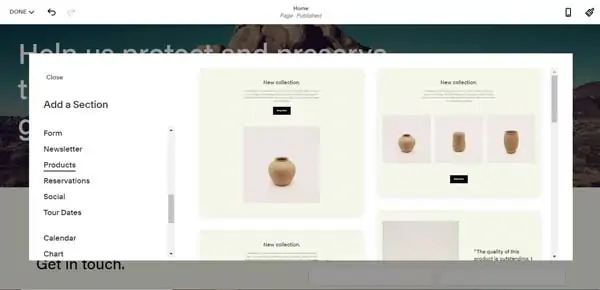
Adding a Products Section
Adding a “Products” section to your homepage will give visitors a sample of what they can purchase through your website. This can help boost conversion rates by inviting visitors to browse your “Products” page by clicking on eye-catching CTA buttons.
To add a Products section:
- Hover below the section in which you want to add your “Products” section, and then click on the “Add Section” button.
- Select whichever layout you prefer from the available options that appear when you click on the “Products” tab.

- Double-click on the existing text to replace it with text specific to your business.
- Use high-quality, eye-catching images of your products instead of the existing stock photos.
- Use an attention-grabbing title for the CTA button.
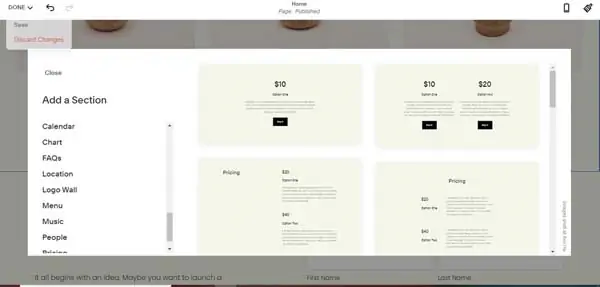
Adding a Pricing Section
If you run a business that operates within a service-based industry, a “Pricing” section can give your clients an idea of what your offerings include at each price point. This type of section also can provide your site visitors the option of purchasing your services directly through your website.
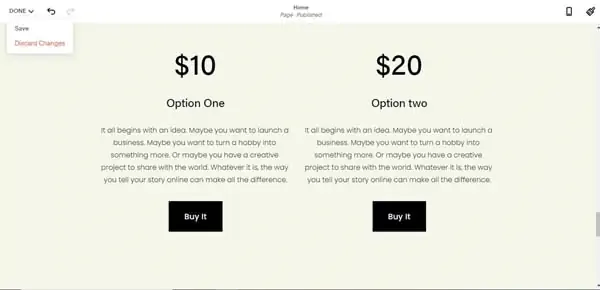
To add a Pricing section:
- Hover below the section in which you want to add your “Pricing” section, and then click on the “Add Section” button.
- Select whichever layout you prefer from the available options that appear when you click on the “Pricing” tab.
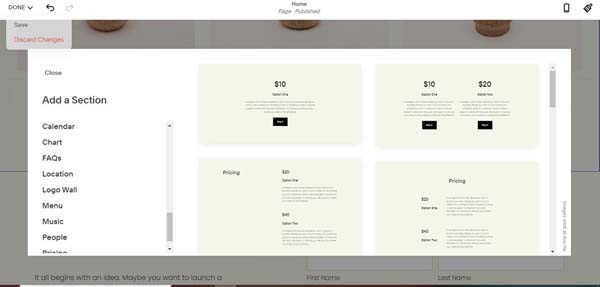
- Double-click on the existing text to replace it with text specific to your business.
- Use attention-grabbing titles for your CTA buttons.
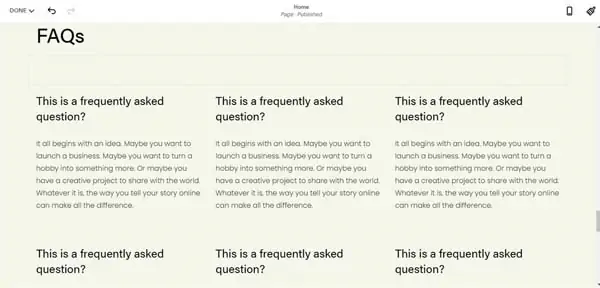
Adding a Frequently Asked Questions (FAQ) Section
Clearly communicating information about your business and brand should represent one of the most important goals for your website. One of the easiest ways to accomplish this involves answering your visitors’ most common questions in an easy-to-navigate FAQ section.
Make sure your FAQ section has everything it needs to provide a great user experience. Check out our FAQ Page Design guide for more.
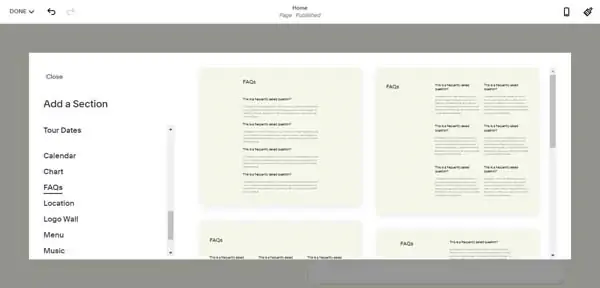
To add an FAQ section:
- Hover below the section in which you want to add your “FAQ” section, and then click on the “Add Section” button.
- Select whichever layout you prefer from the available options that appear when you click on the “FAQs” tab.
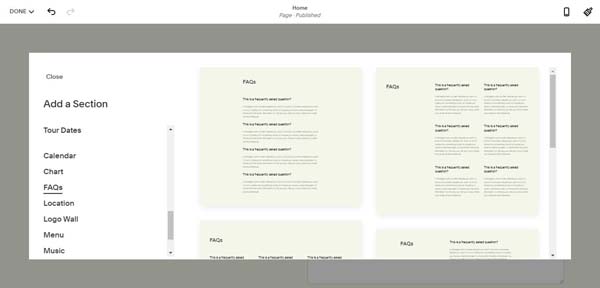
- Double-click on the existing text to replace it with text specific to your business.
- Fill this section with thoughtful answers to the most common questions you receive about your business.
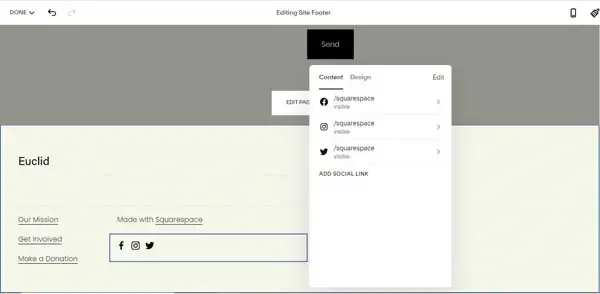
Updating the Footer
The footer is one of the most important — yet often overlooked — parts of a website.
Visitors to your site expect to find certain information in the footer, including:
- A copyright date
- Links to your “Privacy Policy” and “Terms of Service” pages
- Your business’s contact information
- Social media icons linked to your business’s social media accounts
To update the footer:
- Hover over your footer and select “Edit Footer” from the options that then appear.
- Hover over and click on the elements within the footer you wish to change, and then modify them using the steps outlined above.
- Click on the social media icons box to edit the links to your business’s social media pages.
- For social media icons you wish to display on your website, enter your profile link.
- For social media icons you don’t wish to display, either click on the “Delete Social Link” button or switch the social link’s visibility to the “Off” setting.

Adding Ecommerce Features to Squarespace
For businesses that plan to offer retail products on their websites, ecommerce features can help them turn a digital touchpoint into a digital storefront.
To get started, hover over the “Done” option in the upper-left corner of your website’s editor and click on the “Save” button. You’ll then arrive at your editor’s main control panel. From there, simply click on the “Commerce” tab to open a menu of ecommerce tools.
Adding Products
To start selling online, you must first have something to sell. Follow these instructions to create beautiful product listings that your visitors won’t be able to resist.
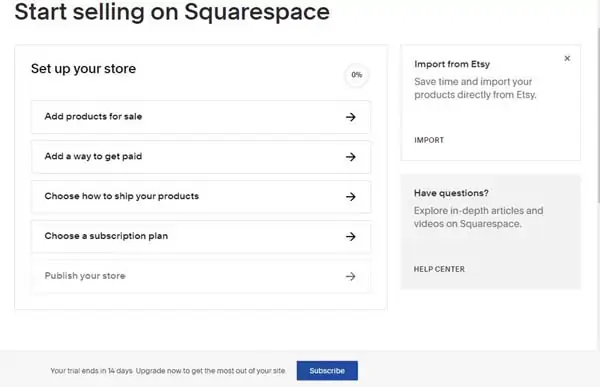
To add a product:
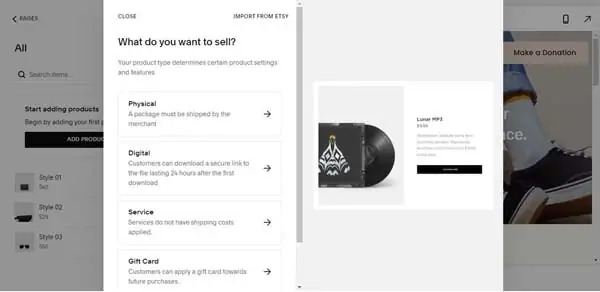
- Click on the “Add Products for Sale” tab to open a screen where you’ll need to indicate the type of products you plan to sell.
- Choose from the four available options: “Physical,” “Digital,” “Service,” and “Gift Card.”
- Alternatively, you can import products from Etsy by clicking on the “Import from Etsy” link and following the login and setup prompts.
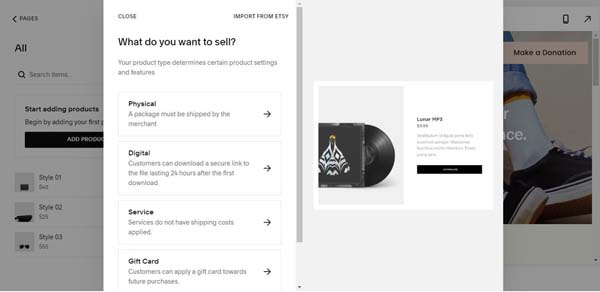
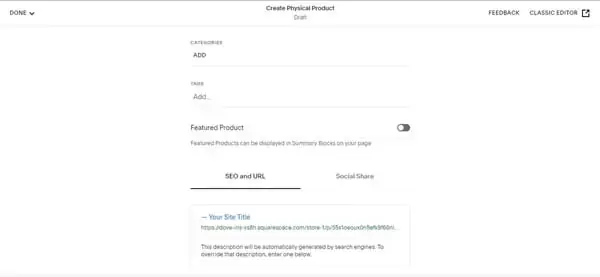
- Once you indicate the type of product you plan to sell, you’ll need to add additional information about your product.
- Upload an image of your product.
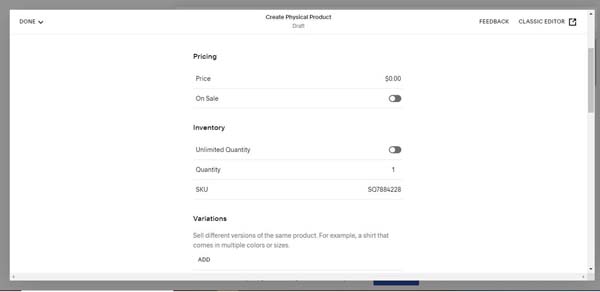
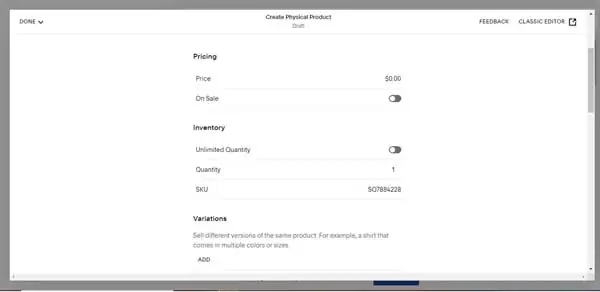
- Choose the price and whether or not the product is on sale.
- Choose the quantity you have in stock and enter the stock-keeping unit (SKU) information.
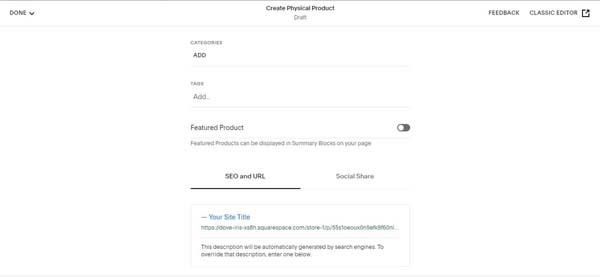
- You also may add a category and a tag as well as SEO information and social sharing tools.
- When you finish entering all your product details, hover over the “Done” button and click on the “Save and Publish” option to publish your product to your online store.
Adding Payment Methods
The Squarespace website builder offers a few useful options when it comes to accepting payments from your online customers.
To add a payment method:
- Return to the “Commerce” tab to open the menu of ecommerce tools.
- Click on the “Add a way to get paid” tab.
- Choose if you want to integrate your site with Stripe, PayPal, and/or Square to receive online payments.
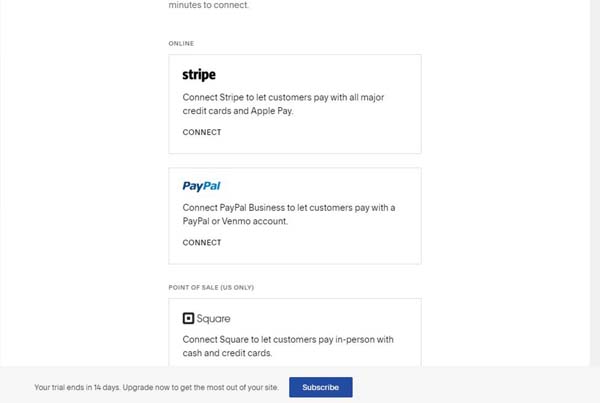
- Whichever option you choose, follow the login and setup prompts to continue.
- You also may change your online store’s currency by scrolling to the bottom of this page and clicking on the “Store Currency” button.

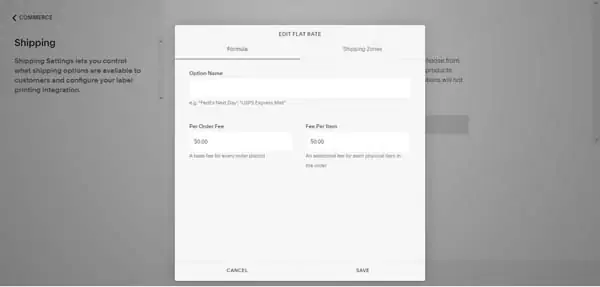
Choosing Shipping Methods
With Squarespace, you can choose from a wide variety of reliable shipping options to ensure your customers always receive their purchases in a timely manner.
To select your shipping method(s):
- Return to the “Commerce” tab to open the menu of ecommerce tools.
- Click on the “Choose how to ship your products” tab.
- Click on the “Add Shipping Option” button.
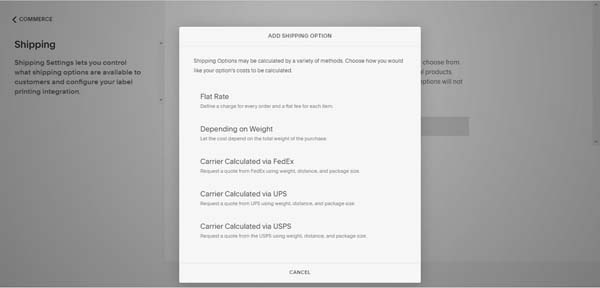
- Under the “Flat Rate” section, choose a shipping zone as well as a per-order and/or per-item fee.
- Choose the name your shipping option will display to customers.
- Click on the “Save” button to finish.
- Add as many flat-rate options for as many shipping zones as you want.
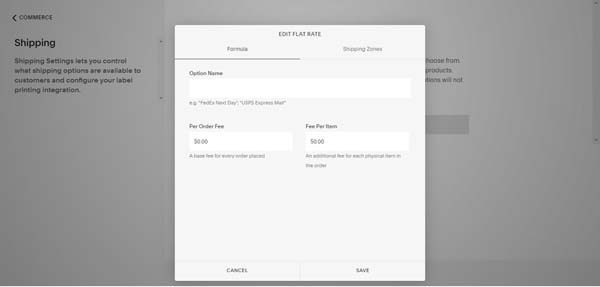
- To set your shipping rates by weight, follow the above steps and simply substitute rate-per-order pricing with prices by weight ranges.
- You also may allow FedEx, UPS and the U.S. Postal Service to determine your shipping rates by selecting which of their shipping options you want to make available on your website.

Adding Squarespace Marketing Tools
Gaining exposure for your website is almost as important as creating a well-designed, functional site.
New to marketing your small business? Check out our Small Business Marketing 101 guide to learn the basic strategies.
Adding an Email Campaign
Email campaigns can allow you to not only engage with new customers, but also drive repeat business by alerting existing customers to sales and other relevant information about your business.
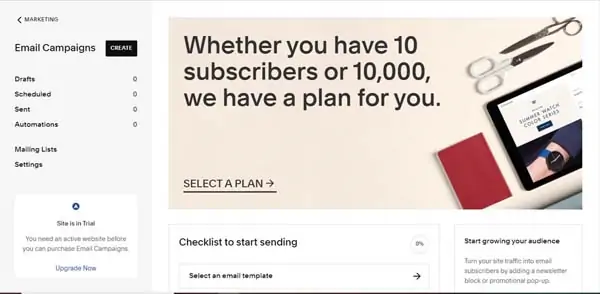
To create an email campaign:
- From your site’s main dashboard, click on the “Marketing” tab and then select the “Email Campaigns” option from the drop-down menu that appears.
- Scroll down and click on the “Select an email template” option.
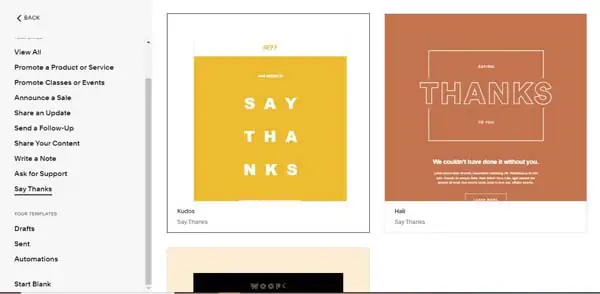
- Choose from the Squarespace website builder’s wide variety of templates based on your specific needs.

- Click on your chosen template, and then select “Choose This Template” in the upper-right corner. A menu will then appear on the right side of the screen.
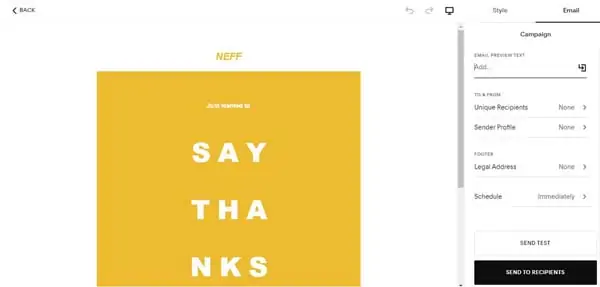
- Enter a sender profile name and email address. Your email address must be addressed to your domain name.
- Choose your target recipients. If your customers choose to subscribe to your mailing list at checkout, they’ll appear in the “Customers” group here.
- Choose an email subject line and your message’s “preview” text.
- Choose your email message’s footer information. This area typically includes legal information and your business’s physical address.

- Choose a schedule for your email campaign.
- Finally, choose if you want to send your email as a test to your own attention or to your chosen recipients.
Using Squarespace Analytics
As a business owner, it’s important to track your website’s traffic data as well as its performance across key metrics. To access your website analytics data, go to your site’s main dashboard and click on the “Analytics” tab.
You’ll then reach a page with a wide variety of reports to help you optimize your business practices as well as your website. These reports include “Sales,” “Traffic,” “Purchase Funnel,” “Abandoned Cart,” and more. As a best practice, you should monitor this data closely and adjust your business tactics accordingly.
Publishing Your Squarespace Website
After you customize your website to ensure it consistently represents your brand and offers all the functionality you want to include, it’s time to go live.
Choosing a Domain Name
Your website automatically comes with a built-in subdomain, but every Squarespace plan includes a free, custom domain name.
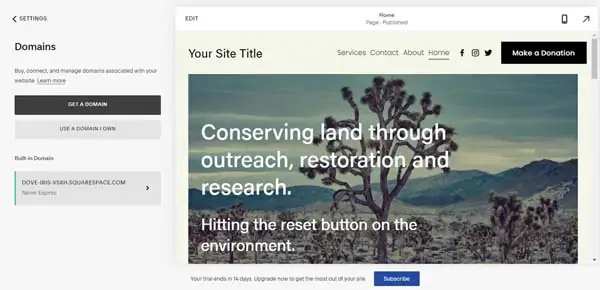
To select your free, custom domain name:
- Go to “Settings” from your website’s main dashboard and click on the “Domains” tab. This’ll open the “Domains” menu, which gives you the option of either choosing a custom domain through Squarespace or using a domain you already own.
- To get a new domain, click on the “Get a Domain” button and search for whichever name you have in mind. If your preferred domain name is unavailable, Squarespace will provide a list of similar alternatives from which you can choose.
Need help choosing a domain? Read our article on How To Choose a Domain Name for some inspiration.
Publish Your Squarespace Website
When you’re ready, it takes just a few simple steps to make your site live.
To publish your website:
- Click on the “Settings” tab in the left-hand menu of your main dashboard followed by “Site Availability.”
- Choose if you want your site to be “Public,” “Password Protected,” or “Private,” and then click on the “Save” button. For your site to appear live, you must choose the “Public” option.
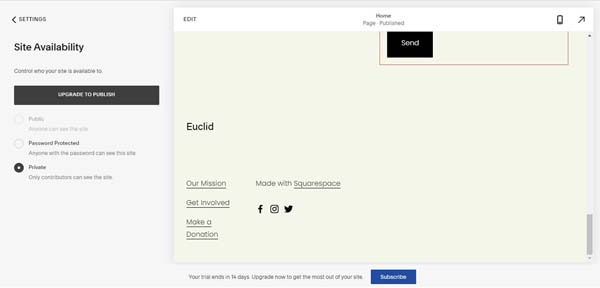
- If you haven’t already purchased a Squarespace plan, click on the “Upgrade to Publish” button and choose a premium plan.

Final Thoughts
Congratulations! You have a fully functioning and professional Squarespace website for your small business. Hopefully, this guide proved helpful as you built your Squarespace website. If you need more guides, check out our references below.
Begin Building With Squarespace
Squarespace makes it easy to have a fashionable and professional business website in a short amount of time. Get started today with a free trial.